
Manual


5) Install the receiver cover. Rotate the receiver cover pin upward and withdraw it to the
right; place the receiver cover on the receiver and slide it forward; holding the cover with
the thumb of the left hand, secure it with the pin and rotate the pin downward.
6) Install the cleaning rod. Rotate the bayonet away from the fore end, insert the cleaning
rod, and return the bayonet to its stowed position.
7) Replace the combination tool in the buttstock chamber. Place the patch holder, brush,
and drift back into the combination tool and close its cover; place the combination tool in
the buttstock well with the cover end toward the buttplate.
8) Release the hammer. Take the safety off by rotating the lever downward; squeeze the
trigger; place the safety on by rotating the lever upward.
Sequence of Complete Disassembly:
1) Carry out partial disassembly, as detailed above.
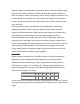
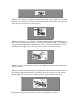
2) Pull out the driving rod and spring (Figure 7). Grasp the carbine by the left hand under
the rear sight; holding the driving rod with the finger of the left hand, rotate the gas tube
lock upward with the right hand; remove the driving rod with spring and remove the
spring from the rod; rotate the gas tube lock downward.
Figure 7: Removing the driving rod with spring
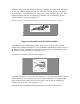
3) Remove the trigger mechanism. Position the carbine in the left hand with the magazine
upward; check to ensure that the carbine is on safe (if it is not, put it on safe); with the
drift secured in the body of the combination tool, push in on the trigger mechanism latch
(Figure 8); grasp the trigger guard and remove the trigger mechanism.