
Manual

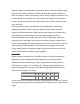
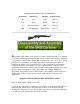
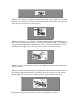
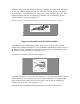
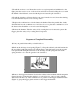


Figure 8: Depressing the trigger mechanism latch to remove the trigger mechanism
4) Remove the magazine. Grasp the magazine by the body and remove it. The magazine
should not be removed from the carbine or installed if the bolt is in the receiver, because
it will damage the lips of the magazine.
5) Separate the barrel and receiver from the stock. Place the bayonet in the combat
position [deployed). Grasp the carbine with the left hand at the small of the stock and the
right hand at the rear of the receiver. By hand effort or with a light blow of the hand on
the buttstock, remove the barrel (Figure 9). Place the bayonet in the stowed position.
Figure 9: Separating the barrel with receiver from the stock
6) Disassembling the trigger mechanism. Release the hammer by taking the safety off,
and press on the end of the automatic sear with the index finger of the left hand (Figure
10). Looking through the hole in the trigger body, align the trigger lever with the sear,
and then squeeze the trigger.
Figure 10: Releasing the hammer from cock
Remove the hammer (Figure 11). Grasp the trigger mechanism in the left hand, and with
the right hand place the body of the combination tool over the hammer; pressing with the
body of the combination tool on the hammer (so that it will not be cocked), compress the
hammer spring, remove the hammer pin from the holes of the trigger body. Gradually