
User Manual

SGD-SB2025NT-TUM, Part 2
Jan 12 Page 15 INTRO TO ET
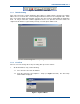
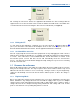
2. On the ET Setup window (see Figure 4 below), in the ‘Communications Parameters’ area,
carry out the following:
2.1. Using the drop-down list, select the ‘Direct’ Method.
2.2. Using the drop-down list, select the COM Port required.
Note.
Only valid com port numbers will be available.
2.3. Select ‘Close’.
3. On the ET window, from the menu bar, select Options > Connect to return to the original
opening view.
Figure 4. ET Setup window.
1.3.3 Making the Connection
With the PC physically connected to the unit, select ‘Connect’ to establish the data connection
between the ET application and the equipment. The ET will firstly initialise the COM port and then
attempt to connect to the Solar unit, each stage being clearly notified. If the main window display
does not appear and the connection attempt times out after a short period of time, check that the
cable connections are secure and confirm that it is connected to the correct COM port on the PC.
If the ET COM port setting needs to be changed either as a result of a connection failure or the
warning message ‘COM port error’ has been reported, follow the information above to change the
ET COM port settings.
1.4 C
LOSING
T
HE
ET
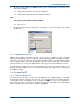
1.4.1 Disconnecting the ET
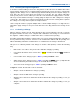
To exit the ET, the first task is to “disconnect” the application from equipment; this is a soft (data)
disconnection and not a physical disconnection. The disconnection may be initiated by either
selecting ‘Disconnect’ on the Options menu or clicking on the
(Close) icon on the main window.
Both actions will cause a ‘Connected’ sub-window to appear in the middle of the main window
where confirmation that a disconnect is required (see Figure 5).