
Owner's Manual


General Information • Installation 4
For parts or assistance, call Simer Customer Service at 1-800-468-7867
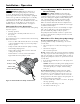
Use the Ace-In-The-Hole Automatic Booster Pump to
boost city water pressure. Plumbing connections are
described in this manual.
General Information
• PumponlycleanwaterwithyourAce-In-The-Hole
Automatic Booster Pump. To avoid clogging the
pump and damaging the shaft seal, do not pump
water containing solids, foreign material, sand, silt,
or abrasives.
• Ifyouareboostingthepressurefromawellpump,
be sure that the system check valves are tight. If the
system pressure drops when the well pump is not
running, the Automatic Booster Pump may start and
cycle. Excessive or rapid cycling may damage the
motor and will void the warranty.
• Donotusepipejointcompoundonpumpports;
use only PTFE tape to seal the threads. Pipe joint
compound will damage the controller materials.
NOTICE: The priming plug has an O-ring already
installed and does not require sealing.
• Tightenallthepipingjointstothepumphandtight
plus 1-1/2 turns (not more).
Overtightening may break the pump and will void
the warranty.
• Pipeandfittingstothepumpshouldbeatleast
nominal 1” diameter. Pipe or fittings less than 1” in
diameter will reduce performance and may damage
the pump through cavitation.
• Makesurethattherearenoairleaksorairpockets
in the suction pipe. An air leak in the suction pipe
may draw air in, although no water leaks out. Air
leaks and air pockets will prevent the pump from
priming properly, and can substantially reduce
itsperformance.
• Thepumpmountshouldbelevel,solid,asnearas
possible to the water source, and protected against
excess moisture and flooding.
• Usetheshortestpossiblerunforpipingandthe
smallest possible number of fittings. Long pipe runs
and numerous fittings increase friction and reduce
the flow of water.
• Supporttheweightofthepipingandpump.
• Donotallowthepump,pressurecontroller,orany
system components to freeze. Freezing will damage
the pump and void the warranty.
• Periodicallyinspectthepump,pressurecontroller,
and system components.
NOTICE: Local code may require a pressure relief valve
or pressure regulator.
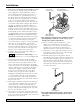
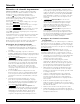
Risk of leaks and flooding. Do not use this
pump with inlet pressure less than 10 psi (70 kPa) or
greater than 50 psi (345 kPa).
Pressure hazard and risk of explosion. This
pump can develop high pressure when operated with the
discharge shut off or obstructed. For safe operation, we
recommend the following:
If not already in the plumbing system, install a pressure
relief valve in the pump discharge line capable of passing
the full pump flow at 100 psi (689 kPa). If local code
requires installation of a pressure relief valve capable
of handling the full pump flow at a pressure less than
100psi (689 kPa), follow the code requirements. Run the
relief valve discharge to a floor drain or other drain that
will give adequate runoff.
Installation
Risk of flooding. Be sure that all plumbing and
fittings are rated to withstand the system pressure which
you expect the pump to generate.
1. Decide what’s the best place to install the pump.
Think about these things:
• itmustbenearthemainwatersupplyline
• thepumpmustbeaccessible
• thepowercordmustreachapoweroutlet
• thecontroller’sLEDlightsmustbevisible
• easeofplumbing
• spacesaving
NOTICE: Installation of a low pressure safety cutoff
switch on the pump discharge is recommended (and
may be required by your local code) to shut off the
power in case of low discharge pressure (caused by
broken pipe, etc.).
2. Mount the pump on a solid base in the location you
have decided on.
3. Choose a time that will allow you to shut off
the water to the household while you install the
Automatic Booster Pump.
4.
Shutoff the main water supply valve to the household.
5. Open any faucet to relieve water pressure in the
plumbing. Once the water pressure is relieved, close
the faucet.
Figure 1 – Do Not Run the Pump With Inlet Shut Off