SIM2 Multimedia SUPERLUMISEC SUPERLUMISHB User Guide
Contents 3 Important information About this User Guide Safety 3D content Environment Notice 7 Chapter 1: Introduction Key Features and Benefits System Components Optional Accessories 9 Chapter 2: Overview Remote Control Projector Keypad Connections 3D RF Emitter 3D Glasses 13 Chapter 3: Installation Location Mounting Connections Switching On and Off 19 Chapter 4: Operation Viewing 3D Content 3D Menu Input Menu Main Menu Picture Image Setup Menu Memories Info Quick Menus Messages 35 37 39 40 Chapt
Important information About this User Guide This User Guide describes how to set up and operate the following projectors: • SUPERLUMISEC • SUPERLUMISHB Except where otherwise indicated, the information in this guide applies to all the projectors listed above, that will be referred to as “SUPERLUMIS”. Information contained in this User Guide may be updated from time to time due to product improvements and customer feedback. Visit www.sim2.com to find the latest version of this document.
electrical supply with rated voltage of between 100-240 V AC, 50/60 Hz and equipped with a protective earth connection. If you are not sure of your domestic mains rating, contact an electrician. Take care to avoid overloading the power socket and any extension leads. Switching the projector off Pay attention to the switch off procedure for the projector. The projector must always be brought back to the standby state to allow the projector to carry out the cooling procedure.
Never look directly at the projection lamp Never look directly into the lens when the lamp is on as the intense light may damage your eyes. Take particular care that children cannot do so. Take special care regarding movement of the lens Do not place objects in the slots on the side of the lens and also ensure that vertical lens movements are not impeded by external objects. Do not insert objects through the openings in the projector Make sure that no objects are inserted inside the projector.
• • • When you no longer wish to use your electrical and electronic equipment, take it to your local waste disposal facility for recycling. You may return your old equipment to your SIM2 Authorized Dealer free of charge when you buy a new product that is equivalent or has the same functions as the old one. Contact SIM2 to find your local dealer. If you need more information regarding recycling, reuse and product exchanges, contact SIM2 customer service.
These limits are perfectly normal for this optical system and will not be considered as a malfunction of the product. Note: One pixel corresponds to 10 thousandths of a millimeter on the DMD.
1 Introduction The SUPERLUMIS is a high-end compact 3-chip DLP 3D single unit projector that utilizes SIM2’s state-of-the-art optical technologies to produce images with exceptional black level and contrast performance. The SUPERLUMIS is able to emulate the best 3D cinema projection systems, in terms of color fidelity, definition and depth of image. These are all conveyed accurately, as is the fluid motion of fast-action movies and sports. This all adds up to an incredible 3D experience at home.
• 3 x jacks for 12 V output connectors • 1 x 4.0-millimeter Hex wrench (for lens shift adjustment) • 1 x User guide (this document) If any items are missing or damaged, contact your SIM2 Authorized Dealer as soon as possible. Keep the original packaging in case anything has to be shipped.
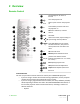
2 Overview Remote Control Turn backlight on for about 5 seconds turns the projector off 1-9 select inputs and turn the projector on 0 enters OSD Input menu and turns the projector on ● OK enters submenus, confirms actions ESC exits OSD ◂ ▴ ▾ select menu items, adjust settings or ▸ cycle through the test patterns MENU enter OSD Main menu and select + / - the desired section, each press of the key selects the next tab in the menu II 3D enters 3D menu Memory enters Memories menu perform user-defin
◦ Memories ◦ 3D Controls (3D Mode and Input Formats) Operation The SUPERLUMIS projector has two IR receivers, one on the front and one on the back of the unit. The operative range of the remote control is approximately 10 m (33 ft.). Make sure that there is nothing obstructing the infrared beam between the remote control and the IR receiver you are pointing to. You can point the remote control towards the screen, as the IR beam is reflected by the screen towards front IR receiver of the projector.
Connections ❶ ❷ ❼ Inputs ❶ HDMI 1 HDMI 2 ❸ ❹ ❺ ❻ ❽ Accept both HDMI and DVI digital video inputs. ❷ Components/RGB-HV Four RCA connectors. They accept both standard and high-definition component (YPrPb) and RGB-HV signals. Also used as RGB input for SCART RGBS signals. Control/ Service Outputs ❸ Video One RCA connector. Accepts composite video signals. Also used as composite sync input for SCART RGBS signals. ❹ Graphics RGB One D-Sub 15-pin female connector.
3D RF Emitter The 3D RF emitter is designed to be placed near the projector and aimed at the screen. It receives the 3D sync signal from the projector and emits RF pulses that reach the 3D glasses RF receiver. The emitter does not require a battery. Note: The emitter emits sync pulses only when the projector displays 3D content. 3D Glasses When displaying 3D content, the projector alternately displays one image for the left eye and one image for the right eye in rapid succession.
3 Installation This section provides instructions for the installation of the SUPERLUMIS projector. Important: Installation procedures should be performed by a qualified AV system specialist. Location When installing the SUPERLUMIS projector, take the following considerations into account.
Ceiling Mounting Invert the projector and suspend it from the ceiling using a specific bracket. • To fit the bracket unscrew and remove the 3 rubber feet (Do not use the rubber feet to fix the bracket to the projector). • Attach bracket by using 3 x M6 screws not exceeding 15 mm in length For ceiling mounting use only SIM2-approved ceiling brackets and adhere to the installation instructions and safety guidelines provided with the bracket. Do not over-tighten the screws.
If it is not possible to position the projector perpendicular to the projection screen (so that the lens center and screen center are aligned with each other) you can use the mechanical lens control at the top of the projector to shift the projected image vertically: • insert the provided hex wrench into the vertical lens shift adjuster • turn the wrench to shift the lens in the desired direction The SUPERLUMIS provides up to 50% of vertical lens shift up. For example, with a 16:9 150 in.
• • • throughout the entire signal path ◦ highest available resolution, because video sources can deliver full resolution content via HDMI only ◦ availability of 3D content, because most 3D compatible sources deliver 3D content from HDMI only ◦ optimization of several image parameters (2D/3D content, color space, aspect, signal range, over scan), thanks to auxiliary information (AVI infoframe) sent by the source device together with the signal.
Note: RS-232 communications are limited to 15 m (50 ft.), whereas USB are limited to 5 m (16 ft.). Triggers Some Home Theater devices can be controlled through a 12 V signal. The projector can output three 12 V (100 mA max) signals: • TRIG1 for motorized screens control • TRIG2 and TRIG3 are for motorized screen masks and anamorphic lens motors control.
Charging the battery The glasses are shipped with the micro USB to USB Type A cable. To charge the glasses battery, plug the micro USB cable in a computer or other USB device capable of supplying power. LED will remain lit while glasses are charging. When battery is fully charged LED will go off. For more information on glasses status and transitions, refer to “3D Glasses” on page 21.
4 Operation Viewing 3D Content 3D stereo visualization offers clear and sharp 3D images thanks to 3 chip DLP Imaging technology. This technique achieves channel separation using Xpand active shutter glasses. • Active shutter glasses turn on and off in rapid succession and stop light reaching your eyes. The glasses are synced using a RF emitter connected to the projector.
• • select the correct one. Switch on your 3D glasses. Refer to the instructions supplied with the glasses to ensure correct operation. The projector will automatically detect the 3D signal and you will be prompted to wear your glasses via the OSD. To Watch 3D Content via Satellite, Cable and Games Console • Switch on the SUPERLUMIS and all other relevant products such as Satellite receiver and AV receiver and ensure the correct inputs have been selected. • Select the appropriate 3D channel.
• 2D display mode for normal 2D material. 3D Input Format adjustment is unavailable. PureMotion adjustment is available. 3D Input Format The SUPERLUMIS checks AVI infoframe data and input signal resolution in order to determine the appropriate 3D format. When automatic detection of 3D format is not possible, choose one of the following options: • (S-S) Side by Side Left and right halves of the image are separated, rescaled and displayed.
Table 4.1 Signal 3D Format 1920 x 1080p @ 23.98/24 Hz Frame Packing Side by Side Top and Bottom 1920 x 1080p @ 25 Hz Side by Side Top and Bottom 1920 x 1080p @ 29.97/30 Hz Side by Side Top and Bottom 1920 x 1080p @ 50 Hz Side by Side Top and Bottom 1920 x 1080p @ 59.94/60 Hz Side by Side Top and Bottom 1920 x 1080i @ 50 Hz Side by Side Top and Bottom 1920 x 1080i @ 59.94/60 Hz Side by Side Top and Bottom 1280 x 720p @ 50 Hz Frame Packing Side by Side Top and Bottom 1280 x 720p @ 59.
• To enter the Input menu press: Key 0 on the remote control or Source on the projector keypad. • To select an input press the corresponding number on the remote control, or: 1. ▴ or ▾ on the remote control or on the keypad to highlight the input 2.
Picture This menu section provides access to common image quality adjustments. Adjustments not available for a given input are not displayed in the menu (See Table 4.3 for details). Table 4.3 Video Brightness Contrast Color Tint Sharpness Filter Sharpness Mode Cinema Mode Video Mode Noise Reduction Mode DynamicBlack PureMotion Notes: 1. NTSC only 2. YPrPb Interlaced only 3. YPrPb only 4.
Color This control (also called Saturation) increases or decreases the picture color intensity. When set to zero, color images are shown in black and white. Increase the value until the colors appear natural: suitable references include skin tones and the green in grass in landscape shots. Tint This adjustment controls the purity of colors. Basically it determines the red-green ratio of the picture. Decreasing the value increases the red content of the image, increasing it increases the green content.
DynamicBlack This function improves the level of black and increases the depth and the detail of the image especially in parts with low and medium brightness. DynamicBlack regulates light based on the informative content of the image being projected. Available settings are Off, Video and Movie. Off is recommended when using test pattern for measurement or calibration purposes. PureMotion Activates the motion estimation/motion compensation function, which suppresses motion judder.
• Letterbox displays a 4:3 letterbox image (source signal with black bands above and below the picture) in such a way that it fills the 16:9 screen and maintains the correct aspect. This aspect ratio is also recommended when using Anamorphic Lenses. • Panoramic widens the 4:3 image cutting off a strip from the top and bottom. Panoramic is ideal for displaying a 4:3 image on the 16:9 screen of the display. • Subtitles moves the image upwards, making enough space for the subtitles to be seen.
◦ User a white point that can be adjusted according to your personal preferences as follows: ▪ press the number 3 on the remote control to activate the User column ▪ position the white point within the CIE chromaticity diagram Note: To accurately set the Primaries and White Point you will need access to specialized color measuring equipment and also the knowledge to use such equipment.
on the remote control to activate the automatic adjustment function. If the automatic procedure fails to achieve the required effect, enter the Frequency and Phase values manually and move sufficiently close to the screen to observe the effects of the adjustments. Y/C Delay Where Video signals are concerned, use this adjustment to correct horizontal color misalignment within the projected image.
To set the custom settings for zoom, focus, vertical and/or horizontal shift is necessary to enter the SETUP menu, Projection Lens or more quickly by pressing the F1 button on the remote control. •Zoom: see zoom on page 32 •Focus: see focus on page 32 •Vertical Picture offset: vertical compensation for the center shift of image (see note).
Menu This menu section provides access to OSD adjustments. Language Selects the desired OSD language. The SUPERLUMIS can display the menus in English, Italian, French, German, Spanish, Swedish, Portuguese, Russian and Simplified Chinese. Source List Allows customization of the Input list. To change the status of an input: 1. highlight the input 2. use the ◂ and ▸ keys to Enable or Disable the input.
Source Information When enabled (Yes), the projector displays information about the current input signal every time a new signal is detected. If disabled (No) no information is displayed. Help Menu When enabled, the Help bar (providing tips for menu navigation) is displayed at the bottom of the main menu. OSD Background Selects the background of the OSD (Clear or Solid). OSD Position Changes the location for the display of the Main Menu OSD.
Memories You can store and recall at a later time up to six different sets of values (Memories) per input type, so that you have customized setups for each viewing condition. Each memory saves the main image settings that are available for a given input type. Refer to Table 4.5 for details. Table 4.
desired, repeat the steps above to save additional memories in different locations. Note: You can change the name of each memory. See “Rename” below for details. Recall To recall the settings for the current input you have previously saved in a Memory: 1. press the Memory key on the remote to display Memories menu 2. press ▴ and ▾ to highlight the desired memory 3. press ▸ to execute The confirmation message “Memory (1-6) recalled” is displayed.
Info Displays a summary of the projector settings This function is displayed by pressing Info on the remote control. Quick Menus The quick menus provide access to the main adjustments that affect image quality without opening the main menu. The adjustments Brightness, Contrast, Color, Tint, Sharpness, Filter and Noise Reduction will appear on after the other in the lower part of the screen by pressing ▴ or ▾. Messages The following messages may appear on your screen: • No signal.
5 Troubleshooting The projector does not turn on • Make sure the main power switch (at the rear of the projector) is in the On position. • Ensure the projector is connected to an electrical outlet and the outlet is working. • Check the fuse located near the AC receptacle on the right hand side of the projector. • Replace the fuse with one of the same type and rating (T 10 A L H 250 V). • If the fuse blows repeatedly, contact an authorized technical center.
3D content is displayed as two near-identical images • If they are next to each other, press the 3D key on the remote control and then choose Side by Side 3D Input Format. • If they are one above the other, press the 3D key on the remote control and then choose Top and Bottom 3D Input Format. 3D image lacks depth • Press the 3D key on the remote control, highlight the 3D Left/Right setting and then choose the value (either Normal or Swapped) that restores the correct sense of depth in the image.
6 Specifications Projection Type Digital Light Processing (DLP), 3-chip DLP Type: 0.95 in., 1920 x 1080, DC4 Optical Engine Die cast, based on SIM2 patented ALPHAPATH Projection Lens High-quality glass Throw ratio: T1: 1.37÷1.66:1 T2: 1.82÷2.48:1 T3: 2.6÷3.
Video Standards Composite: NTSC 3.58/4.43, PAL B/G/H/I/M/N/60, SECAM (automatically selected) Components/RGBHV: 480i, 576i, 480p, 576p, 1080i 50/60, 720p 50/60, 1080p 24/25/30/50/60, VGA, SVGA, XGA, SXGA, UXGA HDMI: 480i, 576i, 480p, 576p, 1080i 50/60, 720p 50/60, 1080p 24/25/30/50/60, VGA, SVGA, XGA 3D Formats All HDMI 1.4a mandatory formats All DVB formats Others (refer to Table 4.
7 Projection Distances 1.78:1 (16:9) Screen Projection Distance Screen T1 (1.37-1.66:1) T2 (1.82÷2.48:1) T3 (2.6÷3.90:1) Vertical Offset (m) Diagonal Size (in.) Width (m) Height (m) Min (m) Max (m) Min (m) Max (m) Min (m) Max (m) 100 2.21 1.25 3.03 3.73 3.92 5.22 5.76 8.63 0.62 120 2.66 1.49 3.65 4.48 4.72 6.38 6.91 10.36 0.75 150 3.32 1.87 4.58 5.62 5.93 8.24 8.63 12.95 0.93 180 3.98 2.24 5.52 6.76 7.13 9.96 10.36 15.54 1.12 200 4.43 2.49 6.14 7.
8 Dimensions SUPERLUMIS dimensions in millimeters and (inches).
SIM2 Multimedia S.p.a. Viale Lino Zanussi, 11 33170 Pordenone – ITALY Phone: + 39 0434 383256 Fax: +39 0434 383260 Email: info@sim2.it www.sim2.com SIM2 USA SIM2 USA Inc. 10216 NW 47th Street Sunrise, FL 33351 Phone: +1 (954) 442 2999 Email: sales@sim2usa.com www.sim2usa.com SIM2 BRIONVEGA Co., Ltd Room 303-304, No. 244 Liaoning Road Shanghai 200080 – CN Phone/Fax: 86 1 62881991 Email: InfoCHINA@sim2.com SIM2 UK Steinway House Worth Farm Little Horsted Nr.