
Video Projector User and Installation Manual
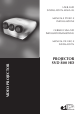

SVD 800 HD
7
ENGLISHENGLISH
ENGLISHENGLISH
ENGLISH
•
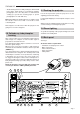
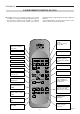
THE FOLLOWING FUNCTIONS ARE ON THE
PANEL:
1- Power switch.
2- Fuse holder. The fuse type is 10A, T-H delayed.
Attention:
For continued protection against the risk of fire,
replace only with one of the same type and rating.
3- Mains power connector. To connect the power cable
120-240Vac 48-62Hz
4- Video output: CVBS.
5- Video 2: CVBS: (Signal input).
6- Video 1: CVBS: (Signal input).
7- S-VHS 1: (Signal input).
8- S-VHS 2: (Signal input).
9- Red BNC input (RGB input) or Cr (components
input).
10- Green BNC input (RGB input) or Y (components
input).
11- Blue BNC input (RGB input) or Cb (components
input).
12- Sync H or H-V. Horizontal synchro or composite
synchro.
13- Sync V. Vertical synchronism.
14- RS422 connector. To connect and control the
projector from a PC.
15- +12V connector (output). It has a +12V output when
the projector is on. This output can activate a relay
with a current less than 10mA. (for example, to enable
a circuit for the automatic unwinding and rewinding
of the motorised screen).
16- Screen command. It has +12V in output when the
aspect ratio selected with the button is SMALL.
It is used to change screen dimensions automatically.
17- Remote control cable input. To connect the RC3000
remote control cable.
18- VGA-SVGA signals input DB 15 connector
19- S-VHS output: (signal output)
20- Rear panel buttons:
Picture adjustment. Each time you press a button
you select one of the follow controls:
Contrast, Brightness, Colour-Hue, Peaking.
Use
the + and - buttons to modify the value of the
selected control.
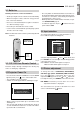
INFO Press this button to have the current projector
settings (ref. INFORMATION paragraph).
To modify the input selection sequentially; it starts
the projector from the STAND-BY state.
21- Led pilot light (red=stand by - green=on).
22- LED, blinks (red) when signal from the remote control
is received.
23- Remote control signal receiver (rear).
24- Remote control signal receiver (front).