
Video Projector User and Installation Manual

SVD 800 HD
24
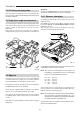
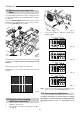
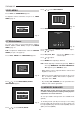
4.9 Mechanical centering of the
tubes
For an installation different to factory setting (90”) the
mechanical centering of the red and blue tubes needs to
be adjusted.
Select the CROSS HATCH signal with the remote control.
Looking at the following figure, unscrew (only 2 turns!)
the screws (A-B-C-D) of the red tube.
Physically move the tube until the red cross is perfectly
over the green. Tighten the four screws when you have
finished.
Repeat this procedure again for the blue tube.
At this point it is necessary to recheck the focus of the red
and blue.
C
D
B
A
Fig. 55
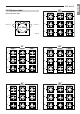
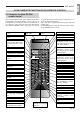
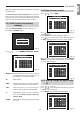
3. If necessary modify the setting as shown in the
following figures.
A
B
Fig. 57
RED
Horizontal Deflection Connectors
Vertical Deflection Connectors
GREEN
BLUE
R
G
B
RED WIRE BROWN WIRE
BLUE WIRE YELLOW WIRE
DESK TOP FRONT PROJECTION
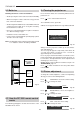
RED
Horizontal Deflection Connectors
Vertical Deflection Connectors
GREEN
BLUE
R
G
B
RED WIRE BROWN WIRE
BLUE WIRE YELLOW WIRE
CEILING FRONT PROJECTION
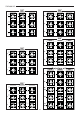
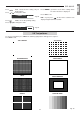
RED
Horizontal Deflection Connectors
Vertical Deflection Connectors
GREEN
BLUE
R
G
B
RED WIRE
BROWN WIRE
BLUE WIRE
YELLOW WIRE
DESKTOP REAR PROJECTION
RED
Horizontal Deflection Connectors
Vertical Deflection Connectors
GREEN
BLUE
R
G
B
RED WIRE
BROWN WIRE
BLUE WIRE
YELLOW WIRE
CEILING REAR PROJECTION
N.B.:
In the case of ceiling to floor installations or vice
versa, see par. 5.11.3, Linearity, page 33.
4.11 Convergence adjustment
To adjust convergence you must read very carefully
the chapter concerning convergence adjustment from
the remote control,
see par. 5.11, Convergence, page
32.
Fig. 58
Fig. 59
Fig. 60
Fig. 61
Fig. 56
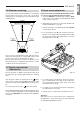
4.10Correct screen viewing
(deflection inversion)
1. Switch the projector off.
2. Take the (A) cover off by unscrewing screw (B)
See
Fig. 57.