
Video Projector User and Installation Manual

SVD 800 HD
20
4.3.5 Ceiling rear projection
Rear projection installation is done by hanging the
projector on the ceiling and following the instructions given
for front installation.
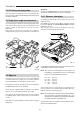
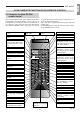
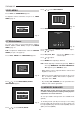
4.4 Projection angle measurement
Use a goniometer to determine the projection angle. First
of all, remove the projector’s top cover and then use the
surface shown in the figure as reference for the
goniometer.
The reference surface has an angle of 14 degrees
compared to the projector’s base when it is perfectly level.
4.5 Spacers
The projector uses some spacers for the “Scheimpflug”
correction of the lenses’ angle so as to achieve a perfect
focusing uniformity over the entire screen surface.
The projector is factory set with spacers for a ceiling front
installation with a 90” screen diagonal.
The projector is equipped with a complete set of optional
spacers for screens ranging from 60” up to 300”.
The spacers are mounted between the lenses and the
assembling block surface where they are fixed with 4
screws.
More than one spacer might be needed to achieve proper
adjustment.
45
0
90
90
45
14°
Fig. 50
Attention:
Correct use of the spacers, as shown in the tables, is of
paramount importance for perfect focus uniformity.
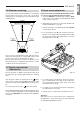
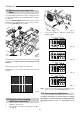
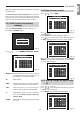
4.5.1. Spacers changing
To change the spacers first of all remove the top cover
and front panel.
Now slightly loosen the 4 screws (A) for each tube, change
the spacers (B)
Fig. 51
(see the spacers table) and then
tighten the screws.
You can only see two screws in the figure because the
other two are under the projection tube.
For the different installation types there are different spacer
combinations that have to be mounted.
Nota:
The spacers have their thickness value expressed
in millimetres and printed on them. The following
pieces are included with the projector:
0.2 mm: 6 pieces
0.3 mm: 6 pieces
0.5 mm: 4 pieces
1 mm: 6 pieces
2 mm: 4 pieces
The 1mm (6 pieces), 0.3 mm (6 pieces) and 0.2 mm (2
pieces) spacers are used for the factory setting (90” 14°),
while the others are inside the pack.
Note:
The angle between the base of the projector and the
axis of the tubes is mechanically fixed at 14
°
; so, if
the projector is installed on a perfectly horizontal table
or ceiling, projection angle will be 14
°
.
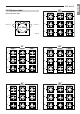
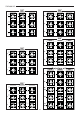
Fig. 52
shows where to install the spacers with the values
given in the following table.
A
B
Fig. 51