
Projector User Manual


2 Overview
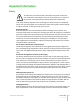
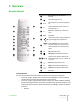
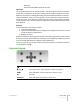
Remote Control
❶
Turn backlight on for about 5
seconds
❶
❸
❹
❺
❼
❽
❾
⓫
⓬
⓮
❷
❻
❿
⓭
⓰
⓯
❷
turns the projector off
❸
1-9
select inputs and turn the projector
on
❹
0
enters OSD Input menu and turns
the projector on
❺
●
OK enters submenus, confirms ac-
tions
❻
ESC exits OSD
❼
▴
◂ ▸
▾
select menu items, adjust settings or
cycle through the test patterns
❽
MENU
+ / -
enter OSD Main menu and select
the desired section, each press of
the key selects the next tab in the
menu
❾
II 3D enters 3D menu
❿
Memory enters Memories menu
⓫ ⓬
F1, F2
perform user-defined actions (de-
fault assignments are: F1 = Zoom, F2
= Focus)
⓭
Info displays projector Info
⓮
A Auto performs Auto Adjustment
⓯
Aspect enters Aspect Quick menu
⓰
Not used
Custom Remotes
You can use your own IR remote control to control your Lumis 3D-S projector.
• If you are using a remote control with learning capabilities, use the projector
remote control to teach the commands to your remote.
• If you are using a programmable remote control, the setup software probably
allows importing of Pronto Hex codes. See SIM2 Lumis 3D-S IR Control for a list
of all the projector codes in Pronto Hex format, including a number of discrete
codes for:
◦ Aspects
2 Overview Lumis 3D-S
User Guide
9