SUGO SERIES SG06
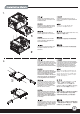
Product Overview SG06 Specification Expansion Slot Model SST-SG06B / SST-SG06S Material Aluminum front panel, SECC body Motherboard Mini-DTX, Mini-ITX 2 Front I/O Port USB2.0 port x 2 Audio x 1 MIC x 1 External Slim optical x 1 Internal 3.5” x 1 , 2.
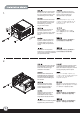
SLIM OPTICAL DRIVE (SOLD SEPARATELY) 3.5” HDD TRAY 3.5” HDD (SOLD SEPARATELY) PSU 2.5” HDD (SOLD SEPARATELY) TOP COVER SLIM OPTICAL DRIVE TRAY RESET BUTTON SLIM OPTICAL DRIVE PANEL EXPANSION SLOTx 2 MOTHERBOARD (OPITON) 12025 FAN FILTER BKT USB2.0 CONNECTOR PICTURE ITEM SCREW A M2*2 PURPOSE SECURE OPTICAL DRIVE SCREW B M3*4 SECURE 2.5” HARD DEVICE SCREW C M3*6 SECURE MOTHERBOARD SCREW D #6-32*6 SECURE 3.
1. Please remove the screws holding the top cover with a screw driver, then pull it toward the back to lift it outward away from the chassis. С помощью отвертки открутите шурупы, удерживающие верхнюю крышку, а затем снимите ее, сдвинув назад и приподняв. Bitte entfernen Sie die Schrauben der oberen Abdeckung mit einem Schraubenzieher und ziehen Sie die Abdeckung nach hinten, weg von dem Chassis. ㇵ⺴ 䀘ⶸ⪰ Ḕ㥉䚌Ḕ 㢼⏈ ⇌㇠⪰ ㏘䆠⪌ ☐⢰㢨ⶸ⪰ 㢨㟝䚨 㥐ᶤ䚐 䟸, ◘㯱㡰⦐ ᷜ ☘㛨 㝠⥘, 䀴㢨㏘⦐ ⺴䉤 㥐ᶤ䚝⏼␘.
3. Press the area as shown to release the clips, then remove the front panel. Нажмите на указанные зажимы и снимите переднюю панель. Drücken Sie auf die Stelle wie abgebildet, um die Klemmen zu lösen und entfernen Sie die Frontabdeckung. Ἤ⫰㜄㉐㝴 ᵍ㡴 㠸㾌⪰ ⍀⤠ 䆨⫱㡸 䖴㛨㨴 䟸, 㤸⮨ 䑜≄㡸 㥐ᶤ䚝⏼␘. Appuyez sur la zone comme montré pour détacher les clips, puis retirez le panneau frontal. ೇߦ⼎ߐࠇߚจ᠔ࠍᢐߒߡࠢ࠶ࡊࠍ 䭟ᬒߒǃࡈࡠࡦ࠻ࡄࡀ࡞ࠍপࠅߒ߹ߔDŽ Presione la zona como se muestra para soltar los enganches, luego quite el panel frontal.
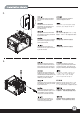
5. Pull the clip apart to remove the slim optical drive cover. Чтобы снять крышку тонкого оптического привода, разомкните крепежную клипсу. Öffnen Sie den Clip um das optische 䆨⫱㡸GᷜG㏠⫰GṅG☐⢰㢨⽀㢌G䀘ⶸ⪰G 㥐ᶤ䚌㉬㟈U Slim Laufwerk herauszunehmen. Tirez sur le clip pour pouvoir retirer le cache du lecteur optique slim. ࠢ࠶ࡊࠍߒߡǃࠬࡓܝᄺ ࠼ࠗࡉߩࠞࡃࠍপࠅߒ߹ߔDŽ 㐕ԧЁ᭛ Tire del clip para sacar la cubierta del dispositivo óptico delgado.
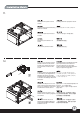
. Install your motherboard into the chassis as shown and secure with included screws. Установите материнскую плату в корпус и закрепите ее прилагаемыми шурупами. Installieren Sie Ihr Motherboard im Chassis und befestigen Sie es mit den beiliegenden Schrauben. Ἤ⫰ḰGᵍ㢨G⇌㇠⪰G㥐ᶤ䚨G㏠⫰G ṅ☐⢰㢨⽀G䀘ⶸ⪰G㥐ᶤ䚝⏼␘U Retirez l’attache de la baie du lecteur optique avec un tournevis. ࿑ߩࠃ߁ߦࡑࠩࡏ࠼ࠍࠤࠬߦࠗࡦࠬ࠻࡞ߒޔ ઃዻߩࡀࠫߢ࿕ቯߒ߹ߔޕ 㐕ԧЁ᭛ Instale su placa base en el chasis como se muestra y asegúrela con los tornillos incluidos.
9. Install your 2.5” hard drive onto the optical drive bracket as shown and secure with included screws. (the maximum thickness of 2.5” hard drive is 15mm). Установите ваш 2,5-дюймовый жесткий диск в кронштейн оптического привода, как показано на рисунке, и закрепите прилагаемыми шурупами. (Максимальная толщина 2,5-дюймового жесткого диска - 15 мм.) Installieren Sie Ihre 2,5 Zoll Festplatte in der optischen Laufwerkshalterung wie abgebildet und befestigen Sie sie mit den beiliegenden Schrauben.
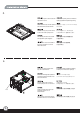
11. Reinstall the front panel onto the chassis. Снова установите переднюю панель. Installieren Sie die Frontabdeckung wieder am Chassis. 㤸⮨G䑜≄㡸G䀴㢨㏘㜄G㣠G㉘㾌䚝⏼␘U Réinstallez le panneau frontal sur le boîtier. ࡈࡠࡦ࠻ࡄࡀ࡞ࠍࠤࠬߦ᠏ߒ߹ߔDŽ 㐕ԧЁ᭛ Reinstale el panel frontal en el chasis. ᇛࠡ䴶ᵓ㺱ಲ″←Ϟ Reinstallare il pannello frontale. ᇚࠡ䴶ᵓ㺙ಲᴎϞ Install your 3.5” hard drive onto the bracket as shown and secure with screws, then reinstall the bracket into the chassis and secure with screws.
13. Please remove the screws holding the expansion card slot cover, and remove it. Открутите шурупы на крышке слота карты расширения и снимите крышку. Bitte entfernen Sie die Schrauben der Expansionssteckplatzabdeckungen und entfernen Sie sie. 䞉㣙㏠⦣ 䀘ⶸ⪰ Ḕ㥉䚌Ḕ 㢼⏈ ⇌㇠⪰ 㥐ᶤ䚐 䟸 ㏠⦣ 䀘ⶸ⪰ 㥐ᶤ䚝⏼␘. Veuillez retirer les vis fixant les équerres des emplacements d’extension, puis retirez-les selon vos besoins.
15. Reinstall the expansion card slot cover and secure with screws. Поместите на место крышку слота карты расширения и закрепите ее шурупами. Installieren Sie die Expansionssteckplatzabdeckung wieder und befestigen Sie sie mit Schrauben. 䞉㣙㏠⦣ 䀘ⶸ⪰ 㣠㉘㾌䚐 䟸 ⇌㇠⦐ Ḕ㥉㐐ή⏼␘. Réinstallez la fixation des équerres et fixez-le avec des vis. ᢵᔉࠞ࠼ࠬࡠ࠶࠻ࠞࡃࠍ᠏ ߒǃࡀࠫߢᅮߒ߹ߔDŽ 㐕ԧЁ᭛ Reinstale la cubierta del zócalo de la tarjeta de expansión y fíjela con tornillos.
17. Attach the rubber standoff onto the chassis appropriately as required. Прикрепите к корпусу резиновые опоры. Befestigen Sie den Gummi-Abstandhalter am Chassis wie benötigt. Ḕⱨ ⵏ㾜㡸 䙸㟈䚐⬀䆰 䀴㢨㏘㜄 ⺴㵝䚝⏼␘. Collez les pieds en caoutchouc convenablement sous le boîtier comme exigé. ᖙ㽕ߦᖰߓߡࠤࠬߦࠧࡓ㻑 ࠬ࠲ࡦ࠼ࠍপࠅҬߌ߹ߔDŽ 㐕ԧЁ᭛ Enganche la base de goma en el chasis si es necesario. ձ䳔∖ᇛ‵㝴㝇䘽⭊ഄ䊐䰘ᮐ″←Ϟ Applicare i piedini in gomma sul telaio. ձ䳔∖ᇚ‵㛊㛮ൿ䗖ᔧഄ䌈䰘ѢᴎㆅϞ Installation complete. Установка завершена.
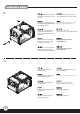
Notice If you need to clean the filter or replace/remove the fan, please refer to the following steps: 1. Please remove the screws holding the top cover with a screw driver, and then pull it toward the back and lift it outward away from the chassis. С помощью отвертки открутите шурупы, удерживающие верхнюю крышку, а затем снимите ее, сдвинув назад и приподняв. Bitte entfernen Sie die Schrauben der oberen Abdeckung mit einem Schraubenzieher und ziehen Sie die Abdeckung nach hinten, weg von dem Chassis.
3. Press the area as shown to remove the filter. Для того чтобы убрать фильтр, нажмите на указанную область. Drücken Sie die Stelle wie abgebildet, um den Filter zu entfernen. Ἤ⫰㜄㉐㝴 ᵍ㡴 㠸㾌⪰ ⍀⤠ 䙸䉤⪰ 㥐ᶤ䚝⏼␘. Appuyez sur la zone comme montré pour détacher le filtre. ೇߦ⼎ߐࠇߚจ᠔ࠍᢐ ߒߡࡈࠖ࡞࠲ࠍߒ߹ߔDŽ 㐕ԧЁ᭛ Presione la zona como se muestra para quitar el filtro. 䂟ձ೪⼎䓩ᣝҹौϟ◒㎆ Premere nell’area indicate per rimuovere il filtro.
April,2009 G11209770