RV05
Installation and system optimization guide: The following manual and guides were carefully prepared by the RAVEN engineering team to help you maximize the potential of your SilverStone product. Please keep this manual for future reference when upgrading or performing maintenance on your system. A copy of this manual can also be downloaded from our website at: Instroduction P.1 Specification P.1 Disassemble Chart P.2 Installation Guide P.4 Connector Definition P.11 Component Size Limitations P.
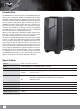
Introduction The RAVEN RV05, the fifth edition in the exciting RAVEN enthusiasts chassis series continues the tradition of breaking and evolving the standards of desktop PC design. With a bold move that sees the removal of all 5.25” drive bays, the RAVEN team engineers again saw the opportunity to re-utilize the 90 degree rotated design. Previous RAVEN models with 90 degree layout often had to compromise on space efficiency due to fixed length of the motherboard in rotated orientation. The elimination of 5.
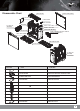
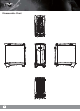
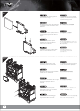
TOP COVER Disassemble Chart RIGHT-SIDE-PANEL PUS FILTER USB COVER PSU (OPTION) RESET BUTTON 3.5”HDD X2 (OPTION) USB 3.0 X2 + MIC + SPK POWER BUTTON 12025 FAN (OPTION) ATX MB (OPTION) SLOT-LOADING OPTICAL DRIVE (SOLD SEPARATELY) LEFT-SIDE-PANEL BOTTOM-FILTER 18032 FAN X2 2.
Disassemble Chart 3
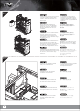
Installation Guide Before you begin, please make sure that you 1 2 3 4 5 have all components collected check that all components do not have compatibility problems with each other or with the case if possible, assemble the components outside the case first to make sure they are working keep the motherboard manual ready for reference during installation prepare a Philips screwdriver.
03 Install power supply into the case. If power supply is longer than 160mm, then remove the 3.5” drive cage Установите в корпус блок питания. Если длина блока питания превышает 160 мм, снимите отсек 3,5-дюймового привода. Bauen Sie das Netzteil ins Gehäuse ein. Ist das Netzteil länger als 160 mm, entfernen Sie den Rahmen für das 3,5” Laufwerk. 安裝電源,如果電源長度 超過160mm的話請拆除3.5” 硬碟架 Installez la source d’alimentation dans le châssis.
05 Insert standoffs as required by your motherboard in corresponding mounting holes, then install motherboard При необходимости установите опорные стойки для системной платы в соответствующие крепежные отверстия, затем установите системную плату. Stecken Sie die Abstandshalter 請依需求安裝主機板螺柱, wie für Ihr Motherboard 安裝主機板 erforderlich in die entsprechenden Befestigungsbohrungen. Installieren Sie dann das Motherboard.
07 Install slim slot-loading optical drive into the cage Установите в отсек тонкий привод оптических дисков с щелевой загрузкой. Befestigen Sie dann das optische Laufwerk im Slim-Format in dem Rahmen. 將光碟機安裝上光碟機架 Installez le lecteur optique mince à chargement par fente dans la cage 将光驱安装上光驱架 Instale el dispositivo óptico delgado de carga mediante ranura en la carcasa スリムタイプのスロットローデ ィング光学ドライブをケージに 取り付けます。 Installare nel cage l’unità ottica slim con caricamento a slot 슬림형 슬롯 로딩 광 드라이브를 케이지에 설치합니다.
09 Insert 3.5” drives into the drive cage, if needed, secure each drive with a thumb screw Установите 3,5-дюймовые приводы в отсек для дисков, при необходимости закрепите каждый привод винтом с накатанной головкой. Schieben Sie die 3,5” Laufwerke in den Laufwerkrahmen und sichern Sie jedes Laufwerk mit einer Rändelschraube. 將3.5”硬碟推入硬碟架, 必要的話鎖上一顆手扭螺絲 Insérez un disque de 3,5" dans la cage de disque si nécessaire, attachez chaque disque avec une vis de serrage 将3.
11 and wires Connect all cables c Подключите все кабели и провода. Schließen Sie alle Kabel an. 將連接所有線材 Branchez tous tou les câbles et les fils 将连接所有线材 Conecte todos todo los cables ケーブルとリード線を全て 接続します。 Collegare tutti tutt i cavi ed i fili 모든 케이블과 전선을 연결합니다. Reinstall side panels back onto the case Установите на место боковые панели корпуса. Bringen Sie die Seitenteile wieder an.
Reinstall the top panel to complete installation И, наконец, установите на место верхнюю панель. Bauen Sie die obere Abdeckung wieder ein. Die Installation ist damit beendet. 裝回上蓋完成組裝 Réinstallez le panneau supérieur pour terminer l'installation 装回上盖完成组装 Reinstale el panel superior para completar la instalación 上面パネルをもどすと、 インストールは完了です。 Reinstallare il pannello superiore per completare l'installazione 상단 패널을 도로 설치하여 설치를 완료합니다.
Connector definition (1) Fort panel connector installation Power switch and reset switch installation guide: Please refer to the motherboard manuals for the motherboard’s “Front Panel Connector” or “System Panel Connector” pin definition. Power switch and reset switch have no polarity, so they can be connected in any orientation.
LED connector installation guide:: Please refer to the motherboard manuals for the motherboard’s “Front Panel Connector” or “System Panel Connector” pin definition. White colored wires are negative while other colored wires are positive. Power LED connector is made to be individual pins by design to accommodate different motherboard specifications.
Component size limitations The RAVEN RV05 was designed to accommodate oversized components, but we still recommend referring to the following dimension guidelines (1) CPU Cooler limitation 162mm 9mm 13mm Height limitation for CPU cooler is 162mm with 13mm clearance over the motherboard’s top edge. Höhenbeschränkung für CPU-Kühler 162 mm mit einem Freiraum von 13 mm oberhalb der Motherboard-Oberkante.
(2) Power supply limitation 160mm 343.8mm A: Length limitation If no 3.5” drives are installed, there is no limitation on power supply size with the drive cage removed If the 3.5” drive cage is in use, the recommended depth of the power supply is 160mm B: Power supply cable length recommendation Below is the recommended cable length for retail ATX motherboards. If the cables are not long enough, please purchase extension cables.
A:长度限制 如果下方没有安装3.5”硬盘,电源就几乎没有长度限制,您可以使用任何超大瓦数的电源 如果电源前方有安装3.5” 硬盘,我们建议您使用160mm以内的电源 B:电源线材建议长度: 以下是以一般市售ATX主板抓出来的各线材建议长度列表,请先确认电源线长度是否足够 如果不够请选购所需要的延长线 A: 長さ制限 3.5”ドライブが装着されていない場合、ドライブケージなしでは電源のサイズに制限はありません。 3.5”ドライブケージが使用される場合、推奨される電源奥行きは160mmです。 B: 電源ケーブル推奨長さ 下図はリテールATXマザーボード用のケーブル推奨長さです。ケーブル長が不十分の場合は、延長ケーブルをご購入ください。 A: 길이 제한 3.5” 드라이브가 설치되지 않은 경우 드라이브 케이지를 제거한 상태에서 전원 공급장치 크기에 대한 제한이 없습니다. 3.5” 드라이브 케이지를 사용 중인 경우 전원 공급장치의 권장 깊이는 160mm입니다. B: 권장 전원 공급장치 케이블 길이 다음은 소매 ATX 메인보드용 권장 케이블 길이입니다.
Cuando se usa una FA no modular con una profundidad de 140mm, primero enrute los 8/4 pines de la CPU a través del agujero indicado. Los cables de extensión PP07 se pueden usar si el cable no es lo bastante largo. Quando si usa una PSU non modulare con una profondità di 140 mm, prima infilare nel foro indicato i pin 8/4 della CPU. Se il cavo non è sufficientemente lungo, possono essere usati cavi di prolunga PP07.
RV05 peut supporter des cartes de jusqu'à 12,3" (314.2 mm) de long, ce qui couvre toutes les cartes graphiques disponibles actuellement sur le marché. La RV05 puede aceptar tarjetas largas de 12,3” (314.2mm), lo que cubre todas las tarjetas gráficas para usuario disponibles en el mercado. RV05 supporta schede lunghe da 12,3” (314.2 mm), coprendo tutte le schede grafiche consumer in vendita al dettaglio disponibili sul mercato. Корпус RV05 позволяет устанавливать 12,3-дюймовые (314.
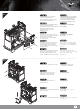
(5) Motherboard size limitation A B A. Illustration: ASUS Rampage III Extreme for example is wider than standard ATX motherboards Although RV05 was not designed for reference Extended-ATX motherboard, the internal space can still allow installation for motherboards with width of up to 11 inches. In addition, the motherboard tray has mounting standoffs for supporting SSI-CEB dual CPU motherboards. Enthusiast motherboards such as ASUS’s Rampage III Extreme and EVGA’s X58 Classified 4-Way SLI are 10.
A. Ilustración: la ASUS Rampage III Extreme, por ejemplo, es más ancha que las placas base ATX estándar Aunque la RV05 no acepta verdaderas placas base ATX Extendidas (SSI-EEB), acepta modelos ATX de hasta 11 pulgadas de ancho.
(6) Liquid cooling radiator limitations 13.1mm 19.8mm 31.8mm 33mm 34.6mm 2.2mm 3.6mm 37.5mm A B 22.8mm 32.8mm 101mm 18.8mm 32.1mm 3mm 27.8mm C 7.5mm D The bottom panel of RV05 supports fan mountings of radiator with sizes of 180mm x 2, 140mm x 2, or 120mm x 3.
El panel inferior de la RV05 acepta montar ventiladores de radiador con tamaños de 180mm x 2, o 120mm x 3 Ya que los radiadores tienen diseños diferentes y difieren en cuánto sobresalen de la estructura de los ventiladores, le recomendamos comprobar dos veces sus dimensiones con la guía siguiente: A: Zona alrededor del ventilador superior de 120mm B: Zona alrededor del inferior si se montan tres ventiladores de 120mm C: Zona alrededor del inferior si se montan dos ventiladores de 140mm D: Zona alrededor del
Optimal Thermal Performance Layout y (1) CPU Cooler If you are installing a tower-style CPU cooler, we recommend d that th t the th CPU fan f blows bl upward d to t workk with RV05’s overall airflow. Falls Sie einen turmartigen CPU-Kühler installieren, empfehlen wir, den CPU-Lüfter die Luft nach oben blasen zu lassen, damit er mit der gesamten Luftbewegung im RV05 zusammenarbeitet.
(2) Graphics Card x o x When choosing a graphics card, we recommend models that have fan blowing exhaust air to the rear slot, this will ensure smooth and efficient airflow within the RV05 for maximum cooling performance. Bei der Auswahl von Grafikkarten empfehlen wir Modelle, die warme Luft über eine Öffnung im hinteren Teil des Steckplatzes in die Außenwelt ableiten; dies gewährleistet eine ungestörte und wirksame Luftzirkulation innerhalb des RV05 und sorgt für eine optimale Kühlung.
(3) Tips for cable management Please refer to the following diagrams A. There are plenty of cable tie bridges behind the motherboard tray, which you can utilize to organize cables. Обращайтесь к следующим чертежам За лотком системной платы имеется множество проушин для безопасного крепления кабелей. Bitte beachten Sie folgende Abbildungen Hinter der Motherboard-Halterung finden Sie reichlich Kabelhalter, mit denen Sie die Kabel sauber verlegen können.
(4) Fan speed adjustment RV05’s Air Penetrator 180mm fans allow for adjustment for speeds of 600/900/1200rpm 180mm fan switch illustration: At "L" position, fan is set to low speed. When the switch is in the middle position, the fan will run at medium speed. At “H” position, the fan is set to high speed. Die Geschwindigkeit der zwei Hauptlüfter des RV05 kann angepasst werden: 600 U/min, 900 U/min oder 1200 U/min. Die Geschwindigkeiten dienen einem geräuscharmen oder besonders leistungsstarken Betrieb.
(5) Replacing fan SilverStone offers three retail 180mm fans for replacement or upgrades. Thermal performance is not always directly related to overall airflow, in most situations, Air Penetrator fan’s air focusing design is most optimal for use in the RV05. SilverStone bietet drei 180-mm-Retail-Lüfter zum Austauschen oder Aufrüsten.
Upgrade and maintenance (1) Fan filter removal guide Illustration: An example of a GPU cooler that is filled with dust and has lost most of its cooling performance RV05’s positive air pressure design is an effective configuration that will reduce dust buildup inside the case. Small air particles or lint will accumulate over time on intake filters instead of on the components inside the case.
01 Main filter can be removed by pulling it rearward from the front lower panel Главный фильтр можно снять, потянув его назад от лицевой нижней панели Hauptfilter wird entfernt, indem er von der unteren Frontplatte nach hinten gezogen wird.
If you accidentally loose/damage filters or need additional ones for backup, please contact your local SilverStone retailers or distributors for purchasing information: http://www.silverstonetek.com/wheretobuy_all.php Wenn Sie einen Lüfterfilter als Zusatz, zum Austausch bei Verlust oder Beschädigung oder einfach als Reserve erwerben möchten, suchen Sie einfach auf unseren Internetseiten nach einem Händler oder Distributor in Ihrer Nähe: http://www.silverstonetek.com/wheretobuy_all.
(2) Fan removal guide 01 A B A. Remove both side panels B. Remove main filter A. Снимите боковые панели B. Снимите главный фильтр A. Entfernen Sie die beiden Seitenteile. B. Entnehmen Sie den Hauptfilter. A. 已經拆卸左右板的狀態 B. 移除主濾網 A. Enlevez les deux panneaux latéraux B. Enlevez le filtre principal A. 已经拆卸左右板的状态 B. 移除主滤网 A. Retire ambos paneles laterales A. 両方の側面パネルを取り外し B. Retire filtro principal ます。 B. メインフィルターを取り外しま す。 A. Rimuovere entrambi i pannelli laterali B. Rimuovere il filtro principale A.
03 Using a smaller screw driver, release screws holding the speeds switches to remove it from the case Чтобы снять с корпуса переключатели скорости вентиляторов, с помощью небольшой отвертки отверните винты их крепления Lösen Sie mit einem kleinen Schraubendreher die Schrauben, die die Geschwindigkeitsschalter halten, und nehmen Sie diese aus dem Gehäuse.
05 Downgrade to 120mm or 140mm fans:The bottom panel has mounting holes designed for 120mm or 140mm fans, install accordingly. Возможность использования 120-мм или 140-мм вентиляторов На нижней панели имеются крепежные отверстия для установки 120-мм или 140-мм вентиляторов, установите их соответственно. Auf 120- oder 140-mm-Lüfter herunterstufen In der Bodenplatte 降級安裝120/140mm風扇:中央有向下相容的120與140mm風扇孔位,請 befinden sich Montagebohrungen für 120 oder 140 mm Lüfter. 直接安裝 Verwenden Sie diese entsprechend.
Q&A Q: If I have a tower-style CPU cooler, is it possible to run it without CPU fan installed? A: It’s possible but for best balance of cooling and quietness, installing a fan directly on the CPU cooler is usually more effective than installing exhaust fan on rear of the case.
Q: I have an all-in-one liquid cooler, where should I install the radiator? A: Most should fit in the top 120mm fan area. If you have larger cooler, we recommend installing it on the bottom panel. F: Ich habe einen All-in.One-Flüssigkeitskühler. Wo soll ich ihn installieren? A: Die meisten passen in den oberen 120 mm Lüfterbereich. Ist der Kühler größer, empfehlen wir Ihnen, ihn auf der Bodenplatte zu montieren.
Q: Can I remove and clean the fan filter while the computer is turned on? A: Yes, but to reduce the chance of foreign objects touching and damaging the spinning fans while the system is on, we recommend doing so quickly. F: Kann ich den Lüfterfilter entfernen und reinigen, während der Computer eingeschaltet ist? A: Ja, aber damit bei eingeschaltetem System keine Gegenstände mit den rotierenden Lüftern in Kontakt kommen und diese beschädigen, empfehlen wir, dies schnell zu erledigen.
Q: When I turn on the computer, why don’t the 180mm fans spin (or they spin slower than expected)? A: If your fans are connected to the motherboard, we suggest turning off temperature control function in the BIOS. If you want to use temperature control function on your motherboard, we recommend setting the RV05’s physical fan speed switch to high for a lower starting voltage and a wider range of control. If the fans still do not spin, please contact reseller or SilverStone to arrange for replacement.
Q: I want to install customized liquid cooling system, do you have any recommendations? A: If you are thinking about installing a triple 120mm radiator, we highly recommend a dual 180mm radiator such as the “Magicool Dual 180” instead. Although both types of radiators have the same length, the dual 180mm radiator has approximately 50% larger surface area for much higher performance potential. F: Ich möchte ein angepasstes Flüssigkeitskühlsystem installieren.
Warranty Information This product has a limited 1 year warranty in North America and Australia. For information on warranty periods in other regions, please contact your reseller or SilverStone authorized distributor. Warranty terms & conditions 1. Product component defects or damages resulted from defective production is covered under warranty. Defects or damages with the following conditions will be fixed or replaced under SilverStone Technology’s jurisdiction.
G11221470