
Installation guide


5
6
繁體中文
简体中文
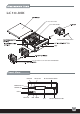
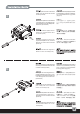
Insert your optical drive into 5.25”device
bracket, then secure with the included
8 screws (screw D)
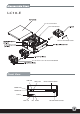
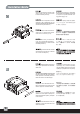
Attach the included 3.5” plastic hard drive
rails onto your hard drive and secure with
included 4 screws (screw E)
Setzen Sie ihre optischen 5.25”Laufwerke
in den Rahmen ein und befestigen Sie
sie anschließend mit 8 der beiliegenden
Schrauben (Schraube D).
Befestigen Sie die beiliegenden 3.5”
plastik Festplatten-Schienen an ihrer
Festplatte und schrauben Sie diese mit
4 der beiliegenden Schrauben fest
(Schraube E)
Вставьте оптический привод в кронштейн
5,25-дюймового устройства и закрепите
его прилагаемыми 8-ю шурупами
(шуруп D).
Прикрепите прилагаемые пластиковые
салазки к 3,5-дюймовому жесткому
диску и закрепите прилагаемыми
4-мя шурупами (шуруп E).
5.25”ドライブブラケットの穴に
光学ドライブを合わせ、付属のネジ
(ネジD)8本で固定します。
お持ちのハードディスクドライブに、
付属の3.5”プラスチック製ハー
ドディスクドライブレールを付属
のネジ(ネジE)4本で固定します
5.25” 드라이브를 디바이스 브라켓에
5.25” 드라이브를 디바이스 브라켓에
삽입한 후, 동봉된 8개의 나사(ScrewD)로
삽입한 후, 동봉된 8개의 나사(ScrewD)로
고정시키십시요.
고정시키십시요.
동봉된 3.5” 플라스틱 하드 디스크 레일을
동봉된 3.5” 플라스틱 하드 디스크 레일을
하드 디스크에 부착한 후 동봉된 4개의
하드 디스크에 부착한 후 동봉된 4개의
나사(screw E)로 고정시키십시요.
나사(screw E)로 고정시키십시요.
Insérez votre lecteur optique dans le
casier 5.25”, puis fixez-le avec les 8
vis incluses (vis D)
Attachez les rails en plastique inclus
pour le disque dur 3.5” et fixez-les
avec 4 vis incluses (vis E)
Inserte su dispositivo óptico en
soporte del dispositivo 5.25 ", entonces
asegure con los 8 tornillos incluidos
(tornillo D)
Una los carriles plásticos de disco duro
3.5" incluidos sobre su disco duro y
asegúrelos con los 4 tornillos incluidos
(tornillo E)
Inserire l’unitá ottica nel supporto e
fissare con le 8 viti incluse(viti D).
Collocare i supporti per hard disk inclusi
sull’hard disk e fissare con le 4 viti
incluse(viti E)
把光碟裝置放入5.25"裝置架內並對准孔
位,從零件包內取出8顆螺絲(螺絲D)將其
鎖固。
從零件包內取出3.5"硬碟塑膠轉接架再用
4顆六角華司螺絲(螺絲E)將其鎖固在硬碟
上
把光 装置放入5.25”装置架内并对
准孔位,从零件包内取出8颗螺丝
(螺丝D)将其锁固。
从零件包内取出3.5"硬盘塑料转接架
再用4颗六角华司螺丝(螺丝E)将其锁
固在硬盘上。
8