
Installation guide


17
18
繁體中文
简体中文
繁體中文
简体中文
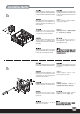
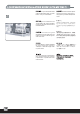
Attach the included optical drive door
cover onto the foam on your optical
drive
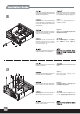
Reinstall the hard drive cage into chassis
and secure with screw (step 10)
Befestigen Sie die beiliegende Blende
für optische Laufwerke an dem
Schaumstoff-Pad an ihrem optischen
Laufwerk
Setzen Sie den Festplatten-Rahmen
wieder in das Gehäuse ein und befestigen
Sie ihn mit Schrauben (Schritt 10)
С помощью липкой прокладки
прикрепите к оптическому приводу
крышку.
Вставьте корзину для жесткого диска
обратно в корпус и закрепите шурупами
(шаг 10).
從零件包內取出5.25"裝置門板,然后對
準貼在光
碟機的門板上的雙面背膠上
把第十步驟安裝好硬碟的硬蝶架鎖回原位
从零件包内取出5.25”装置门板,然
后对准贴在光碟机的门板上的双面背
胶上
把第十步骤安装好硬盘的硬碟架锁回
原位
光学ドライブに貼った両面テープの
ハクリ紙をはがし、付属の光学ドラ
イブドアカバーを貼り付けます
ハードディスクドライブケージをケ
ースに入れ、ネジで固定します。
(ステップ10参照)
동봉된 광드라이브 커버를 광드라이
동봉된 광드라이브 커버를 광드라이
브에 붙어있는 폼에 부착합니다.
브에 붙어있는 폼에 부착합니다.
하드 드라이브 케이지를 케이스에
하드 드라이브 케이지를 케이스에
재설치하고 나사로 조입니다. (Step 10)
재설치하고 나사로 조입니다. (Step 10)
Fixez le cache (inclus) de la porte du
lecteur optique sur l'autocollant double
face que vous avez collez sur votre
lecteur optique
Una la cubierta óptica incluida de la
puerta del dispositivo sobre la espuma
en su dispositivo óptico
Reinstale la caja de disco duro en chasis
y asegúrelo con el tornillo (paso 10)
Incollare la porta dell’unitá ottica
sul cuscinetto adesivo che si trova
sull’unitá ottica.
Reinstallare il box dell’hard disk da
3,5” nel chassis e fissare con le
viti(passo 10)
Reinstale la caja de disco duro en
chasis y asegúrelo con el tornillo
(paso 10)
14