
Installation guide


15
16
繁體中文
简体中文
繁體中文
简体中文
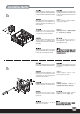
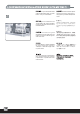
Reinstall the 5.25” device with optical
drive and hard drive into chassis and
secure with screw (step 8)
Setzen Sie das 5.25” Gerät mit den
optischen Laufwerken und Festplatten
in das Gehäuse ein und befestigen Sie
es mit den beiliegenden Schrauben
(Schritt 8)
Если кнопку извлечения оптического
привода нельзя достать, прикрепите
к ней прилагаемую пенопластовую
надставку.
Снова установите в корпус 5,25-
дюймовое устройство с оптическим
приводом и жестким диском и
закрепите шурупами (шаг 8).
某些光碟的按鍵位置比較特殊,請使用橡
膠墊校正位置,使得面板按鍵與光碟機按
鍵容易接觸.請從零件包內取出橡膠墊,
貼在光碟機按鍵上.
某些光驱的按键位置比较特殊,请使
用橡胶垫校正位置,使得面板按键与
光碟机按键容易接触.请从零件包内
取出橡胶垫,贴在光碟机按键上.
光学ドライブのボタンが奥にあって
操作しにくい場合は、ボタンの上に
付属のフォームを貼ってください。
光学ドライブを取り付けた5.25”
ドライブブラケットをケースに入れ、
ネジで固定します。(ステップ8参照)
광드라이브 버튼이 닿지 않는다면, 단추에
광드라이브 버튼이 닿지 않는다면, 단추에
동봉된 폼을 붙입니다.
동봉된 폼을 붙입니다.
5.25” 디바이스와 하드디스크를 케이스에
5.25” 디바이스와 하드디스크를 케이스에
재 설치한 후, 나사로 고정합니다. (Step 8)
재 설치한 후, 나사로 고정합니다. (Step 8)
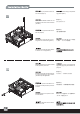
Si le bouton de votre lecteur optique
ne peut pas être atteint, veuillez
attachez l'autocollant inclus sur votre
bouton
Réinstallez le casier 5.25” avec le
lecteur optique et le disque dur dans
le boîtier et fixez-le avec des vis
(étape 8)
Si su botón de dispositivo óptico no
puede alcanzar, por
Reinstale el dispositivo 5.25 " con el
dispositivo óptica y disco duro en
chasis y asegúrelos con el tornillo
(paso 8)
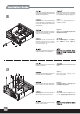
把第八步驟安裝好光碟裝置和硬碟的5.25"
裝置架鎖回原位
把第八步骤安装好光盘装置和硬盘的
5.25"装置架锁回原位
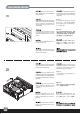
If your optical drive button can not
reach, please attach the included foam
onto the button
Falls die Bedienungselemente ihres
optischen Laufwerks nicht erreichbar
sind, bringen Sie die beiliegende
Schaumstoff-Unterlage an der
Unterseite an
Se il pulsante dell’unità ottica non è
raggiungibile, incollare il cuscinetto
incluso sul pulsante.
Reinstallare il supporto del dispositivo
da 5.25” nel chassis e fissare con le
viti(passo 8)
13