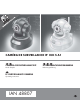
CAMÉRA DE SURVEILLANCE IP IUK 5 A1 CAMÉRA DE SURVEILLANCE IP IP-ÜBERWACHUNGSKAMERA Mode d'emploi Bedienungsanleitung IP SURVEILLANCE CAMERA Operating instructions IAN 48807
Avant de lire le mode d'emploi, ouvrez les deux pages contenant les illustrations et familiarisez-vous ensuite avec toutes les fonctions de l'appareil. Klappen Sie vor dem Lesen die beiden Seiten mit den Abbildungen aus und machen Sie sich anschließend mit allen Funktionen des Gerätes vertraut. Before reading, unfold both pages containing illustrations and familiarise yourself with all functions of the device.
A B
C D
Table des matières FR BE Introduction . . . . . . . . . . . . . . . . . . . . . . . . . . . . . . . . . . . . . . . . . . . . . . . . . .3 Informations relatives à ce mode d'emploi . . . . . . . . . . . . . . . . . . . . . . . . . . . . . . . . . . . . . Droits d'auteur . . . . . . . . . . . . . . . . . . . . . . . . . . . . . . . . . . . . . . . . . . . . . . . . . . . . . . . . . . Usage conforme . . . . . . . . . . . . . . . . . . . . . . . . . . . . . . . . . . . . . . . . . . . . . . . . . . . . . . .
Nettoyage . . . . . . . . . . . . . . . . . . . . . . . . . . . . . . . . . . . . . . . . . . . . . . . . . . .38 FR BE Entreposage / Mise au rebut . . . . . . . . . . . . . . . . . . . . . . . . . . . . . . . . . . . .38 Entreposage . . . . . . . . . . . . . . . . . . . . . . . . . . . . . . . . . . . . . . . . . . . . . . . . . . . . . . . . . . . 38 Mise au rebut de l'appareil . . . . . . . . . . . . . . . . . . . . . . . . . . . . . . . . . . . . . . . . . . . . . . . 38 Dépannage . . . . . . . . . .
Introduction FR BE Informations relatives à ce mode d'emploi Toutes nos félicitations pour l'achat de votre nouvel appareil. Vous venez ainsi d'opter pour un produit de grande qualité. Le mode d'emploi fait partie de ce produit. Il contient des remarques importantes concernant la sécurité, l'usage et la mise au rebut. Avant d'utiliser le produit, veuillez vous familiariser avec toutes les consignes d'utilisation et de sécurité.
AVERTISSEMENT FR BE Un avertissement à ce niveau de danger signale une situation potentiellement dangereuse. Si la situation dangereuse ne peut être écartée, cela peut entraîner des blessures. ► Les consignes de cet avertissement doivent être suivies pour éviter de blesser des personnes. ATTENTION Un avertissement de ce niveau de danger signale un risque de dégâts matériels. Si la situation dangereuse ne peut pas être écartée, elle risque d'entraîner des dégâts matériels.
■ Veillez lors de la fixation de l'appareil à un maintien sûr, pour qu'il ne puisse pas tomber et blesser les gens. ■ L'utilisation de l'appareil par les enfants est autorisée uniquement sous surveillance. Les enfants ne sont pas toujours en mesure de reconnaître les dangers potentiels. AVERTISSEMENT ! L'étendue de la livraison comporte de petites pièces pouvant être avalées. En cas d'avalement de pièce, consulter immédiatement un docteur.
■ Avant un orage et/ou une tempête avec un risque de foudre, veuillez débrancher l'adaptateur réseau du réseau électrique. FR BE ■ La prise de courant utilisée doit être facilement accessible, de sorte que l'adaptateur secteur puisse en cas d'urgence être facilement retiré. ■ Si vous percevez des bruits, une fumée ou autre inhabituels, ou des situations qui ne sont pas claires, débranchez immédiatement l'adaptateur réseau de l'alimentation électrique.
Caméras de surveillance au poste de travail En Allemagne, la surveillance au poste de travail est soumise à des conditions particulièrement strictes. Les employeurs doivent entièrement renoncer aux caméras de surveillance au poste de travail tant qu'une éventuelle infraction à la loi ne peut pas être entièrement exclue.
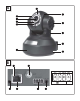
Éléments de commande (Figures voir les pages dépliantes) FR BE Figure A : Capteur de lumière pour le contrôle de l'exposition Tête de caméra Haut-parleur Support pour la tête de caméra Champ de raccordement Pied de la caméra Microphone LED d'état rouge Bague de focalisation pour la mise au point manuelle Lentille de la caméra LED infrarouges Figure B : LED de contrôle jaune pour la connexion réseau Raccord fileté pour l'antenne WLAN Connexion pour la tension d'alimentation de l'adaptateur secteur Connexion
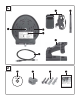
Installation et raccordement FR BE DANGER Toute mise en service de l'appareil peut entraîner des dommages corporels et des dégâts matériels ! Veuillez respecter les consignes de sécurité suivantes pour éviter les risques : ► Tenez compte des remarques relatives au branchement de l'appareil afin d'éviter tous dégâts matériels. Contenu de la livraison et inspection après transport Veuillez vérifier l'étendue de la livraison (voir les volets dépliants).
REMARQUE ► Si possible, conservez l'emballage d'origine pendant la période de garantie de l'appareil afin de pouvoir emballer ce dernier en bonne et due forme en cas de recours en garantie. FR BE Exigences requises sur le lieu d'installation Pour assurer un fonctionnement fiable et sans défaillances de l'appareil, le lieu d'installation doit répondre aux conditions suivantes : ■ Pour l'installation de l'appareil, le placer sur un support solide, plat et horizontal.
■ Utilisez uniquement l'appareil dans des endroits secs, jamais dans un environnement chaud ni à proximité de matériaux inflammables. ■ N'utilisez l'appareil qu'aux endroits offrant une aération suffisante. Alimentation électrique ♦ Pour utiliser l'appareil, utilisez exclusivement l'adaptateur réseau livré. ♦ Branchez la fiche du câble de l'adaptateur réseau dans la connexion pour la tension d'alimentation .
♦ Un appareil externe comme un émetteur d‘alarme, une sirène ou un ouvre-porte peut être branché aux deux connexions OUT à gauche. Un signal est alors émis dès que la sortie a été activée manuellement ou que la sortie a été choisie pour les messages d‘alarme et que la caméra de surveillance IP détecte une alarme. La puissance de commutation maximale des connexions OUT est de 5 V / 500 mA. FR BE ♦ Pour de plus amples informations, lisez les modes d'emploi des composants concernés.
Navigateurs web compatibles : Résolution écran : Internet Explorer 11, différents autres mais avec une gamme de fonctions moins importante FR BE 1024 × 768 ou plus Mise en service Env. 30 secondes après la mise sous tension, la caméra effectue un test automatique et parcourt tout la plage de pivotement horizontale et verticale. L'appareil est ensuite prêt à fonctionner. Lorsque l'appareil détecte une connexion réseau câblée, la LED de contrôle jaune clignote rapidement.
2) Le programme trouve la caméra et lorsque vous cliquez sur le nom de l'appareil "IPCAM", les informations concernant le réseau apparaissent. FR BE Le mise en place du réseau de la caméra de surveillance IP se fait automatiquement lorsque l'option "Auto" est activée et que le routeur se trouve en mode DHCP. Si la caméra n'apparait pas dans la liste, vous pouvez actualiser la liste avec la touche "Find". Vous devez ici absolument conserver les paramètres proposés.
3) Cliquez sur "Others" pour ouvrir la page des options additionnelles : FR BE Le numéro du firmware actuel de la caméra s'affiche maintenant à droite. Sur la ligne en dessous, vous pouvez lire l'adresse MAC de la connexion réseau actuellement utilisée.
1) Pour faire s'afficher l'image de la caméra dans le navigateur, double-cliquez sur le nom de l'appareil à gauche dans la liste ou à droite sur la page d'information "General" de la caméra. Authentifiez-vous pour transmettre l'adresse au navigateur avec le nom d'utilisateur "admin" et sans saisie de mot de passe.
4) Si vous souhaitez enregistrer plus tard des vidéos et images fixes via Internet Explorer 11 sur un ordinateur, vous devez d'abord configurer les options Internet comme suit : Cliquez en haut à droite sur l'icône des paramètres puis sur "Internet options". 5) Sélectionnez "Trusted Sites" dans l'onglet "Security" et cliquez sur "Sites". 6) La fenêtre suivante vous propose d'ajouter l'adresse de la caméra aux sites fiables.
7) Pour établir la connexion avec la caméra, cliquez sur "Internet Explorer mode". La fenêtre de navigateur suivante apparait : FR BE Signification des touches et champs de commande Les significations des touches de commande sont listées ici sur la page de gauche. −> −> −> −> −> −> −> 18 Commande d'axe horizontale ( / ) /verticale ( / ) et pivotement croisé ( ). Cliquez brièvement sur l'une des touches pour faire pivoter la caméra légèrement dans la direction correspondante.
Mode Vous pouvez régler ici la fréquence du processus de saut de ligne (anglais Interlace) pour réduire le scintillement de l'image. 50 ou 60 Hz sont disponibles. Resolution Ce champ de commande vous permet de commuter entre GA (640 x 480 pixels) et QVGA (320 x 240 pixels) Frame rate Ce champ de commande vous permet de sélectionner le nombre d'images par seconde dans la plage de 1 – 25. Plus la valeur est élevée, plus les mouvements sont fluides.
FR BE −> Pour la représentation d'une image de caméra. −> Pour la représentation parallèle de 4 images de caméra sous forme de tuiles. −> Pour la représentation parallèle de 9 images caméra sous forme de tuiles. L'option respectivement activée est représentée en orange. REMARQUES ► Lorsque vous double-cliquez sur l'une des tuiles, seule cette image est alors affichée. Lorsque vous double-cliquez sur l'image en cas d'illustration d'une seule image, cette dernière s'affichera en plein écran.
Configuration via l'interface du navigateur REMARQUES Consignes valables pour tous les menus décrits ci-dessous : ► Pour la transmission des paramètres réglés sur la caméra, cliquez sur "Set", le contenu de l'image clignote ensuite une fois à titre de confirmation. Pour charger à nouveau les données enregistrées dans la caméra sur la page du navigateur, cliquez sur "Refresh". ► L'appareil redémarre après certaines saisies. Les secondes sont décomptées à l'écran jusqu'au redémarrage.
Date & time settings FR BE Dans le point de menu "NTP Server" vous pouvez régler le fuseau horaire dans lequel la caméra est utilisée. Lorsque la coche est placée sur "Synchronise with NTP server time", vous pouvez sélectionner un serveur temporaire qui met à disposition l'heure actuelle sous "NTP Server". Cliquez sur "Synchronise with PC time" pour synchroniser le réglage de l'heure de la caméra avec celui de l'ordinateur.
La page "Alarm settings" Alarm settings FR BE Si vous cochez "Alarm triggered by motion detection", le contenu de la fenêtre change : Vous pouvez maintenant régler la sensibilité de l'alarme de mouvement (Alarm-motion detection sensitivity) sur "High", "Medium" ou "Low". Si vous cochez "Alarm triggered by audio detector", une alarme peut être déclenchée par un signal audio enregistré par la caméra.
FR BE Si vous cochez "Ring external siren on alarm", une ligne supplémentaire "Output level" apparait sur laquelle vous pouvez régler ce seuil sur "High" ou "Low". Cochez "Alarm mail notification" si l'appareil doit envoyer un e-mail lors du déclenchement de l'alarme. Si vous cochez "Upload image when the alarm is triggered", une ligne supplémentaire apparait "Upload intervall (seconds)", dans la boîte de saisie de laquelle vous pouvez fixer l'intervalle selon lequel une image doit être chargée.
Lorsque l'envoi d'e-mails doit être réalisé avec une authentification, cochez "Need authentification". Les lignes supplémentaires "Sender‘s account" et "Account password" apparaissent alors. Entrez ici les informations SMPT nécessaires de votre fournisseur Internet. Sélectionnez sous "SSL" la méthode de cryptage : SSL, TLS ou NONE pour une connexion e-mail non cryptée. Entrez dans les champs "Receiver 1 – 4" les adresses e-mail de quatre destinataires max. de l'e-mail d'alarme.
La page "Network" FR BE Network settings Si la caméra doit obtenir un numéro IP du routeur automatiquement, la coche doit être placée dans le champ "Obtain IP address from DHCP server" et il faut cliquer sur "Set". L'appareil redémarre ensuite. Le temps est décompté sur l'écran jusqu'au redémarrage. Ne débranchez en aucun cas l'appareil de l'alimentation électrique durant ce temps, sans quoi il risquerait d'être endommagé irréparablement.
WiFi settings FR BE Pour connecter la caméra de surveillance IP sans fil dans un réseau, cliquez sur "Scan". Tous les réseaux se trouvant à portée apparaissent et sont affichés dans le champ "WiFi list". Parallèlement la coche est placée dans le point de menu "Use WiFi". Cliquez sur le nom du réseau WLAN avec lequel vous voulez connecter la caméra dans la colonne "SSID". À droite du nom, l'adresse MAC ainsi que la puissance de réception du réseau WLAN sont indiqués.
La page "User settings" FR BE Multi device settings Dans ce menu vous pouvez renommer chacune des caméras dans le réseau et les rendre accessibles aux utilisateurs. ■ Commencez par cliquer sur la touche supérieure "Refresh" pour faire s'afficher les caméras disponibles dans le réseau.
User account settings FR BE Ici, vous pouvez modifier le nom de connexion de l'administrateur et attribuer un mot de passe pour son accès jusque lors non protégé. En outre, vous pouvez attribuer un compte avec nom et mot de passe pour un utilisateur, qui peut voir l'image de la caméra, mais qui ne dispose d'aucune autre possibilité de commande. Pour se connecter avec d'autres données respectives, redémarrez le navigateur.
Commande divergente lors de l'utilisation de l'aperçu Smartphone FR BE Si après avoir démarré le navigateur vous cliquez sur "Smartphones modus" l'interface web s'affichera fortement simplifiée. Si vous cliquez sur l'une des quatre flèches de direction, la tête de la caméra direction correspondante.
Commander la caméra via Smartphone REMARQUE FR BE ► Le mode de fonctionnement de l'appli pour Android est présenté ici, ses différences lors de l'utilisation d'appareils Apple sont possibles. Lorsque vous touchez l'écran pendant l'affichage de l'image de la caméra, les icônes de commande suivantes apparaissent sur les bords supérieur et inférieur de l'écran.
FR BE −> Effleurez cette touche pour activer ou désactiver la transmission audio entre caméra et téléphone portable. −> Effleurez cette touche pour enregistrer un instantané de l'affichage. −> Effleurez cette touche pour que le flux vidéo de la caméra s'enregistre comme vidéo sur le téléphone portable. Durant l'enregistrement, "Recording" s'affiche en haut à droite de l'écran. Lorsque la fonction est activée, l'icône est rouge. Effleurez à nouveau cette touche pour mettre fin à l'enregistrement.
Monitoring central avec un logiciel spécial Vous pouvez installer le logiciel livré "IUK Viewer" et faire s'afficher les images de 64 caméras maximum en même temps. Placez pour cela le CD livré dans le lecteur de l'ordinateur Windows® avec lequel vous voulez surveiller la caméra. Ouvrez le lecteur dans l'Explorer de Windows et effectuez un double clic sur le fichier "IUK Viewer_Setup". Cela lance le programme d'installation du logiciel de monitoring central.
▯ Settings FR BE System settings Si vous cliquez dans le menu "Settings" => "System settings", la fenêtre suivante s'ouvre : REMARQUE ► Les possibilités de configuration via le logiciel "IUK Viewer" correspondent largement à celles qui ont déjà été décrites dans l'interface Web. C'est la raison pour laquelle aucune nouvelle description détaillée n'a lieu. Configurez les paramètres affichés comme souhaité, puis cliquez sur le bouton "OK".
Device settings Si vous cliquez dans le menu "Settings" => "Device settings", vous voyez la fenêtre suivante : FR BE Les caméras détectées dans le réseau s'affichent ici. Si vous ne voyez pas toutes les caméras escomptées dans la liste, cliquez sur "Seaching Page" pour lancer une nouvelle recherche de caméras. L'extension suivante se déroule alors en dessous : Cliquez sur "Searching" et ensuite les noms et paramètres des caméras disponibles dans la liste s'affichent.
FR BE Si vous sélectionnez une entrée dans la liste d'appareils par clic de la souris et cliquez ensuite sur "Modify", vous pouvez modifier manuellement dans la fenêtre suivante les paramètres de la caméra choisie en entrant les détails de connexion. Une fois les saisies effectuées, cliquez sur "OK" pour fermer la fenêtre. Sélectionnez une entrée dans la liste d'appareils d'un clic de la souris et cliquez sur "Delete" lorsque vous voulez supprimer la caméra sélectionnée de la liste d'appareils.
Screen Lorsque vous cliquez sur "Screen" dans la fenêtre principale, un menu s'ouvre dans lequel vous pouvez sélectionner le nombre souhaité de tuiles à l'écran. Le nombre maximum de tuiles affichables est de 64. Vous pouvez ensuite attribuer une image de caméra séparée à chaque tuile en tirant une caméra avec la souris pour l'amener sur la tuile souhaitée depuis la liste de caméras située en bas à gauche dans la fenêtre principale.
Nettoyage FR BE ATTENTION Endommagement de l'appareil ! ► Lors du nettoyage de l'appareil, veillez à ce qu'aucune humidité ne pénètre dans ce dernier afin d'éviter tous dégâts irréparables. ■ Nettoyez les surfaces de l'appareil à l'aide d'un chiffon doux et sec. En présence de salissures tenaces, utilisez un produit de nettoyage disponible dans le commerce et un peu d'eau. Évitez que de l'eau pénètre dans l'appareil.
Causes des pannes et remèdes Le tableau ci-dessous vous aidera à localiser les petits dysfonctionnements et à y remédier : FR BE Panne Cause possible Remède La caméra ne fonctionne pas. Alimentation électrique coupée. Branchez l'adaptateur réseau joint dans une prise de courant et connectez la fiche du câble de l'adaptateur connexion de tension d'alimentation.
Annexe FR BE Remarques relatives à la déclaration de conformité Cet appareil est conforme aux exigences de base et aux autres prescriptions pertinentes de la directive européenne relative à la compatibilité électromagnétique 2004/108/EC ainsi que de la directive RoHS 2011/65/EU. La déclaration de conformité originale complète est disponible auprès de l'importateur.
Adaptateur secteur Type Fabricant Minwa Electronics Co., Ltd. Tension d'entrée 100 – 240 V ~, 50/60 Hz Courant absorbé 0,26 A Tension de sortie 5V Courant de sortie Classe de protection FR BE MW6FU21NGS 2100 mA |10,5 VA (max) II / Garantie Cet appareil est garanti 3 ans à partir de la date d'achat. L'appareil a été fabriqué avec soin et consciencieusement contrôlé avant sa livraison. Veuillez conserver le ticket de caisse en guise de preuve d'achat.
Service après-vente Service France Tel.: 0800 919270 E-Mail: kompernass@lidl.fr IAN 48807 FR BE Service Belgique Tel.: 070 270 171 (0,15 EUR/Min.) E-Mail: kompernass@lidl.be IAN 48807 Heures de service de notre hotline : du lundi au vendredi de 8 h à 20 h (HEC) Importateur KOMPERNASS HANDELS GMBH BURGSTRASSE 21 44867 BOCHUM GERMANY www.kompernass.
Inhaltsverzeichnis Einführung . . . . . . . . . . . . . . . . . . . . . . . . . . . . . . . . . . . . . . . . . . . . . . . . . . .45 Informationen zu dieser Bedienungsanleitung . . . . . . . . . . . . . . . . . . . . . . . . . . . . . . . . . Urheberrecht. . . . . . . . . . . . . . . . . . . . . . . . . . . . . . . . . . . . . . . . . . . . . . . . . . . . . . . . . . . Bestimmungsgemäße Verwendung . . . . . . . . . . . . . . . . . . . . . . . . . . . . . . . . . . . . . . . . . Warnhinweise . . . . . . .
Reinigung . . . . . . . . . . . . . . . . . . . . . . . . . . . . . . . . . . . . . . . . . . . . . . . . . . .80 Lagerung / Entsorgung . . . . . . . . . . . . . . . . . . . . . . . . . . . . . . . . . . . . . . . . .80 Lagerung . . . . . . . . . . . . . . . . . . . . . . . . . . . . . . . . . . . . . . . . . . . . . . . . . . . . . . . . . . . . . 80 Gerät entsorgen . . . . . . . . . . . . . . . . . . . . . . . . . . . . . . . . . . . . . . . . . . . . . . . . . . . . . . . . 80 DE AT CH Fehlerbehebung .
Einführung Informationen zu dieser Bedienungsanleitung Herzlichen Glückwunsch zum Kauf Ihres neuen Gerätes. DE Sie haben sich damit für ein hochwertiges Produkt entschieden. Die Bedienungsanleitung ist Bestandteil AT dieses Produkts. Sie enthält wichtige Hinweise für Sicherheit, Gebrauch und Entsorgung. Machen Sie CH sich vor der Benutzung des Produkts mit allen Bedien- und Sicherheitshinweisen vertraut. Benutzen Sie das Produkt nur wie beschrieben und für die angegebenen Einsatzbereiche.
WARNUNG Ein Warnhinweis dieser Gefahrenstufe kennzeichnet eine mögliche gefährliche Situation. Falls die gefährliche Situation nicht vermieden wird, kann dies zu Verletzungen führen. DE AT CH ► Die Anweisungen in diesem Warnhinweis befolgen, um Verletzungen von Personen zu vermeiden. ACHTUNG Ein Warnhinweis dieser Gefahrenstufe kennzeichnet einen möglichen Sachschaden. Falls die Situation nicht vermieden wird, kann dies zu Sachschäden führen.
■ Gestatten Sie Kindern die Benutzung des Gerätes nur unter Aufsicht. Kinder können mögliche Gefahren nicht immer richtig erkennen. WARNUNG Im Lieferumfang befinden sich verschluckbare Kleinteile. Wurde ein Teil verschluckt, konsultieren Sie sofort einen Arzt. ■ Lassen Sie Reparaturen am Gerät nur von autorisierten Fachbetrieben oder dem Kundenservice durchführen. Durch unsachgemäße Reparaturen können Gefahren für den Benutzer entstehen. Zudem erlischt der Garantieanspruch.
■ Vor einen Sturm und/oder Gewitter mit Blitzschlaggefahr trennen Sie den Netzadapter bitte vom Stromnetz. ■ Die verwendete Steckdose muss leicht zugänglich sein, so dass der Netzadapter notfalls leicht abgezogen werden kann. DE AT CH ■ Sollten Sie ungewöhnliche Geräusche, Rauch oder ähnlich unklare Situationen wahrnehmen, trennen Sie unverzüglich den Netzadapter von der Stromversorgung.
Überwachungskameras am Arbeitsplatz Die Überwachung am Arbeitsplatz untersteht in Deutschland besonders strengen Auflagen. Arbeitgeber sollten auf Überwachungskameras am Arbeitsplatz vollständig verzichten, solange eine mögliche Rechtsverletzung nicht vollständig ausgeschlossen werden kann.
Bedienelemente (Abbildungen siehe Ausklappseiten) Abbildung A: Lichtsensor für die Belichtungssteuerung Kamerakopf Lautsprecher Kamerakopfträger Anschlussfeld Kamerafuß Mikrophon Rote Bereitschaft-LED Fokussierring zur manuellen Scharfstellung Kameralinse Infrarot-LEDs DE AT CH Abbildung B: Gelbe Kontroll-LED für die Netzwerkverbindung Gewindeanschluss für die WLAN-Antenne Anschluss für die Versorgungsspannung vom Netzadapter Alarmanschluss (IN/OUT) LAN-Anschluss AUDIO-Ausgang Abbildung C: Gewinde zur Bef
Aufstellen und Anschließen GEFAHR Bei der Inbetriebnahme des Gerätes können Personen- und Sachschäden auftreten! DE AT CH Beachten Sie die folgenden Sicherheitshinweise, um die Gefahren zu vermeiden: ► Beachten Sie die Hinweise zum elektrischen Anschluss des Gerätes, um Sachschäden zu vermeiden. Lieferumfang und Transportinspektion Bitte prüfen Sie den Lieferumfang (siehe Ausklappseiten).
HINWEIS ► Heben Sie wenn möglich die Originalverpackung während der Garantiezeit des Gerätes auf, um das Gerät im Garantiefall ordnungsgemäß verpacken zu können. DE AT CH Anforderungen an den Aufstellort Für einen sicheren und fehlerfreien Betrieb des Gerätes muss der Aufstellort folgende Voraussetzungen erfüllen: ■ Zum Aufstellen können Sie das Gerät auf eine feste, flache und waagerechte Unterlage stellen.
■ Betreiben Sie das Gerät nur an trockenen Orten, nie in einer heißen Umgebung oder in der Nähe von brennbarem Material. ■ Betreiben Sie das Gerät nur an Orten, die eine ausreichende Belüftung bieten. Stromversorgung ♦ Zum Betrieb des Gerätes verwenden Sie ausschließlich den mitgelieferten Netzadapter . ♦ Stecken Sie den Stecker des Netzadapterkabels in den Anschluss für die Versorgungsspannung .
DE AT CH ♦ An den beiden OUT-Anschlüsse links kann ein externes Gerät wie ein Alarmgeber, eine Sirene oder ein Türöffner angeschlossen werden. Hier wird ein Signal ausgegeben, sobald der Ausgang manuell eingeschaltet wurde oder wenn der Ausgang für Alarmmeldungen ausgewählt wurde und die IP-Überwachungskamera einen Alarm erkennt. Die maximale Schaltleistung der OUT-Anschlüsse beträgt 5 V / 500 mA. ♦ Für weitere Informationen lesen Sie die Bedienungsanleitungen der beteiligten Komponenten.
Inbetriebnahme Ca. 30 Sekunden nach Herstellen der Spannungsversorgung führt die Kamera einen Selbsttest durch und fährt dabei den vollständigen horizontalen und vertikalen Schwenkbereich ab. Anschließend ist das Gerät einsatzbereit. Hat das Gerät eine kabelgebundene Netzwerkverbindung erkannt, blinkt die gelbe Kontroll-LED in schneller Folge. HINWEIS ► Für die Erstkonfiguration muss die Kamera mit dem LAN-Anschluss verbunden sein.
2) Das Programm findet die Kamera, und wenn Sie auf den Gerätenamen „IPCAM“ klicken, erscheinen die netzwerkrelevanten Informationen: DE AT CH Die Netzwerkeinrichtung der IP-Überwachungskamera erfolgt automatisch, wenn die Option „Auto“ aktiviert ist und sich der Router im DHCP-Modus befindet. Sollte die Kamera nicht in der Liste erscheinen, können Sie die Liste mit der Taste „Find“ aktualisieren. Hier sollten Sie unbedingt die vorgeschlagenen Parameter beibehalten.
3) Klicken Sie auf „Others“, um die Seite für weitere Optionen zu öffnen: DE AT CH Rechts wird nun die Nummer der aktuellen Kamera-Firmware angezeigt. In der Zeile darunter lesen Sie die MAC-Adresse der gerade verwendeten Netzwerkverbindung.
1) Um das Kamerabild im Browser anzeigen zu lassen, klicken Sie doppelt auf den Gerätenamen links in der Liste, oder rechts auf in der Kamera-Informationsseite „General“. Authentifizieren Sie sich für die Adressweitergabe an den Browser mit dem Benutzernamen „admin“ und ohne Eingabe eines Passworts.
4) Wenn Sie später Videos und Standbilder über den Internet Explorer 11 auf einem Computer speichern wollen, müssen Sie zunächst die Internetoptionen wie folgt konfigurieren: Klicken Sie oben rechts auf das Einstellungen-Symbol und dann auf „Internetoptionen“: DE AT CH 5) Wählen Sie den Reiter „Sicherheit“ aus, markieren Sie „Vertrauenswürdige Sites“ und klicken auf „Sites“: 6) Im nächsten Fenster wird Ihnen angeboten, die Kameraadresse zu den vertrauenswürdigen Seiten hinzuzufügen: Entfernen Sie den Hak
7) Um die Verbindung zu Kamera aufzunehmen, klicken Sie auf „Internet Explorer modus“. Folgendes Browserfenster erscheint: DE AT CH Bedeutung der Steuertasten und -felder Hier werden die Bedeutungen der Steuertasten auf der linken Seite aufgelistet. −> −> Horizontale ( / ) / vertikale Achssteuerung ( / ) und Kreuzschwenk ( ). Klicken Sie kurz auf eine der Schaltflächen, um die Kamera ein Stück in die entsprechende Richtung schwenken zu lassen.
−> Klicken Sie auf diese Schaltfläche, um das Bild vertikal gespiegelt zu sehen. −> Klicken Sie auf diese Schaltfläche, um das Bild horizontal gespiegelt zu sehen. −> Klicken Sie auf diese Schaltfläche, um den externen Alarmanschluss einzuschalten. −> Klicken Sie auf diese Schaltfläche, um den externen Alarmanschluss auszuschalten. Modus Hier können Sie die Frequenz des Zeilensprungverfahrens (engl. Interlace) zur Verringerung des Bildflimmerns einstellen. 50 oder 60 Hz stehen zur Auswahl.
DE AT CH −> Für die Darstellung eines Kamerabildes. −> Für die gleichzeitige Darstellung von 4 Kamerabildern als Kacheln. −> Für die gleichzeitige Darstellung von 9 Kamerabildern als Kacheln Die jeweils aktivierte Option wird orange dargestellt. HINWEIS ► Wenn Sie auf eine der Kacheln doppelklicken, wird nur noch dieses Bild dargestellt. Wenn Sie bei Einzelbilddarstellung auf das Bild doppelklicken, wird dieses bildschirmfüllend angezeigt.
Konfiguration über das Browser-Interface HINWEIS Für alle im Folgenden beschriebenen Menüs gilt: ► Zur Übermittlung der vorgenommenen Einstellungen an die Kamera klicken Sie auf „Übermitteln“, der Bildinhalt blinkt dann einmal zur Bestätigung. Um die in der Kamera gespeicherten Daten wieder in die Browser-Seite zu laden, klicken Sie auf „Aktualisieren“. DE AT CH ► Nach manchen Eingaben startet das Gerät neu. Die Sekunden bis zum Neustart werden auf dem Bildschirm herunter gezählt.
Zeit- und Datums Einstellungen DE AT CH Im Menüpunkt „NTP Server“ können Sie die Zeitzone einstellen, in der die Kamera betrieben wird. Wenn das Häkchen bei „Mit NTP Server Zeit synchronisieren“ gesetzt ist, können Sie unter „NTP server“ einen Zeitserver auswählen, der die aktuelle Uhrzeit bereitstellt. Klicken Sie auf „Mit PC Zeit synchronisieren“, um die Zeiteinstellung der Kamera mit der des Computers zu synchronisieren.
Die Seite „Alarm“ Alarm Einstellungen DE AT CH Wenn Sie das Häkchen bei „Alarm ausgelöst durch Bewegungserkennung“ setzen, ändert sich der Inhalt des Fensters: Nun können Sie die Empfindlichkeit für den Bewegungsalarm (Sensitivität der Bewegungserkennung) „Hoch“, „Mittel“ oder „Gering“ einstellen. Wenn Sie das Häkchen bei „Alarm durch Geräuscherkennung“ setzen, kann ein Alarm durch ein von der Kamera aufgenommenes Audiosignal ausgelöst werden.
Setzen Sie das Häkchen bei „Alarm E-Mail Mitteilung“, wenn das Gerät bei Alarmauslösung eine E-Mail verschicken soll. DE AT CH Wenn Sie das Häkchen bei „Bei Alarm Bild uploaden“ setzen, erscheint eine zusätzliche Zeile „Upload Intervall (Sekunden)“, in deren Eingabebox Sie festlegen können, in welchen Abständen ein Bild hochgeladen werden soll. 0 – 255 Sekunden stehen zur Auswahl.
Unter „SSL“ wählen Sie die Verschlüsselungsmethode aus: SSL, TLS oder NONE für unverschlüsselte E-Mail-Verbindung. In den Feldern „Empfänger 1 – 4“ tragen Sie die E-Mail-Adressen von bis zu vier Empfängern der Alarm-E-Mail ein. DE AT CH Nachdem Sie die Eingaben vorgenommen haben, können Sie die E-Mail-Funktion mit einem Klick auf „Testen“ überprüfen. FTP Einstellungen Hier können Sie die Verbindungsdaten eines FTP-Servers eingeben, zu dem die Kamera Bilder hochladen kann.
Die Seite „Netzwerk“ Netzwerk Einstellungen DE AT CH Wenn die Kamera eine IP-Nummer automatisch vom Router erhalten soll, muss das Häkchen im Feld „IP vom DHCP Server beziehen“ gesetzt werden und auf „Übermitteln“ geklickt werden. Anschließend startet das Gerät neu. Die Zeit bis zum Neustart wird auf dem Bildschirm herunter gezählt. Trennen Sie es während dieser Zeit auf keinen Fall von der Stromversorgung, andernfalls könnte es dadurch irreparabel beschädigt werden.
WLAN Einstellungen DE AT CH Um die IP-Überwachungskamera drahtlos in ein Netzwerk einzubinden, klicken Sie auf „Scannen“. Nun werden alle in Reichweite befindlichen WLAN-Netze angezeigt und im Feld „Liste der WLAN Netzwerke“ angezeigt. Gleichzeitig wird das Häkchen im Menüpunkt „Benutze WLAN“ gesetzt. Klicken Sie auf den Namen des WLAN-Netzwerkes in der Spalte „SSID“, mit dem Sie die Kamera verbinden wollen. Rechts vom Namen werden die MAC-Adresse sowie die Empfangsstärke des WLAN-Netzwerkes dargestellt.
Die Seite „Benutzer Einstellungen“ Multi Geräte Einstellungen DE AT CH In diesem Menü können Sie einzelne Kameras im Netzwerk umbenennen und Benutzern zugänglich machen. ■ Klicken Sie zunächst auf die obere Schaltfläche „Aktualisieren“, um die im Netzwerk verfügbaren Kameras auflisten zu lassen.
Benutzer Einstellungen DE AT CH Hier können Sie den Anmeldenamen des Administrators ändern und für dessen bislang ungeschützten Zugang ein Passwort vergeben. Darüber hinaus können Sie ein Konto mit Namen und Passwort für einen Benutzer vergeben, der das Kamerabild sehen darf, sonst aber über keinerlei Steuermöglichkeiten verfügt. Um sich mit den jeweils anderen Daten anzumelden, starten Sie den Browser neu.
Abweichende Bedienung bei Verwendung der Smartphone-Vorschau Wenn Sie nach Starten des Browsers auf „Smartphones modus“ klicken, wird Ihnen das Webinterface stark vereinfacht angezeigt: DE AT CH Klicken Sie auf eine der vier Richtungstasten, dann fährt der Kamerakopf chende Richtung.
Kamera über Smartphone steuern HINWEIS ► Gezeigt wird hier die Funktionsweise der App für Android, Abweichungen bei Verwendung von Apple-Geräten ist möglich. DE AT CH Wenn Sie das Display während der Anzeige des Kamerabildes berühren, erscheinen am oberen und unteren Bildschirmrand folgende Steuersymbole: HINWEIS ► Je nach Größe des Smartphone-Displays können Sie bei Bedarf die untere Symbolleiste mit dem Finger seitlich bewegen, um alle Steuersymbole erreichen zu können.
−> Berühren Sie diese Schaltfläche, um einen Schnappschuss der Anzeige speichern zu lassen. −> Berühren Sie diese Schaltfläche, um den Stream von der Kamera als Video im Handy speichern zu lassen. Während der Aufnahme wird oben rechts im Display „Recording“ eingeblendet. Bei aktivierter Funktion leuchtet das Symbol in rot. Berühren Sie diese Schaltfläche erneut, um die Aufnahme zu beenden.
Zentrales Monitoring über spezielle Software Sie können die mitgelieferte Software „IUK Viewer“ installieren und darüber die Bilder von bis zu 64 Kameras gleichzeitig anzeigen lassen. Legen Sie dazu die mitgelieferte CD in das Disc-Laufwerk des Windows®-Computer ein, mit dem Sie die Kamera überwachen wollen. Öffnen Sie das Laufwerk im Explorer und klicken Sie mit einem Doppelklick auf die Datei „IUK Viewer_Setup“. Dies startet das Programm zur Installation der zentralen Monitoring-Software.
▯ Menü System Einstellungen Wenn Sie im Menü auf „Einstellungen“ => „System Einstellungen“ klicken, öffnet sich folgendes Fenster: DE AT CH HINWEIS ► Die Konfigurationsmöglichkeiten über die Software „IUK Viewer“ entsprechen weitestgehend denen, die bereits beim Web-Interface beschrieben wurden. Daher erfolgt hier keine erneute detaillierte Beschreibung. Konfigurieren Sie die gezeigten Parameter wie gewünscht, anschließend klicken Sie auf die Schaltfläche „OK“.
Geräte Einstellungen Wenn Sie im Menü auf „Einstellungen“ => „Geräte Einstellungen“ klicken, sehen Sie folgendes Fenster: DE AT CH Hier werden die im Netzwerk erkannten Kameras aufgelistet. Wenn Sie nicht alle erwarteten Kameras in der Liste sehen, klicken Sie auf „Such-Seite“, um noch einmal nach Kameras suchen zu lassen. Dann klappt unten folgende Erweiterung aus: Klicken Sie auf „Suchen“,dann erscheinen die Namen und Parameter der im Netzwerk verfügbaren Kameras in der Liste.
Wenn Sie einen Eintrag in der Geräteliste per Mausklick auswählen und anschließend auf „Anpassen“ klicken, können Sie in folgendem Fenster die Parameter der ausgewählten Kamera durch Eingabe der Anschlussdetails manuell ändern. DE AT CH Nach Abschluss der Eingaben klicken Sie auf „OK“, um das Fenster zu schließen. Markieren Sie einen Eintrag in der Geräteliste per Mausklick und klicken auf „Löschen“, wenn Sie die ausgewählte Kamera aus der Geräteliste löschen wollen.
Anzeige Wenn Sie im Hauptfenster auf „Anzeige“ klicken, öffnet sich ein Menü, über das Sie die gewünschte Anzahl von Bildschirmkacheln auswählen können. Die maximale Anzahl darstellbarer Kacheln beträgt 64. Jeder Kachel können Sie dann ein separates Kamerabild zuordnen, indem Sie aus der Kameraliste unten links im Hauptfenster eine Kamera mit der Maus auf die gewünschte Kachel ziehen. Wenn Sie auf eine der Kacheln doppelklicken, wird dieses Bild fensterfüllend angezeigt.
Reinigung ACHTUNG Beschädigung des Gerätes! DE AT CH ► Stellen Sie sicher, dass bei der Reinigung keine Feuchtigkeit in das Gerät eindringt, um eine irreparable Beschädigung des Gerätes zu vermeiden. ■ Reinigen Sie die Oberflächen des Gerätes mit einem weichen, trockenen Tuch. Verwenden Sie bei hartnäckigen Verschmutzungen handelsübliche Spülmittel und nur wenig Wasser. Achten Sie darauf, dass kein Wasser ins Gerät eindringt.
Fehlerursachen und -behebung Die nachfolgende Tabelle hilft bei der Lokalisierung und Behebung kleinerer Störungen: Fehler Mögliche Ursache Behebung Die Kamera Stromversorgung funktioniert nicht. unterbrochen. Stecken Sie den beiliegenden Netzadapter in eine Steckdose und verbinden Sie den Stecker des Adapterkabels in den Anschluss für die Versorgungsspannung . DE AT CH Netzwerkverbindung fehlerhaft.
Anhang Hinweise zur Konformitätserklärung Dieses Gerät entspricht hinsichtlich Übereinstimmung mit den grundlegenden Anforderungen und den anderen relevanten Vorschriften der europäischen Richtlinie für elektromagnetische Verträglichkeit 2004/108/EC sowie der RoHS-Richtlinie 2011/65/EU. Die vollständige Original-Konformitätserklärung ist beim Importeur erhältlich.
Netzadapter Typ MW6FU21NGS Hersteller Minwa Electronics Co., Ltd. Eingangsspannung 100 – 240 V ~, 50/60 Hz Stromaufnahme 0,26 A Ausgangsspannung 5V Ausgangsstrom Schutzklasse DE AT CH 2100 mA |10,5 VA (max) II / Garantie Sie erhalten auf dieses Gerät 3 Jahre Garantie ab Kaufdatum. Das Gerät wurde sorgfältig produziert und vor Auslieferung gewissenhaft geprüft. Bitte bewahren Sie den Kassenbon als Nachweis für den Kauf auf.
Service Service Deutschland Tel.: 0800 5435 111 (Kostenfrei aus dem dt. Festnetz/Mobilfunknetz) E-Mail: kompernass@lidl.de IAN 48807 DE AT CH Service Österreich Tel.: 0820 201 222 (0,15 EUR/Min.) E-Mail: kompernass@lidl.at IAN 48807 Service Schweiz Tel.: 0842 665566 (0,08 CHF/Min., Mobilfunk max. 0,40 CHF/Min.) E-Mail: kompernass@lidl.ch IAN 48807 Erreichbarkeit Hotline: Montag bis Freitag von 8:00 Uhr – 20:00 Uhr (MEZ) Importeur KOMPERNASS HANDELS GMBH BURGSTRASSE 21 44867 BOCHUM GERMANY www.kompernass.
Contents Introduction . . . . . . . . . . . . . . . . . . . . . . . . . . . . . . . . . . . . . . . . . . . . . . . . .87 Information concerning these operating instructions . . . . . . . . . . . . . . . . . . . . . . . . . . . . Copyright . . . . . . . . . . . . . . . . . . . . . . . . . . . . . . . . . . . . . . . . . . . . . . . . . . . . . . . . . . . . . Intended use . . . . . . . . . . . . . . . . . . . . . . . . . . . . . . . . . . . . . . . . . . . . . . . . . . . . . . . . . . . Warning notes . . .
Cleaning . . . . . . . . . . . . . . . . . . . . . . . . . . . . . . . . . . . . . . . . . . . . . . . . . . 122 Storage / Disposal . . . . . . . . . . . . . . . . . . . . . . . . . . . . . . . . . . . . . . . . . . 122 Storage . . . . . . . . . . . . . . . . . . . . . . . . . . . . . . . . . . . . . . . . . . . . . . . . . . . . . . . . . . . . . . 122 Disposal of the device . . . . . . . . . . . . . . . . . . . . . . . . . . . . . . . . . . . . . . . . . . . . . . . . . . 122 Troubleshooting . . . . . . .
Introduction Information concerning these operating instructions Congratulations on the purchase of your new device. You have selected a high-quality product. The operating instructions are part of this product. They contain important information on safety, usage and disposal. Before using the product, familiarise yourself with all handling and safety guidelines. Use the product only as described and for the range of applications specified. Please pass on all documentation incl.
WARNING A warning notice at this hazard level indicates a potentially hazardous situation. Failure to avoid this hazardous situation could result in injury. ► Follow the instructions in this warning notice to prevent injury. CAUTION A warning notice at this hazard level indicates a potential for property damage. GB Failure to avoid this situation could result in property damage. ► Follow the instructions in this warning notice to prevent property damage.
■ Allow children to use the device only with supervision. Children are not always able to correctly recognise potential dangers. WARNING! Some of the supplied parts can be swallowed. If a part is swallowed, seek medical advice as soon as possible. ■ All repairs must be carried out by authorised specialist companies or by the Customer Service department. Failure to make proper repairs may put the user at risk. It will also invalidate any warranty claims.
■ Please remove the mains adapter from the mains before a storm and/or thunderstorm. ■ The power socket used must be easily accessible so that the mains adapter can be easily disconnected in an emergency. ■ If you notice any unusual noises, smoke or similar uncertain situations, immediately disconnect the mains adapter from the power supply. Have the device checked by a qualified specialist before using it again (see section "Service").
Road traffic surveillance cameras In the case of surveillance cameras directed at road traffic, it is advisable that the location of the camera and the image frame be selected so that the road users cannot be identified by means of the license plates. Inscriptions/logos on vehicles may also serve as a means of identifying a road user.
Operating components (For illustrations see fold-out pages) Figure A: Light sensor for controlling exposure Camera head Loudspeaker Camera head mounting Connection panel Camera base Microphone Red operating LED Focus ring for manual focusing Camera lens Infrared LEDs GB Figure B: Yellow control LED for the network connection Threaded connection for the Wi-Fi antenna Contact for power supply from the mains adapter Alarm connection (IN/OUT) LAN connection AUDIO output Figure C: Thread for attaching the moun
Setting up and connecting DANGER During the first use of the device there is a risk of injury and/or damage to property! To avoid risks, observe the following safety instructions: ► Please follow the instructions regarding the electrical connection of the device to avoid damage to property. GB Package contents and transport inspection Please check the contents of the package (see fold-out pages).
NOTE ► If possible, keep the original packaging of the device for the warranty period so that the device can be packed properly for return shipment in the event of a warranty claim. Set-up location requirements For safe and trouble-free operation of the device, the set-up location must fulfil the following requirements: ■ Set up the device on a firm, flat and horizontal surface. GB ■ The surfaces of some items of furniture might contain components that can corrode and soften the rubber pads of the device.
Power supply ♦ Use only the supplied mains adapter to operate the device. ♦ Push the plug of the mains adapter cable into the power supply socket . Then plug the mains adapter into a properly connected power socket that supplies the voltage specified in the technical data.
Handling and operation This section provides important information about proper handling and operation of the device. The basic function of the surveillance camera is to provide video images via an IP network. Highquality (VGA and QVGA) real-time video images are transmitted at a rate of up to 25 frames per second via the LAN/Wi-Fi network. Compression technology using H.264/JPEG hardware is used. GB The functions of the surveillance camera are based on the TCP/IP standard network protocol.
Before use Around 30 seconds after the power supply is switched on, the camera carries out a self-test and completes a movement covering its entire horizontal and vertical panning range. Afterwards, the device is ready for use. If the device has recognised a wired network connection, the yellow control LED flashes rapidly. NOTE ► For the first configuration, the camera must be connected via the LAN connection.
2) The program finds the camera and when you click on the device name "IPCAM", the relevant network information appears: GB The network configuration of the surveillance camera is carried out automatically if the "Auto" option is activated and the router is in DHCP mode. If the camera does not appear on the list, you can refresh the list by clicking on the "Find" button. Here, we strongly recommend that you retain the suggested parameters.
3) Click "Others" to open the page for advanced options. GB The number of the current camera firmware is displayed on the right. In the line below, you can read the MAC address of the current network connection. If you would like to update the software, click on "Upgrade" and, following authentication (account: admin, password: no entry, OK) click on the folder symbol to find the file with which you want to update either the browser-based control software ( ) or the firmware for your surveillance camera ( ).
1) To display the camera image in the browser, double-click on the device name in the list on the left or click on the button on the right in the camera information page "General". Sign yourself into the browser for the address disclosure using the user name "admin" without any password. If Internet Explorer 11 is set up as your default browser, the following Windows query should appear: GB 2) Select the desired language: 3) Then click on "Plug-in download" to install a required plug-in. Click on "Save".
4) If you want to save videos and stills on your computer via Internet Explorer 11, you must first configure the Internet options as follows: Click on the settings symbol in the upper right-hand corner and then on "Internet Options". GB 5) Click on the "Security" tab, select "Trusted sites" and then click on the "Sites" button: 6) In the next window, you have the option to add the camera address to your trusted zone. Uncheck the box "Server verification", click on "Add", then on "Close" and finally "OK".
7) To make the connection to your camera, click on "Internet Explorer mode". The following browser window appears: GB Meaning of the control buttons and fields The following is a list of the meanings of the control buttons on the left side. Horizontal ( / )/vertical ( / ) axis control and diagonal panning ( ). Click briefly on one of the buttons to make the camera pan in the corresponding direction.
Mode Here you can set the interlace frequency to reduce image flicker. 50 or 60 Hz are available. Resolution In this control field, you can switch the image resolution between VGA (640 x 480 pixels) and QVGA (320 x 240 pixels). Frame rate You can use this control field to set the frame rate per second from 1–25 images. The higher the number, the smoother the motion. GB PT speed This sets the speed with which the servomotors carry out the tilt and pan movements.
NOTE ► If you double-click on one of the tiles, this image will then be displayed by itself. If you double-click on an image that is being displayed on its own, the image will then be shown full-screen. You can return to the original display with a second double-click. −> If you click this button, the audio signals picked up by the microphone will be played back via the computer’s speakers. When the "Audio" function is activated, this button is shown in orange.
Configuration via the browser interface NOTE The following applies to all the menus described below: ► To apply the settings you have made to the camera, click on "Set". The screen content flashes once as confirmation. To reload the data stored in the camera back on the browser page, click "Refresh". ► After some entries, the camera will restart. A countdown appears on the screen showing the number of seconds until the restart.
Date & time settings GB Under the menu item "NTP Server" you can set the time zone in which the camera is being operated. If you have checked the box "Synchronise with NTP server time", you can select a time server under the option "NTP server", which will set the current time. Click on "Synchronise with PC time" to synchronise the camera’s time setting with that of the computer. Video saving-path Click on "Browse" to set the location where you want to save the videos captured by the camera.
The "Alarm settings" page Alarm settings GB If you check the box "Alarm triggered by motion detection", the content of the window will change. Now you can adjust the motion detection sensitivity for the alarm ("High", "Medium" or "Low"). If you check the box "Alarm triggered by audio detector", the alarm can be triggered by an audio signal recorded on the camera.
If you check the box "Ring external siren on alarm", an additional line ("Output level") appears. Here you can set the threshold to "High" or "Low" in the selection box. Check the box "Alarm mail notification" if you want the device to send an e-mail when the alarm is triggered. If you check the box "Upload image when the alarm is triggered", an additional line appears "Upload intervall (seconds)". Here you can set the intervals at which an image is to be uploaded.
If the e-mail is to be sent with authentication, check the box "Needs authentication". Then the additional lines "Sender’s account" and "Account password" appear. Enter the required SMTP information of your e-mail provider here. Enter the required encryption method under "SSL": SSL, TLS or NONE an unencrypted e-mail connection. Enter the e-mail addresses of up to four recipients in the fields "Receiver 1–4". After you have made your entries, you can test the e-mail function by clicking the "Test" button.
The "Network" page Network settings GB If you want the router to automatically assign the camera an IP number, check the box "Obtain IP address from DHCP server" and then click on "Set". After this, the device will restart. A countdown appears on the screen showing the time until the restart. Never disconnect the device from the power supply during this time because otherwise, it might be damaged irreparably.
WiFi settings GB To link the surveillance camera to a wireless network, click on "Scan". All available Wi-Fi networks within range will be shown in the field "Wi-Fi list". At the same time, the menu item "Use Wi-Fi" is checked. Click on the name of the Wi-Fi network in the "SSID" column that you want to connect to. On the right of the name, the MAC address and the reception strength of the Wi-Fi network is displayed.
The "User settings" page Multi device settings GB In this menu, you can rename individual cameras in the network and assign user access. ■ Start by clicking on the "Refresh" button at the top to display the list of available cameras. ■ Click on the word "Device" on the desired table entry in the lower device list and an additional table pops up: ■ Then, in the upper device list, click on the name of the camera that you want to assign. The required information is added automatically.
User account settings Here you can change the sign-in name of the administrator and assign a password (by default no password is set). In addition, you can set up an account with name and password for another user, who may view the camera images but who cannot control any functions. To log on with these new data, you must restart the browser. Maintenance Click on "Maintenance" in the left navigation pane to open the "Maintenance" page.
Operating differences when using the smartphone preview If you click on "Smartphone mode" when you start the browser, the web interface is displayed in a much simplified form: GB Click on one of the four direction buttons to move the camera head a little in the desired direction. Displaying the camera image on a smartphone You can control the surveillance camera via a smartphone and also display the camera image on the smartphone if both devices are logged on to the same Wi-Fi network.
Controlling the camera via smartphone NOTE ► The functions shown here are from the Android app. There may be slight differences compared to the use of Apple devices. If you touch the display while a camera image is being shown, the following control icons appear at the top and bottom frame of the screen. GB NOTE ► Depending on the size of the smartphone display, you may need to move the lower icon list from side to side to access all of the control icons.
−> Tap this icon to save the stream from the camera as a video on the smartphone. During the recording, "Recording" appears in the upper right of the display. When the function is activated, the symbol lights up red. Tap the icon again to stop the recording. NOTE ► If your default video player cannot play the files, you may install other players. For example: „MX Player“. GB 116 −> Tap this icon to switch the yellow LAN LED vated, the symbol lights up red. on or off.
Central monitoring via special software You can install the supplied software "IUK Viewer" to view images from up to 64 cameras at the same time. Insert the supplied CD into the disk drive of the Windows® computer with which you want to operate your camera. Open the drive in Explorer and double-click on the file "IUK Viewer_Setup". This starts the installation program for the central monitoring software.
▯ Settings System settings If you click in the menu on "Settings" => "System settings", the following window opens: GB NOTE ► The configuration options available via the software "IUK Viewer" correspond almost exactly to those that have already been described for the web interface. Therefore, they will not be described here again in detail. Configure the displayed parameters as required. Afterwards, click on the "OK" button.
Device settings If you click in the menu on "Settings" => "Device settings", the following window opens: GB All recognised cameras in the network are listed here. If you do not see all the cameras as expected, click on "Searching Page" to carry out another search for cameras. The following sub-window appears. Click on "Searching". The names and parameters of the available cameras in the network will appear in the list.
If you select an entry in the device list by mouse click and subsequently click on "Modify", you can edit the parameters of the selected camera by manually entering the connection details. GB After making your entries, click on "OK" to close the window. Mark the entry in the device list with a mouse click and click on "Delete" if you want to delete the selected camera from the device list. Confirm the subsequent confirmation prompt by clicking on "OK" to close the window.
Screen If you click on "Screen" in the main window, a menu opens via which you can select the desired number of the screen tiles. The maximum number of tiles that can be displayed is 64. You can assign a separate camera image to each tile by dragging a camera from the camera list on the lower left of the main window onto the desired tile. If you double-click on one of the tiles, this image will then be displayed full screen.
Cleaning CAUTION Damage to the device! ► To avoid irreparable damage to the device, ensure that no moisture gets into it during cleaning. ■ Clean the surfaces of the device with a soft, dry cloth. Use a normal commercial detergent and a little water to remove stubborn residue. Ensure that no water gets into the device. GB Storage / Disposal Storage If you plan not to use the device for an extended period, store it in a clean, dry place away from direct sunlight.
Fault causes and rectification The following table will help to identify and rectify minor malfunctions: Malfunction Possible cause Remedy The camera does not work. Power supply interrupted. Plug the supplied mains adapter into a power outlet and connect the plug of the adapter cable into the power supply socket . Network connection faulty. Start the "Search Tool" software on the supplied CD to set up the connection between the camera and the computer.
Appendix Notes on the Declaration of Conformity This device complies with the basic requirements and other relevant provisions of the Electromagnetic Compatibility Directive 2004/108/EC and the RoHS Directive 2011/65/EU. The complete Declaration of Compliance, in its original form, is available from the importer. GB Technical data IP surveillance camera Operating voltage Current consumption Sensor Resolution Wi-Fi standard Working frequency Max. video frame rate 5V via the supplied mains adapter 2A 0.
Mains adapter Type MW6FU21NGS Manufacturer Minwa Electronics Co., Ltd. Input voltage 100–240 V ~, 50/60 Hz Current consumption 0.26 A Output voltage 5V Output current Protection class GB 2100 mA |10.5 VA (max) II / Warranty You are granted a 3-year warranty on this device, valid from the date of purchase. This device has been manufactured with care and inspected meticulously prior to delivery. Please retain your receipt as proof of purchase.
Service Service Great Britain Tel.: 0871 5000 720 (£ 0.10/Min.) E-Mail: kompernass@lidl.co.uk IAN 48807 Hotline availability: Monday to Friday 08:00 - 20:00 (CET) GB Importer KOMPERNASS HANDELS GMBH BURGSTRASSE 21 44867 BOCHUM GERMANY www.kompernass.
KOMPERNASS HANDELS GMBH BURGSTRASSE 21 44867 BOCHUM DEUTSCHLAND / GERMANY www.kompernass.com Version des informations · Stand der Informationen Last Information Update: 04 / 2015 Ident.-No.