Instruction Manual MANSECURE01 REV-A 23/07/13 Motion Activated Security Camera SILVAN AUSTRALIA PTY. LTD. ABN 48 099 851 144 VICTORIA (HEAD OFFICE) NEW ZEALAND 244- 264 Greens Rd, Dandenong South, 3175 Australia Telephone: +61 (03) 9215 2700 Facsimile: +61 (03) 9215 2701 www.silvan.com.au Te Rapa, Hamilton, 2001 New Zealand 22 Sunshine Avenue Telephone: +64 (07) 8496030 Fax: +64 (07) 8496070 www.silvannz.co.
New Product Warranty Silvan Warranty Our goods come with guarantees that cannot be excluded under the Australian Consumer Law. You are entitled to a replacement or refund for a major failure and for compensation for any other reasonably foreseeable loss or damage. You are also entitled to have the goods repaired or replaced if the goods fail to be of acceptable quality and the failure does not amount to a major failure.
Table of Contents General Information 1.1 Introduction 1.2 Application 1.3 Illustration Quick Start 2.1 Load Batteries 2.2 Insert SD Card 2.3 Enter Test Mode 2.4 Enter Live Mode Advanced Settings 3.1 Parameter Settings 3.2 File Format 3.3 Review Pictures or Video Appendix Technical Specifications Appendix Instruction on Installing Additional Battery Box General Information 1.
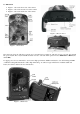
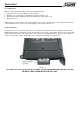
1.3 Illustration Figure 1.1 shows the front view of the camera Figure 1.2 shows the bottom view of the camera Figure 1.3 shows the back view of the camera Figure 1.2: Bottom View-1 Figure 1.1: Front View Figure 1.2: Bottom View-2 The camera provides the following connections for external devices: USB port, SD card slot, TV out jack, and external DC power in jack. The 3-way Power/Mode Switch is used to select the main operation modes: OFF, ON and TEST (Also called SET).
Quick Start 2.1 Load Batteries Begin by loading the batteries. Please follow the instructions below. Open the bottom cover by pulling down the lock hole. Push the cover of the battery compartment and release. It will pop out. Install 4 AA batteries. Make sure the polarity matches the sign on the cover. Replace the cover. Alternatively the camera can run on an external 6V DC power source (optional, user provided).
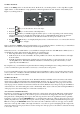
2.3 Enter Test mode Switch to the TEST position to enter the Test mode. In this mode you can take pictures or video clips like a regular digital camera, or enter the Menu to set up parameters. On the keypad there are four “shortcut” functional keys (see Figure 2-1) working as below: Figure 2.1 Press the key to set the camera to shoot video clips. Press the key to set the camera to take still pictures. Press the SHOT key to manually trigger the shutter.
If the moving object continually enters into the area of the main sensor, the camera takes pictures immediately, therefore catching the whole body of the game. This split-second process could be as short as 0.2 second.
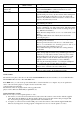
Parameter Date Stamp (affects still photos only) Timer Switch Settings (Bold = default) On, Off Off, On Password Set Off, On Serial No. Off, On Time Lapse Off, On Side PIR On, Off Audio On,Off Default Set Description Select On if you want the date & time imprinted in every photo. Note: When Date/Time is additional details are recorded including Serial No. and temperature. Select On if you only want the camera to work within a specified time period every day.
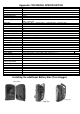
Appendix: TECHNICAL SPECIFICATION Model Image Sensor Lens IR Flash LCD Screen Operation Keypad Memory Compatibility Picture Size (pixels) Video Size PIR (Motion) Sensitivity PIR Sensing Distance PIR (Motion) Sensors Central PIR Sensing angle Side PIR Sensing Angle Operation Mode Trigger Time Trigger Interval Photo Playback Zoom Time Stamp Timer Password Device Serial No.