
User`s guide


C8051F34x-DK
6 Rev. 0.1
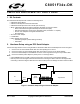
6.3. Universal Serial Bus (USB) Application Example
The included USB application example requires Windows 98SE/2000/XP operating system. This example consists
of three parts: firmware running on the C8051F340 device, a USB device driver running on the host PC, and a host
application. The host application communicates with the C8051F340 via USB, allowing the user to view and to
change the state of several I/O peripherals on the C8051F340 target board. The example files can be found in the
“SiLabs\MCU\Examples\C8051F34x\C\USB_INT” directory. Located in this directory is the project file for the
firmware, the USB driver files, and the host application executable. In addition, three subdirectories are provided
that contain the source code for each part of the example application; Host Application Source, Driver Source, and
Firmware. Use the following instructions to set up the example USB firmware, install the USB driver, and then run
the example host application.
After the target board is connected to the host computer via USB, the example application enumerates and sends
data between the target and the host application using Endpoint 0, 1, and 2. The Endpoint 0 packets are control
packets as defined in Chapter 9 of the Universal Serial Bus Specification, version 2.0. Endpoints 1 and 2 are used
for data IN and OUT, respectively. These data packets consist of 8 bytes used to denote the current status of the
buttons, LEDs, Potentiometer, and logic levels of various port pins on the target board. Accessing the USB core
(i.e., accessing the USB registers and moving data to and from the Endpoint FIFOs on the target board) is
documented in Silicon Laboratories’ C8051F34x datasheet.
6.3.1. Setting-up the Firmware
1. Set up the hardware on the C8051F340 target board according to the instructions in Section 2 or
Section 3.
2. Create a project using the following steps.
a. Open the Silicon Laboratories IDE.
b. Click on the Project->Open Project... option in the IDE menus.
c. Answer No to the following message:
Not all project windows can be restored if not connected.
Do you want to connect now?
d. Select the USB__Int.wsp project, located by default in the SiLabs\MCU\Exam-
ples\C8051F34x\C\USB_INT directory, and click the Open button.
e. Click the Build/Make Project button in the IDE toolbar.
f. The project should now be compiled and linked successfully, with no errors.
g. Connect to the device by clicking the Connect button on the IDE toolbar.
h. Download the project to the target by clicking the
Download Code
button in the IDE toolbar.
3. Begin program execution on the target by either of the following methods:
a. Click the Go button in the IDE toolbar.
b. Disconnect the IDE from the device by pressing the Disconnect button on the toolbar. Next, press
the Reset button on the C8051F340 target board.