
Installation guide


2
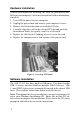
Hardware Installation
General instructions for installing the card are provided below.
Refer to your computer’s reference manual for further information,
if needed.
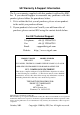
1. Turn OFF the power to your computer.
2. Unplug the power cord and remove your computer's cover.
3. Remove the slot bracket from an available PCI slot.
4. Carefully align the card to the selected PCI slot and push the
board down firmly, but gently, until it is well seated.
5. Replace the slot bracket's holding screw to secure the card.
6. Replace the computer cover and reconnect the power cord.
Figure 1. Inserting PCI Board
Software Installation
The USB 2.0 PCI has three built-in USB hosts. Two hosts handle
USB 1.1 devices and the third host handles USB 2.0 devices. USB
1.1 and USB 2.0 devices are automatically routed to the correct USB
hosts. Please follow instructions below to install drivers.
Note: Throughout the driver installation, you may be prompted to
insert your Windows Installation CD. Some files on this CD are
neccessary to complete the installation. Please insert the CD when
prompted and follow the on-screen instructions.