Aluminum Mini DisplayPort 1.2 to VGA Adapter Converter Installation Guide Introduction The Aluminum Mini DisplayPort 1.2 to VGA Adapter Converter converts Mini DisplayPort equipped computers and mobile devices to work with VGA display devices. System Requirements • PC's or mobile devices with an available Mini DisplayPort connector LOT Number Sticker For future product return or exchange, this number is required. Please keep it for your reference.
Key Features and Benefits • • • • • Convert your desktop's, notebook's or tablet's Mini DisplayPort connector to VGA to use with a VGA monitor or VGA projector Compliant with Mini DisplayPort specification v1.2 Supports VESA and CEA timing standards up to 1920x1200 @ 60Hz Supports Auto Power Saving mode and low stand-by current Power consumption: 230mA at 1920x1200 Package Contents • • 2 Aluminum Mini DisplayPort 1.
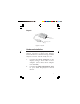
Layout VGA connector Mini DisplayPort plug Figure 1: Layout Hardware Installation The Aluminum Mini DisplayPort 1.2 to VGA Adapter Converter is driver free. Simply follow the device connection steps and the Adapter Converter will be ready for use. 1. 2. Connect the VGA connector to the display using a VGA cable or VGA adapter. (VGA cable/VGA adapter not included) Connect the Mini DisplayPort plug to your Mini DisplayPort source device.
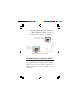
3. Follow Windows Display Properties or Mac Display Utility section to configure your display, if needed. Mini DisplayPort equipped desktop, notebook or tablet VGA display (VGA monitor, VGA projector, etc) VGA cable Figure 2: Hardware Installation Windows Display Properties (WDP) Use the embedded Windows Display Properties (WDP) to change display settings. WDP allows you to rotate, duplicate or extend screens as well as modify screen resolution.
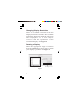
Position the mouse anywhere on the Windows Desktop, For Windows 8 / Windows 7: Right click and select Screen Resolution. For Windows Vista / Server 2008: Right click and select Personalize, then click Display Settings. For Windows XP / Server 2003: Right click then select Properties. At the Display Properties window, select Settings tab. Figure 3: Windows Display Properties Note: The available WDP functions may be slightly different under different Windows OSes.
• • • • 6 Display: Use the drop down list to select a display to be configured. Resolution: Use the drop down list and move the slider to choose a resolution. Orientation: Landscape - Sets the display to landscape mode. Portrait - Sets the display to portrait mode. Landscape (flipped) - Sets the display to upside down landscape mode. Portrait (flipped) - Sets the display to upside down portrait mode. Multiple displays: Duplicates these displays - Duplicates the main display onto the second display.
• • Shows Desktop only on 2 - The desktop appears on the display marked 2. The display marked 1 becomes blank. Make this my main display: Check the box and you will make your Aluminum Mini DisplayPort 1.2 to VGA Adapter Converter the main display adapter in the system (make sure the secondary monitor is selected before choosing this option). Display Positions: To move the position of a display, click and hold the display you wish to move then drag it to the desired position.
Changing Display Resolution Select an available resolution from the Display Preferences window. The available resolutions depend on both the Aluminum Mini DisplayPort 1.2 to VGA Adapter Converter and the capabilities of the connected display. See Figure 4. Rotating a Display Select the appropriate angle of rotation from the Rotate drop down list to match your display's position. See Figure 4.
Mirror/Extend Mode Check Mirror Displays box on the Arrangement pane to enable mirror mode. Uncheck the box to set the displays to extend mode. See Figure 5. Changing the Main Display As shown in Figure 5, you can select the main display by moving the Menu Bar between displays. Changing the main display affects where new windows appear and the position of the Dock. Change the main display by simply dragging the white Menu Bar between the displays.
Eyefinity Mode Users are allowed to connect three to six multiple displays to one graphic card if their system comes with an AMD graphic card which supports Eyefinity mode. Configure Eyefinity mode from Catalyst Control Center/ Multi-Displays/Create Eyefinity Display Group. Refer to the AMD user's manual or AMD website for more details.
Technical Support and Warranty QUESTIONS? SIIG’ s Online Support has answers! Simply visit our web site at www.siig.com and click Support. Answers to your questions could be just a few clicks away. You can also submit questions online and a technical support analyst will promptly respond. SIIG offers a 3-year manufacturer warranty with this product.
About SIIG, Inc. Founded in 1985, SIIG, Inc. is a leading manufacturer of IT connectivity solutions (including Serial ATA and Ultra ATA Controllers, FireWire, USB, and legacy I/O adapters) that bridge the connection between Desktop/Notebook systems and external peripherals. SIIG continues to grow by adding A/V and Digital Signage connectivity solutions to our extensive portfolio.