
User`s manual


16
3.4 Build VxWorks and Boot ROM Images
1. Make sure the Tornado Registry is running. You should see its icon in the Windows tray on the taskbar.
If not, start it manually from the Start→
→→
→Programs→
→→
→Tornado2→
→→
→Registry shortcut.
2. Start Tornado 2 from the start menu at Start→
→→
→Programs→
→→
→Tornado2→
→→
→Tornado
3. The “Create Project in New/Existing Workspace” dialog window should appear upon startup. If it does
not appear, select “New Project” from the “F
ile” menu.
4. In the “New” tab, select “Create a bootable VxWorks image (custom configured)” and click the
“OK” button.
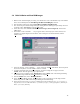
5. The window “Create a bootable… …step 1” appears. Here, enter the project’s name, location, and
workspace. A sample diagram is shown below. After entering the relevant information, click the
“N
ext>” button.
6. In the next window, “Create a bootable… …step2,” Select the “A BS
P” radio button. In the drop-down
list, choose “KeyWest”. Click the “N
ext>” button to continue.
7. A window will appear with your current selections. To finish creating the new project, click the
“F
inish” button. This will generate project dependencies.
8. When the process is complete, select “R
ebuild All” from the “Build” menu. This will begin building
the VxWorks image, which may take a few minutes to complete.
9. From the “B
uild” menu, select “Build Boot ROM…”
10. In the “Build Boot ROM” window, select “KeyWest”. Select “bootrom.hex” as the image to build.
When ready, click the “OK” button to begin building the boot ROM image.
11. If one does not exist, create a “release” subdirectory in the root directory (ex. “C:\release\”).
Copy the bootrom.hex file from the C:\tornado\target\config\KeyWest\ directory to
this C:\release\ directory.