
User`s manual


14
Section 3 Quick Start Guide (VxWorks)
The following information gives guidelines and suggestions for the setup of the SH7751 HARP when using
the Wind River Tornado tools. The Wind River Tornado User’s Guide was used as a guide for some of the
explanation and can be referenced for a more complete guide for the installation.
3.1 Installing Tornado 2 on a Windows Host PC
There are a number of ways to set up Tornado 2 with the different platforms. This section will discuss the
Windows environment. Before beginning the installation, you should have administrative privileges on the
host PC. Without administrative privileges, you will not be able to install Tornado 2 for all users.
1. Insert the Tornado 2 CD-ROM into the Host PC’s CD-ROM drive.
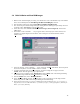
2. The SETUP program should “autorun” and you should see the “Welcome” window. If not, manually
run D:\SETUP, where “D” represents the drive letter of the CD-ROM drive.
3. At the “Welcome” window, click the “N
ext>” button to continue.
4. The “README.TXT” document is displayed. After reading the latest release notes, click the “N
ext>”
button.
5. The “License Agreement” window appears. Read the License Agreement and click the “I A
ccept”
button. Now, you may click the “N
ext>” button to continue.
6. At this point, you may receive a warning if you do not have administrative privileges. You may
continue by clicking the “N
ext>” button or you may cancel the installation by clicking the “Cancel”
button.
7. In the “User Registration” window, enter the appropriate information for the “Name,” “Company,” and
“Key” fields. The “Key” field refers to the CD-key that came with that particular disc. Take care when
entering the key; it is case-sensitive. When all of the fields are complete, click the “N
ext>” button.
8. At the “Installation Options” window, choose a full install by selecting the “Full Install” option. Click
the “N
ext>” button to continue.
9. In the “Project Information” window, enter the name of the project and the number of licensed users in
the appropriate fields. In many cases, these values can be virtually anything. Click the “N
ext>” button.
10. The “Select Directory” window will appear. Here, select a location to install Tornado 2. Enter the
location in the “Destination Director” field. Click the “N
ext>” button to continue. If the selected
directory does not exist, a prompt will appear asking for permission to create it. In this document, we
will assume that the directory is C:\Tornado.
11. In the “Select Products” window, you may select the individual components to be installed. By default,
all ordered products are pre-selected. Make sure that there is an adequate amount of free disk space.
Click the “N
ext>” button to continue.
12. The “Select Folder” window appears. Here, enter the program folder in which SETUP will create
shortcuts to the installed components of Tornado 2. From here, we will assume that the default value,
“Tornado2” is accepted. Click the “N
ext>” button to accept your selection.
13. At the “Tornado Registry” window, select an option that best suits individual needs. Although mostly
unaffected by your choice, the instructions presented here will assume that the Tornado Registry is
installed locally in the startup group. Click the “N
ext>” button to continue.
14. The “Backward Compatibility” window will appear. Select “no” and click the “N
ext>” button to begin
installation. This is the last window before SETUP begins copying files.
15. The file copy procedure may take a significant amount of time to complete. Depending on the size of
your installation and the speed of the host PC, it may take anywhere from several minutes to several
hours to complete.
16. When the procedure is complete, the “Finish” window will appear with a list of successfully installed
components. Click the “OK” button to complete the setup process and close SETUP.