
User`s manual


11
• Data bits: 8
• Parity: None
• Stop bits: 1
• Flow control: None
5. File->Save. Save these settings so that you don’t have to enter them the next time.
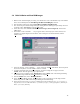
6. Select “Disconnect” and “Connect” on the menu bar to force Hyperterm to use the new
settings.
2.4.2 CESH (Windows CE Parallel Port Download Tool)
1. Install the Windows CE Toolkit. Enable the parallel port download option during the
installation..
2. Set the parallel port mode on the HOST PC to “bi-directional” in the BIOS setup program
(accessed upon system boot).
2.5 Downloading a Windows CE image
The image can be downloaded either through the HDI/E10A (Hitachi emulator) or through the
parallel port. You should have two Windows CE images::
• Nk.bin: Windows CE binary file to be downloaded using the parallel port
• Nk.sre: S-record file that can be downloaded through HDI.
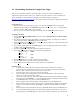
2.5.1 Parallel Download
1. Copy the Windows CE image file nk.bin to the c:\wince\release directory (or whatever
directory you used to install Windows CE)
2. Click on:
a. Start->programs->Windows CE platform builder->SHx tools->Build
Minshell for SH3
This opens up a DOS prompt window with the appropriate environment to
download a Windows CE binary image
b. C:\Wince211> cd release
c. C:\Wince212\release> cesh –s –p cepc
From the serial terminal program type the “load” command (lowercase L) at the prompt:
FW> l
Now you should see the image being downloaded through CESH. Wait until it finishes.
5. The image should start automatically after the download is complete.
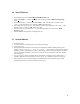
2.6 Running Windows CE
You should see the Windows CE “splash” screen on Key West video display after the platform
has booted up. You can try out the following commands from the Windows CE keyboard:
1. Alt-Tab
2. Click on Run.
3. Click on Browse.
4. Double click on cmd.exe.
3. Click OK.