
User guide

• www.signwarehouse.com • SignWarehouse, Inc. • 2614 Texoma Drive, Denison, TX 75020
•Toll Free Phone: 1-800-899-5655 •Local Phone: 903-462-7700 •Fax: 1-800-966-6834
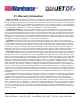
29: Maintenance Station Assembly
The PrismJET DTx uses a fixed-position maintenance station assembly for more con-
sistent printing and ink flow. The maintenance station sits beneath the print head
and is normally covered by the head. During cleaning cycles, the maintenance sta-
tion pulls ink through the bottom of the head and expels it onto the waste ink pad.
29.1
29.2
There is very little regular
maintenance required
for the maintenance sta-
tion assembly, but if a
thorough cleaning of the
bottom of the print head
or a manual flushing of
the head is required, the
maintenance station will
need to be removed. This will require the removal of the right side cover from the
printer and the use of a phillips-head screwdriver with a shaft at least six” long. A
screwdriver with a magnetic tip is recommended but not required.
Removal or Replacement of the maintenance station assembly
1) With the printer turned on and the print head parked on the right hand side of
the platen atop the maintenance station, press the Ink button once. Do not hold it
down. A cleaning cycle is not desired at this point. Your power light should be on
solid, with no other lights lit up on the control panel.
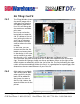
2) The print head will uncap, move leftward, and park under the ink slot indica-
tors. At this point, the print head can be moved manually without damaging the
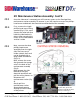
capping station or head. Slide the print head to the left, towards the middle of the
platen, completely exposing the maintenance station (as seen in the illustration
above).
3) Remove the side cover of the printer using a phillips-head screwdriver. There are
four small black screws holding the cover on; two in front and two in back. Remove
these, then pull the cover off and set it aside.
4) Remove the two small phillips-head screws securing the front maintenance door,
then lift the panel and remove it.