
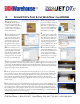
User guide


• www.signwarehouse.com • SignWarehouse, Inc. • 2614 Texoma Drive, Denison, TX 75020
•Toll Free Phone: 1-800-899-5655 •Local Phone: 903-462-7700 •Fax: 1-800-966-6834
PrismJET DTx Print & Cut Workflow: CorelDRAW
18
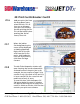
Design your graphic in
CorelDRAW. It’s a good idea to
add a contour around the edge
to support a full bleed decal with
a margin of error. is makes it
easier to produce a decal with no
white border if desired.
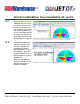
Now open the JetCUT Print
and Cut Queue. You will see the
job pending. ere will be a star
icon next to the job. is indi-
cates that data is needed in order
to nish processing the job. In
this case, the RIP needs to know
how to nd the cutting path.
Once the print job is done, load the media in the vinyl cutter. Be sure to cover the rear optical media
sensor (as shown on page 2). en load the media using the Roll 2 option. Set the cutting conditions and
perform a test cut to ensure proper cutting depth. en use the control panel arrow keys to position the
blade within the area dened by the lower right registration mark and set that as the origin point.
e cut job is holding in the JetCUT Queue. Right-click, then select Cut from the menu and click OK to
send the cut job.
Use the File/Print command
and select the Print and Cut
Queue from the printers menu.
Click on Properties/Advanced
and change the page size to t
the image area. is will place
the registration marks around
the print area and reduce waste.
Adjust the margin in the Print preview to allow room for the registration marks. (You can also access the
Queue properties, click on cutter, then registration marks to set default margins). en send the print job
to the printer. e PrismJET DTx will print the job and add the Graphtec registration marks. If you fail to
leave enough room at the sides of the print for the cutter’s pinch rollers, you can widen the print media by
taping a sheet of white vinyl to the printed sheet.
e vinyl cutter will now automatically nd the printed registration marks. Once the marks have been
scanned, the cutter will begin processing the cut job along the path designed in the CorelDRAW le. Once
the cutting job is done, simply weed the vinyl and apply your contour-cut decal. (Larger graphics may re-
quire transfer tape for easier application). In this case, we have a professional quality label for a wine bottle
from your local vineyard (seen at right). You may also use the CorelDRAW plug-in to send les directly to
the Queue as discussed in section 5.2 on page 19.
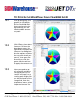
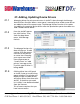
e cutting path needs to
have certain attributes in order for
JetCUT to read and process it.
Make the line weight hairline and
set the color with a CMYK value
of 99/99/99/99 as indicated in
the illustration at the right.
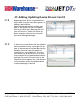
Check Enable Cut Processes
and check the Meld Boxes in the
Cut Stroke Setup Window. Now
you are ready to print and cut
the job using the same workow
outlined in steps 9 - 24 on pages
one and two of this tutorial.
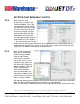
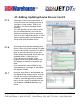
When you click the star, the
Cut Stroke Setup window pops
up showing all the vector paths
in the le. You are asked to iden-
tify the one that will be used as a
cutting path. Select the one with
the 99/99/99/99 CMYK value.
1
3
5
7
8
9
4
6
2