
User guide


• www.signwarehouse.com • SignWarehouse, Inc. • 2614 Texoma Drive, Denison, TX 75020
•Toll Free Phone: 1-800-899-5655 •Local Phone: 903-462-7700 •Fax: 1-800-966-6834
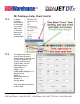
PrismJET DTx Print & Cut Workflow: Photoshop
17
To send an image directly
from PhotoShop to the Jet-
CUT print and cut Queue, you
must ensure that there is vector
information in the PhotoShop
document that can be processed
as a cutting path.
Once the new path is se-
lected, you can rene it using the
Direct Select tool. is elimi-
nates unwanted noise in the arcs
producing precisely cut decals.
Once all the paths are as you
want them to be cut, you’re ready
to send the le to JetCUT.
Save your .PSD le. en
open your JetCUT Print and
Cut Queue. Use the File/Import
function, or click the green “+”
icon in the upper le corner.
Browse to the le and click
“Open” to add it to the Queue.
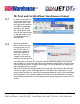
To use several shape tools in
this manner, place them in your
image and make sure they all
have the same ll color. en
merge the layers. Use the magic
wand to select the pixels. en
open the Paths window and con-
vert the selection to a path.
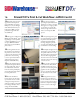
You can also convert a selec-
tion to a path using the magic
wand. Use the magic wand to
select the background pixels.
Click Shi-Control-I to select
the image, then right click and
select Make Work Path.
From here, proceed from Step 9 on page one to complete the print and cut process. Once printed and cut, the le can be stored in the Jet-
CUT Queue to be reproduced at a later date without having to import or re-RIP the PSD le. You may also send the completed le directly to
the JetCUT queue by using the PhotoShop plug-in as discussed in section 5.3 on page 20.
ere are two ways to add
vector data to a .PSD le. e
rst is to use the shape tools (i.e.
ellipse). For instance, adding
shapes to an image can add the
cutting paths needed to turn it
into a custom license plate blank.
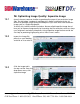
Once the selection has been
converted to a path, use the
Direct Select tool to adjust the
vectors and ne tune the path
to your desired contour. For a
full bleed decal with a choke,
remember to position it slightly
inside the printed area.
e import paths window
will popup indicating that vector
data has been found. Check the
“process as cutting path” box to
import the le and use the path
as the vector data. is will dene
the path cut by the plotter.
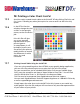
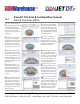
To create an image with a more
complex cut path (i.e. placing a
cut path around a specic part of
an image), begin by selecting the
area. en open the Paths win-
dow and click the “Make work
path from selection” button.
When you choose “make
work path” you will be asked to
choose a threshold. e smaller
the numerical value, the more
tightly the path will follow the
outline of the pixels. For precise
contours, choose 1.0 or lower.
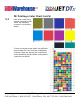
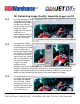
ese custom license plate blanks were designed in PhotoShop using shape tools to create the cutting paths
1
3
5
7
9
11
4
6
8
10
2