
User guide


• www.signwarehouse.com • SignWarehouse, Inc. • 2614 Texoma Drive, Denison, TX 75020
•Toll Free Phone: 1-800-899-5655 •Local Phone: 903-462-7700 •Fax: 1-800-966-6834
Right click on the job in the
Queue. From the drop down
menu, click Print to begin the
RIP process. (Or you can right
click and Press Alt+P on your
keyboard). To RIP a job to be
printed later, right click and
select RIP only
Once the Queue begins
processing the job, e status bar
will show it as “Active”. Once this
has begun, it is no longer possible
to reposition or re-size the le
unless you right-click and select
“Abort” to interrupt the RIP
process.
11 12
PrismJET DTx Print & Cut Workflow: JetPRO Cont’d
If the Queue is congured to
RIP & print immediately, print-
ing will begin as soon as JetCut
completes the RIP process. You
can opt to RIP les and hold
them in the Queue, but RIP &
print is faster.
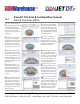
To simplify cutting the sheet
of vinyl, place a piece of vinyl over
the optical media sensor on the
back of the platen . is prevents
the cutter from stopping when
the sensor is uncovered. You will
load a sheet, but set the cutter up
to feed it as a roll.
Cut along the blue dotted
line and remove the print from
the printer. You are now ready
to place it in the vinyl cutter and
perform the contour cutting
to create a peel and stick decal.
(ese instructions are for a
Graphtec Cra ROBO Pro).
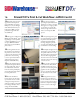
Press the Conditions
button, then use the le, right,
up, and down arrows to set the
cutting force and speed. Force
will vary according to the media.
For cutting 3 mil vinyl, a Force
setting of 12 should suce.
Once printing is done, press
the media feed button to advance
the print forward. e printer
will add a dotted line behind
the image designed to provide
enough room behind the registra-
tion marks for contour cutting.
ere are three options in the
load media menu: Sheet, Roll 1,
and Roll 2. Roll 2 is the easiest
option for contour cutting small
graphics. Use the up and down
arrows to select Roll 2. en press
the enter button on the control
panel.
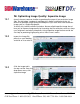
Place the vinyl in the plotter
and position the pinch rollers at
the edges of the vinyl. To clear
the “Load media” command
from the control panel display,
raise the black bar in the back to
lower the pinch rollers.
Always perform a test cut
rst. Press the enter button to
save the conditions, use the arrow
keys to move the cutter head to a
blank area, and press the Origin
button to set that as the origin
point.
13
15
17
19
16
18
20
14
16.