
User guide


• www.signwarehouse.com • SignWarehouse, Inc. • 2614 Texoma Drive, Denison, TX 75020
•Toll Free Phone: 1-800-899-5655 •Local Phone: 903-462-7700 •Fax: 1-800-966-6834
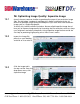
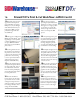
Print & Cut from JetPro:
JetCUT loads in a new win-
dow. If you have more than one
Queue setup, you may have to
click the tab for your print and
cut Queue to see the pending
job. You should see a job preview
with registration marks around
the printed image.
You can click the job in the
Preview area to reposition or
re-size it. Click and drag it to the
right to create more space for the
pinch rollers. You can also re-size
by using the arrows or typing in
specic sizes in the lower right
window of the Preview area.
Click the OK button to ex-
tract the bitmap. A box appears
around the image. Click in an
empty area of the workspace to
remove this. You should see a
dotted line indicating the new
cut path.
Select the image and choose
File/Print and Cut from the top
menu. e Print and Cut win-
dow pops up. Here you will select
or setup the print and cut Queue.
If it is already setup, choose it
and click OK to open the Queue.
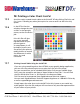
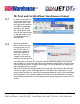
To turn a raster image into a
“contour-cut” decal, begin by
selecting Cut from the top menu
bar. en, from the drop-down
menu, click on Contour Cut.
e Contour Cut tool bar will
appear at the top of your screen.
To make a rectangular cut
around the image, check the
Bitmap Frame box. To extract
the image from the surrounding
white space, leave the Bitmap
Frame box un-checked.
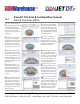
e Oset window sets the
distance between the extracted
image and the contour cut path.
A value of 0.25 will add a 1/4”
border around the print. A nega-
tive number will place the cut
path inside the printed area for a
full bleed decal.
Click the Apply button. e
Monochrome Filter window
shows a sliding reshold bar on
a scale from 0 to 255. e higher
the number, the closer to white
the deleted space will be. To re-
move a white background, select
a reshold value of 253.
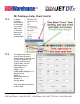
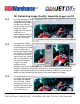
To create a decal using an ex-
isting image, begin by importing
it into the JetPro workspace
(or GUI) using the File/Import
feature to browse to the le’s
location on your computer and
click Import.
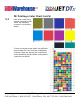
Once you’ve selected the le,
a corner shaped cursor will help
you place the image where you
want it on the GUI. If the image
has an embedded ICC Prole, it
is recommended that you switch
to the default prole.
PrismJET DTx Print & Cut Workflow Tutorial
1
3
5
7
9
4
6
8
10
2
16.1