
User guide


• www.signwarehouse.com • SignWarehouse, Inc. • 2614 Texoma Drive, Denison, TX 75020
•Toll Free Phone: 1-800-899-5655 •Local Phone: 903-462-7700 •Fax: 1-800-966-6834
3: Production Queue Setup, cont’d.
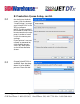
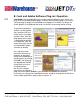
NOTE: If the Graphtec_USB
or Printer_USB000 port is not
displayed, it is because either
your vinyl cutter is not turned
on, or the USB Cable is not
connected. Click “Back” to go
back to the “Printer Defaults”
screen. Then, turn the cutter
on and connect it to the PC
before returning to the
“Cutter Default” screen.
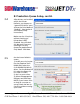
The USB connection for your
printer should now be visible
in the list of ports. (The USB
Driver should have already
been installed before
installing the JETCut soft-
ware.)
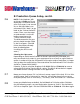
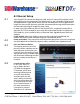
Selecting the right cutter.
3.6
Depending on which level of JetPRO or JetCUT software you purchased, you
may see several vinyl cutters in your setup menu for a cut only or a print and cut
queue. In order to enjoy the full benefits of the print and cut workflow, it’s impor-
tant to select the correct driver. The cutter driver for the EnduraCUT LX is listed in
JetCUT as “Expert 24LX (AASII)”.
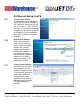
Likewise, if you’re using the Graphtec Craft ROBO PRO or CE6000-40, be sure to
select the HP-GL driver, not the GP-GL variant. The GP-GL driver doesn’t support
the ARMS contour cutting firmware in this application.
Name your Setup Queue. If it is a Print only setup, name it Print Only. If it is a Print
and Cut setup, type in Print and Cut. Later on, you will be shown how to set up
multiple Queues, such as “Print Only”, “Cut Only”, and “Print and Cut”. Click Next.
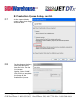
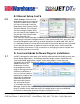
3.7
Leave your Media Setup at default, for Roll Media of 13 inches wide. Click Next.
On the following screen, set your Registration System to “AAS II” for the Endura-
CUT LX or Graphtec Type 1 for the Craft ROBO PRO or CE6000-40. Click Next again.
3.8