PrismJET© DTx Users Manual CONTENTS PAGE NUMBER 1: Quick Start Guide: Unpacking your printer: 1-6 2: Installing the Software: 7 - 10 3: Setting up the Queues 11-15 4: Ethernet Setup 16 - 18 5: Installing Plug-ins 18 - 21 6: Loading & Refilling Ink Cartridges 22 - 25 7: Ink Charge 26 - 27 8: Media (loading, ejecting, changing roll widths) 28 - 29 9: Heater Temperature Controller 30 10: Nozzle Check 31 11: Head Cleaning 32 12: First Print 33 - 39 13: Printing a Swatch Table 40 - 43
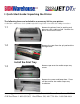
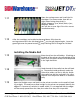
I: Quick-Start Guide: Unpacking the Printer The following items are included in an accessory kit for your printer: • USB Cable • 110V Power Cord • JetPRO 13/JetCUT Setup DVD • User Guide CD • Phillips Screwdriver 1.1 Remove the printer from its packing and place on a flat, stable surface. Remove the plastic film from the cover. 1.2 Remove the tape from the spit pad and the carriage cover. Install the Print Tray 1.3 Remove tape over the media output tray screws. Remove the screws and keep them.
Install the Print Tray cont’d Insert the longer end of the tray into the printer and attach with the screws provided. 1.4 1.5 1.6 Remove the tape from the waste ink drawers located on the back of the printer on the left and right side. Remove the label over the electrical input module. Compare the voltage on the label to the voltage of the location where the printer is being installed. If they match, plug the power cord into the back of the printer and flip the power switch to On.
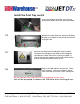
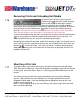
Setting the Heater 1.7 Push the red SET button on the black heater control panel twice. Use the arrows to increase or decrease the temperature to 175°F. Hit SET again. The Enduraink DTx ink works best when the surface temperature of the media is between 140 and 170°F. Setting the temperature at 165-180° is the best way to achieve optimal media surface temperature and drying. Depending on saturation, some prints may need a few minutes to dry before handling or loading in the vinyl cutter for contourcutting.
Open the carriage cover and install the ink cartridges. The correct order, from left to right (when facing the printer) is: Yellow, Magenta, Cyan, Black, Black, Cyan, Magenta, Yellow. You will see an error light if the inks are not installed correctly. 1.11 1.12 After the cartridges are installed and pressed down fully close the carriage cover and hit the ink drop button on the grey keypad again. Once the green light over the power button stops flashing the ink charge has finished.
Removing Prints and Unloading Roll Media 1.16 To remove your roll prints, press the roll media button to feed the media forward, then cut off your printed images straight across the media at the cutting guideline. Pressing the Roll media button to advance the media pauses the printer. To resume printing, press the roll media button again to return the media to printing position.
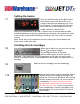
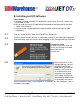
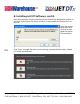
2: Installing JetCUT Software Items needed: A) Already installed: PrismJET DTx USB Drivers (and Cutter Drivers if a cutter was purchased as well) B) Printer and vinyl cutter (if applicable) connected to the computer by the USB Cable and turned On C) Internet Access will be required to download the Software Drivers for your equipment. 2.1 Click on “Install JETCut” from the PrismJET DTx Setup DVD 2.
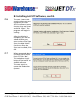
2: Installing JetCUT Software, cont’d. Within Computer, you will see a list of the drives on your system. Within Removable Storage, you will have a drive for CADLINK. Pay attention to the Letter that shows up next to the Drive. This is the LOCATION of your License File. NOTE: In the example below, the CADlink key is designated as Drive H. This is only an example. On your system, this drive letter will probably be different. • www.signwarehouse.com • SignWarehouse, Inc.
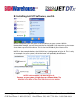
2: Installing JetCUT Software, cont’d. Now that you know the Drive location of your license file, designate that drive as the Path in the Licence File Query window. In the example, the license file is on Drive H. Enter the correct drive letter and Click OK to complete the license file installation. 2.5 Click “Next” through the menus until reaching a Setup Selection screen. Choose Full Install and click Next. • www.signwarehouse.com • SignWarehouse, Inc.
2: Installing JetCUT Software, cont’d. 2.6 The next 2 menus determine where on your computer to install JETCut software. Leave these as they are listed and click “Next”. The program will begin installing. After installation is complete, you will be asked whether you want to have True Type fonts installed. Select Continue. After the fonts are installed, Click OK. 2.7 When prompted about installing Fonts from a Font CD, click “No”. This completes installation of the JetCUT or JetPRO software.
3: Production Queue Setup 3.1 After installing JetPRO or JetCUT, you will be prompted to run First Time Setup. Opt to use the software with the AS IS setting, and click OK. You will be brought to the “Create Queue Wizard” Screen, click next. The Create Queue Wizard will guide you through configuration of the production queues for printing, print and cut decal production and for using your JetPRO or JetCUT software to create vinyl graphics with a vinyl cutter only. • www.signwarehouse.
3: Production Queue Setup, cont’d. 3.2 On the Printer Defaults screen, Click the button “Install Printer” to setup your PrismJET DTx in the JETCut software. NOTE: The Printer MUST be turned On and it must be connected to the computer in order to install it with the correct port settings. If your printer is not connected, or powered on, click the Back button, turn it on, then return to the Printer Defaults Screen. 3.3 Choose PrismJET DTx or JetPRINT from the dropdown list of available printers.
3: Production Queue Setup, cont’d. 3.4 After drivers are installed, within the Printer Defaults, set the port to “generic ESC driver” port, and set the Print Mode to “Default”. (See Section 4 for Ethernet setup instructions). Make sure the “Continue without Setting up” Printer box is NOT Checked. You will check this box only if you are creating a Cut Only Queue for production of vinyl decals. Click Next. 3.5 On the Cutter Defaults screen, 1) Install your vinyl cutter.
3: Production Queue Setup, cont’d. 3.6 NOTE: If the Graphtec_USB or Printer_USB000 port is not displayed, it is because either your vinyl cutter is not turned on, or the USB Cable is not connected. Click “Back” to go back to the “Printer Defaults” screen. Then, turn the cutter on and connect it to the PC before returning to the “Cutter Default” screen. The USB connection for your printer should now be visible in the list of ports.
3: Production Queue Setup, cont’d. 3.7 At the Layout Mode screen, select Auto Page and click Next. 3.8 For the Output Options, select RIP Now print later for Print. For the Cut Output Option, select “Hold”. Click Finish to complete the Setup of the Production Queues. • www.signwarehouse.com • SignWarehouse, Inc.
4: Ethernet Setup 4.1 4.2 Your PrismJET DTx printer has Ethernet, USB, and wi-fi connectivity options. Both USB and Ethernet are supported. The default port in the standard installation and setup documents is USB, which works well for standard print and cut applications. Large files may not RIP correctly with USB. We recommend using the Ethernet port for consistent printing of image files over 15mb. In order to use the Ethernet port on the PrismJET DTx, a separate setup utility is required.
4: Ethernet Setup Cont’d 4.5 Connect to the Printer: The Net Utility will automatically search for the printer via USB or wifi. While it’s searching, you will see this screen. If it fails, it will report that it was unable to connect and give you the option to cancel or try again. It is no uncommon for success to take two or three attempts. 4.6 Record the IP Address: When the printer has been found, it will appear in the list of found devices with its MAC address and IP address.
4: Ethernet Setup Cont’d 4.8 TCP/IP Settings: Click the small drop-down arrow at the right of the port window for the Queue you want to change. From the drop-down menu, choose TCP/IP (network device). This will open the Port settings window. Here you will type in the IP address for the printer. Click the LPR radio button, then click OK. Then close the Queue Manager window and send a nozzle check to make sure the port settings have been changed correctly.
5: Corel and Adobe Software Plug-ins: Operation 5.2 CorelDRAW: The CorelDRAW plug-in can be used two different ways. There is a plug-in for the JetPRO graphic design interface and a separate plug-in for JetCUT. You may begin a design in CorelDRAW and complete it in JetPRO, or design the entire graphic in CorelDRAW and send it to JetCUT for printing and/or cutting. To send your graphic to JetPRO, use the Application launcher. Click the rocket icon in the upper tool bar.
5: Corel and Adobe Software Plug-ins: Operation 5.3 Adobe Photoshop: Although Adobe Photoshop is a bitmap editing platform, it can be used to create both print and print & cut decals. To send a job from Photoshop to the JetCUT RIP, click File/Automate. Then from the Automate flyout menu, select Send to JetCUT. The Send to JetCUT pop-up window will open displaying all of your JetCUT Queues. Select the appropriate queue for the desired workflow (i.e.
5: Corel and Adobe Software Plug-ins: Operation 5.4 Adobe Illustrator: Since Illustrator is a vector design application, it’s easy for Illustrator users to create print and cut graphics for the PrismJET DTx Clicking the Install button in JetCUT (see 5:1, page 18) adds the JetCUT Plug-in to the Adobe Illustrator File menu. Sending job files from Illustrator requires only that you save the file and click File/JetCUT.
6: Refilling Ink Cartridges - “Bulk Ink” System. 6.1 After using the printer for a time, it will be necessary to replace or refill spent ink cartridges. One option is to dispose of the spent cartridge and replace it with a new pre-filled EnduraINK DTx ink cartridge. Another option is to use the 150ml bottles to refill and reuse your ink cartridges. (The Bulk Ink System, includes the bottles and related supplies and is sold separately).
6: Refilling Ink Cartridges - “Bulk Ink” System: Cont’d 6.4 With the print head carriage cover open, you will see all 8 individual cartridges. Press the Cartridge clip at the top of the cartridge to release it from being locked in its place. Then lift the entire cartridge straight up to remove it from the print head. After removing it, you will be able to remove the cartridge plug to open the cartridge up and refill ink. Note: Take care to make sure you put the cartridges back in their correct positions.
6: Refilling Ink Cartridges - “Bulk Ink” System: Cont’d 6.5 Remove the cap from the bottle of ink. If you have not already done so, screw the needle onto the bottom of the syringe. Lower the needle and syringe into the bottle making sure the needle is below the surface of the ink. Carefully pull the plunger of the syringe upward, and draw approximately 17ml into the syringe. After removing the plug from the cartridge, insert the syringe all the way down into the cartridge.
6: Refilling Ink Cartridges - “Bulk Ink” System: Cont’d 6.5 6.6 Place the chip of the ink cartridge into the chip reset tool, making sure the prongs of the reset tool are pressing against the chip. The light indicator of the reset tool will flash green and red. When the light turns solid green, then the chip is reset, and the cartridge is ready to be loaded into the print head again. Note: Do not reinsert the refilled cartridge until the print head is in the Ink fill position.
7: Ink Charge 7.1 As is explained in the Nozzle check section, clogged nozzles can be opened by performing a simple head cleaning from the printer’s control panel or from the JetCUT RIP. However, there are occasions when a more thorough cleaning cycle is needed. This is accomplished by initiating an ink charge. The ink charge is also recommended during setup, right after loading the ink cartridges for their initial use.
7: Ink Charge: Cont’d 7.3 Scroll down to the Maintenance section in the Particular Adjustment Mode window and click on Ink Charge. Then click OK. 7.4 When the Ink Charge window opens, click on the Ink Charge button. A slider will appear displaying the progress of the charge. Once the ink charge is complete, click Finish to exit the program. Since the Ink Charge is most often used to initiate the printer, it requires a full set of cartridges.
8: Loading and Ejecting Media 8.1 8.2 Feed the end of the media into the roll feeder. The media should go directly under the white rollers you see in the slot. If you are behind the printer during loading, align the left edge of the media with the left edge of the media feed slot. Gently guide the media into the slot and hold it for a few seconds until the printer feeds it in automatically. Raise the Plexiglas cover and look into the printer to make sure the media is feeding straight.
8: Loading Media: Custom Roll Widths 8.3 When you open the Queue, the default media size and margins are displayed in the window below the preview pane. The default media width for the PrismJET DTx is 13”, but some PrismJET DTx compatible media is only 12” wide. If you use the 13” preview pane for a narrower roll, you won’t see the correct relationship of your image to the available media size.
9: Heater Temperature Controller 9.1 Push the red SET button on the black heater control panel. Use the arrows to increase or decrease the temperature to 170°F. Hit SET again. To see the current temperature of the heater, press the Set button and Down arrow at the same time. EnduraINK DTx ink works best when the surface temperature of the media is between 113 and 131°F. The best way to achieve this optimal media surface temperature is to set the heater temperature at 165-180°F.
10: Nozzle Check 10.1 Open the JetCUT Print Only queue. Go to Devices>Print Test Page and select the nozzle check file (Nozzle_ Check_19.ps) to print. Select the Default print mode to print the nozzle check file. 10.2 Note: The nozzle check file can only be printed from a Print only Queue. Setup a Print Only Queue for your print jobs and send the nozzle check from there. Trying to print a nozzle check from a Print and Cut queue will result in an error.
11: Head Cleaning: Clogged Nozzles 11.1 There are two ways to run a normal head cleaning. A normal head cleaning pumps small amounts of ink through the head to flush the nozzles. As noted in section 10, most clogs can be cleared with one to five cleaning cycles. Cleaning cycles can be performed through the JetCut RIP software or via the printer’s control panel. 11.
12: First Print 12.1 There are three levels of graphic design and RIP software available for the PrismJET DTx. • JetCUT is RIP software that sends print jobs to the printer and can also send jobs to specific vinyl cutters. It also coordinates the print and cut workflow and can be used with the PrismJET DTx, Graphtec Craft ROBO PRO, or CE6000-40, and Vinyl EXPRESS EnduraCUT LX.
12: First Print: Cont’d 12.3 Within the JETPro software, you will find design tools such as shape, text, fill and stroke tools on the left side of the work area or GUI* . Change the dimensions of your design with the Sizing tools at the top. 12.4 To incorporate existing art into your designs, use the Import tool by clicking File, then choosing Import from the File menu options. Use this tool to import clip art files, web graphics and other design elements into your work.
12: First Print: Cont’d 12.5 Click on the screen to show where in your workspace you want to place the imported file. In this case, we’ve imported the JetPRO splash screen image. 12.6 Some imported image files have embedded ICC profiles. If not, JETPro will ask if you would like to choose a default profile, or choose one from a list. In most cases, the default profile will work fine. 12.7 Once your design is complete, you are ready to send it to the Printer.
12: First Print: Cont’d 12.8 The choice of Queues determines wether the job is printed, cut, or printed and cut. The Print and Cut window will open prompting you to select the correct queue, or setup a new one. For your first print, you should only have one Queue set up, so just choose OK for now. Sending your job to the Queue will launch the JetCUT RIP. NOTE: If you did not purchase JetPRO, you will begin by launching the JetCUT RIP software from your start menu (or desktop shortcut).
12: First Print: Cont’d 12.9 On the JetCUT screen, you will see details of your job on the Left, which Queue tab it is under, and a preview of your job on the right. If you did not use JETPro designing software to bring a job into JetCUT, or no job is listed at this point, you can import a job directly into JetCUT by clicking File/ Import Files. You can also Click on the Green plus sign just under the File menu to import image files.
12: First Print: Cont’d 12.10 JetCUT uses print modes to manage output quality. In order to get the best results, you will need to change this from time to time depending on what media you use. In the job listing on the left, job information is displayed, including the Print Mode. In most cases, it will be set to Default. The Print Mode should be set to match the media being used whenever possible. To change the Print Mode, right-click on the job, and select Properties.
12: First Print: Cont’d 12.11 The status of the job will reflect the Print Mode you selected. Any time you load new material into the printer, you will need to set the Print Mode for that specific media if there is one. Not all media require a unique print mode. JetCUT will retain the most recently used print mode setting until it is changed. 12.12 To send the job to the printer, right click on the job, and select Print from the drop-down menu.
13: Printing a Color Chart 13.1 The PrismJET DTx is a dual CMYK printer. The CMYK gamut is the most widely used in digital printing and is adequate for most print jobs large and small. However, there may be times when a customer’s expectations for specific colors cannot be met in the printed spectrum. And your computer’s monitor uses an RGB color space, which may not quite match the CMYK gamut of the printer.
13: Printing a Color Chart: Cont’d 13.2 To begin resetting your palette or creating a new swatch table, click in the open area to the left of the Swatch table. 13.3 The Page Setup Screen controls how large the swatch table (or color chart) will be. To optimize the quality of the printed swatch table, use the following settings: Page Width: 11 Height: 40 Swatch Width X Height: 1 x 1” Margin Left: 0 Right: 0 Spacing Horizontal: 1 Vertical: .2 Sorting: None Then click OK to create the swatch table. • www.
13: Printing a Color Chart: Cont’d 13.4 Each color swatch has a caption showing its RGB value. You may have to zoom in to see them clearly. To view the entire swatch table, use the Zoom tool to zoom out. This will show all 200 color swatches. There are actually 201 swatches because the default setup includes a transparent swatch next to White. • www.signwarehouse.com • SignWarehouse, Inc.
13: Printing a Color Chart: Cont’d 13.5 Send the newly created Swatch table to the PrismJET DTx by clicking File/ Print and Cut, just as if sending any other job to print. Be sure to send it to the Print Only queue. 13.6 In the JETCut Preview window, change the view to 50% in the top right corner, to view the entire job. Print this file will give you a very accurate representation of your printer’s gamut.
14: Optimizing Image Quality: Supersize Image 14.1 One of the most common hurdles to good quality output is low resolution image files. The old adage “garbage in, garbage out” applies to digital printing. It’s difficult to produce a high quality finished print if you start with a low resolution image such as a 72dpi web graphic.
14: Optimizing Image Quality: Supersize Image: cont’d 14.3 The native resolution and image file specifications will appear in the upper nav bar area showing you the actual size of the image file. Enter a target value for desired resolution or a percentage by which you want to incrEase the file size. Then click APPLY 14.4 The SuperSize window will pop up. A thumbnail of the image is at the top of the window with a percentage representing the viewing size. Reduce it to see more of the image.
15: Print and Cut Workflow: Simultaneous Output 15.1 In order to send files to your printer and cutter at the same time, a simple adjustment needs to be made in the default settings in the JetCUT RIP. Open JetCUT and click on the Tools button in the top navbar. From the drop-down menu, click Options. 15.2 Within the Options Menu, click on the Processing option on the left. On the right, increase the number of concurrent jobs to at least two.
16.1 PrismJET DTx Print & Cut Workflow Tutorial Print & Cut from JetPro: 1 To create a decal using an ex- 2 Once you’ve selected the file, 3 To turn a raster image into a “contour-cut” decal, begin by selecting Cut from the top menu bar. Then, from the drop-down menu, click on Contour Cut. The Contour Cut tool bar will appear at the top of your screen. 4 To make a rectangular cut around the image, check the Bitmap Frame box.
16. PrismJET DTx Print & Cut Workflow: JetPRO Cont’d 11Right click on the job in the 12 Once the Queue begins 13 If the Queue is configured to 14 Once printing is done, press 15Cut along the blue dotted line and remove the print from the printer. You are now ready to place it in the vinyl cutter and perform the contour cutting to create a peel and stick decal. (These instructions are for a Graphtec Craft ROBO Pro).
16. PrismJET DTx Print & Cut Workflow: JetPRO Cont’d 21Hold the Test Button for a few seconds to perform the test cut. Then use a weeding tool to remove the triangle. It should be easy to lift. The underlying release liner should be lightly scored, but not cut. Press enter to continue. 22 Using the arrow keys, posi- 23The job is now waiting to be 24 JetCUT will activate the sent to the cutter. Right-click on the job and, from the drop down menu, click Cut.
17 PrismJET DTx Print & Cut Workflow: Photoshop 1 To send an image directly from PhotoShop to the JetCUT print and cut Queue, you must ensure that there is vector information in the PhotoShop document that can be processed as a cutting path. 2There are two ways to add vector data to a .PSD file. The first is to use the shape tools (i.e. ellipse). For instance, adding shapes to an image can add the cutting paths needed to turn it into a custom license plate blank.
18 PrismJET DTx Print & Cut Workflow: CorelDRAW 2 1 Design your graphic in CorelDRAW. It’s a good idea to add a contour around the edge to support a full bleed decal with a margin of error. This makes it easier to produce a decal with no white border if desired. The cutting path needs to have certain attributes in order for JetCUT to read and process it. Make the line weight hairline and set the color with a CMYK value of 99/99/99/99 as indicated in the illustration at the right.
19: Print & Cut Workflow: From FlexiSIGN & LXI 19.1 Start by designing your graphic in LXI Master Plus or FlexiSIGN-PRO. Once you have the image created, you will need to add a contour cut path. 19.2 Click Effects, then select Contour Cut from the drop-down menu. Design Editor will open the Contour Cut dialog box. Use the options to place the cut path where you want it, then press the Enter key or click the green check mark icon to apply the contour cut. 19.
Print & Cut Workflow: From FlexiSIGN & LXI: cont’d 19.4 Now use the Fill-Stroke Editor to change the color of the contour cut. This can be done by using the drop-down palette in the editor or the standard palette at the bottom of the workspace. Select a color named CutContour. 19.5 Now select the design and Export it as an .EPS file. Be sure to check the Selected Only box in the export window. Otherwise the entire workspace will be exported and the file may be too large to print. 19.
Print & Cut Workflow: From FlexiSIGN & LXI: cont’d 19.7 Once the file has been added to the Print and Cut queue, you will see an icon resembling a series of boxes next to the file name. Double click on this to enable JetCUT to search the vector information and find the designated cutting path. 19.8 If you have named the contour cut path “CutContour” JetCUT will automatically find it and designate it as the cutting path. The path will be indicated in the Preview pane as a gray, dotted line.
20: Print Cost Estimator 20.1 JetCUT includes a tool to help you determine your actual print costs. It calculates the amount of ink required for a particular job and computes actual ink and material cost using your costs for ink and media. You will need to calculate your ink cost per liter and your media cost per square foot. Once you have calculated that data, determining your actual print cost is easy. Open the Queue Properties tab for the Queue for which you want to calculate print cost.
20: Print Cost Estimator: Cont’d 20.4 Now enter ink and material cost values in the Costing Window. This is the raw data from which JetCUT will compute your print costs. The only values you need to enter are material cost (per square foot), Black ink and Colored Ink cost (per liter). The standard cost per liter for EnduraINK DTx ink is $599.67 *. The square foot cost for the media of your choice can be found in your SignWarehouse catalog. Most rolls of media for the PrismJET DTx are 13” x 30’ which is 32.
20: Print Cost Estimator: Cont’d 20.6 Add your print job. From the drop-down menu, select RIP Only. This allows you to compute your print cost without actually printing the file. This can be helpful when quoting jobs and of course, saves ink. 20.7 When the job has finished processing the status will be displayed as Holding (Spooled). Right click on the job and, from the fly-out menu, click Properties. From the fly-out menu, click Show for Page Content. 20.
21: Adding, Updating Device Drivers 21.1 Managing drivers for printer and cutters in JetCUT is done through the Manage Device Drivers function. When a new queue is created, printer and/or cutter drivers are added as part of the queue setup. The Manage Devices function is for updating, adding, or removing device drivers after the production queues have been created. To add a device driver... 21.2 From the JetCUT top nav bar, click Devices. Then, from the drop-down menu, click Manage Devices. 21.
21: Adding, Updating Device Drivers: Cont’d 21.5 Clicking on a printer or cutter driver to install launches the Configure Printer or Configure Cutter widow. Within this window is the Device Package Search function. This tool searches for the newest driver for the selected device. You have the option of searching online or searching your PC or an installed driver disc. In most cases, searching online will produce the fastest and most desirable results. 21.
21: Adding, Updating Device Drivers: Cont’d 21.8 Updating drivers for an installed device is easily done using the same basic process as adding a device driver. Open the Manage devices window and click on the device you want to update. Click on the blue icon. Mousing over this icon will launch a “Check for online updates” prompt. Click the icon to launch the Device Package Manager. 21.
22: Managing Print Modes 22.1 JetCUT uses Print Modes to control print quality. Print Modes incorporate ICC Profiles but also include settings such as print head height, margins, and selection of registration marks for contour cutting. The easiest way to change from one print mode to another or to make minor adjustments in Print Mode settings is through the Queue Properties (section 23). Adding a new Print Mode is very similar to adding a new device driver. 22.
22: Managing Print Modes: Cont’d 22.4 To add a print mode, simply click on the Green arrow icon at the top of the Manage Print Modes window. This is the Import Print Modes launcher. The Import Print Modes window will popup. Click the ellipse next to the Locate Print Mode archive window to begin searching. 22.5 Clicking the ellipse next to the Locate Print Mode Archive window will launch a browser. Browse to the location to which you’ve downloaded the print mode package you wish to add.
22: Managing Print Modes: Cont’d 22.7 The new print mode now appears in your list and can be added to your Production Queues. In this example, we’ve added a PrismJET 201 Graphics Mode. The Graphics mode version of the PrismJET 201 mode is designed to produce more saturated colors for vector graphics. 23: Managing Print Queues 23.1 23.2 23.3 Basic changes to the JetCUT RIP are made through the Manage Queue function. To open the Queue Manager, click Queue from the JetCUT upper nav bar.
24: Queue Properties Necessary changes in the print settings for different media and print modes are made by accessing and changing Queue properties. The Queue Properties window can be opened from the Queue Menu in the JetCUT Navbar, or from the Queue Manager window. 24.1 From the Queue Manager, click on the button with an ellipse to the right of the Name of the Queue. It is the left most column in the Queue Manager Window.
24: Queue Properties: Cont’d 24.3 From the General Tab, you can change the Print Mode by clicking on the arrow at the right of the Print Mode window. A drop-down menu will show all the installed print modes for that device. Click on a mode from the list to make it the new mode for that queue. 24.
24: Queue Properties: Cont’d 24.6 Printer Status: As Noted in section --- you can perform head cleaning from the Printer Status window instead of using the Ink button on the printer’s control panel. 24.7 You can also schedule regular cleaning cycles in the Printer Status window by entering the desired interval between cleanings to the right of the Head Clean check box. Enter the time in Hours and minutes.
24: Queue Properties: Cont’d 24.7 Printer Options: There are two parameters you may need to change in the Printer Options window. To access these from the Queue Properties window, click the Print Mode Overrides button beneath the Settings Menu. 24.8 The parameters in the Printer Options menu are incorporated into the print modes and for the most part, should not be changed. For this reason, they are all grayed out and inaccessible by default.
24: Queue Properties: Cont’d 24.10 The other parameter you may want to change is the platen gap. If you are experiencing head strikes, you may want to increase the Platen gap from normal to Max. This increases the clearance between the print head and the media. 25: Copies 25.1 The simplest way to print multiple copies of an image is to design or import the image file once and to send more than one copy to the printer after the job is sent to the JetCUT production queue.
25: Copies: Cont’d 25.2 The two lower rows of job control windows below the preview pane adjusts to display a quick preview of the copy layout below the image size information. The upper row shows the total number of rows and columns, the number of rows, number of columns, and the total number of copies. The lower row shows the margins between rows and columns. 25.3 The default layout leaves no margin between copies in order to save media.
25: Copies: Cont’d 25.4 If you want to design a complex layout of multiple rows and columns, click the Copies button to open the Modify Copy Group window give you a better preview of the page layout showing the rows and columns adjusted to fit your page size. Here you can quickly design the page layout for multiple rows and columns. Once finished, click the Apply button to close the Modify Copy Group window and show the new layout in the Queue Properties Preview pane. • www.signwarehouse.
26: Tiling 26.1 26.2 Although the maximum media size for the PrismJET DTx is 13” wide, the JetCUT RIP software supports creating and printing images wider than 13”. This is done through the use of the tiling feature. Tiling breaks an image into smaller sections, or tiles, that fit the print or cut parameters of your output device. This design for an 18” x 24” printed real estate sign can be created in JetPRO and printed and contour-cut in JetCUT using the Tiling feature.
26: Tiling: Cont’d 26.3 The Tiling Window shows the entire image with a solid gray line showing the default separation line. This will always be the maximum available print area. But it may not be the best place to create the tile. If it bisects a line of text, joining the tiles on your sign or substrate may create a small distraction where the tiles overlap. In that case, you can choose to move the tile border to a better place in the design. In this case, we’ve moved it to make the first tile 11.
26: Tiling: Cont’d 26.5 Tiled Printed and Cut graphics: The tiling feature works the same way when designing a graphic to the print and cut queue for contourcutting. The only difference is that the tiles will be a little smaller to allow room for the printed registration marks. Here the real estate sign has been tiled and sent to the printer and cutter. The bottom tile can be contour-cut while the top tile is being printed. 26.6 The finished, applied sign looks professionally designed and produced.
27: Recommended Maintenance 27.1 The EnduraINK DTx inks used in the PrismJET DTx are very forgiving and less prone to clogs than solvent based ink. However, if the PrismJET DTx is not maintained properly, or used often, the inks in the print head may eventually dry up, causing your nozzles to stop firing. This is a very serious matter, as this could ruin your print head.
28: Ink Pads: Cont’d 28.2 2) Ink Waste Pad This pad is accessed from the back of the printer, in a tray found on the left side (when looking at the printer from behind). This pad collects waste ink from the maintenance station as the head is purged through cleaning cycles. It should be replaced every 6-9 months. The part number is PRNA-DC-PT-1900-M038. 28.3 3) Ink Waste Purge Pad This pad is also on the back of the printer, on the right hand side.
29: Maintenance Station Assembly 29.1 The PrismJET DTx uses a fixed-position maintenance station assembly for more consistent printing and ink flow. The maintenance station sits beneath the print head and is normally covered by the head. During cleaning cycles, the maintenance station pulls ink through the bottom of the head and expels it onto the waste ink pad.
29: Maintenance Station Assembly: Cont’d 29.3 Once the side cover is removed, you will have easy access to the fixed-position maintenance station assembly. To remove it, you will need to unscrew five phillipshead screws and detach the electrical connector behind the assembly. 29.4 First, unscrew the single phillips-head screw facing upward (Fig 1). This screw secures the metal tab that holds the side bracket in place. After removing this screw, lift the side bracket and set it aside. 29.
30: Cleaning and Flushing the Print head 30.1 Cleaning: These instructions are for manual cleaning of the bottom of the print head. This is only necessary if there is a clog in the nozzles which normal cleaning cycles have not resolved. See section 11 - page 32 - for instructions on running normal cleaning cycles. Once the maintenance station assembly has been removed, you have clear access to the print head (Fig 1).
30: Cleaning and Flushing the Print head: Cont’d 30.3 30.4 Draw some cleaning fluid into the syringe (Fig1). Then fasten the end of the hose over the nipple of the channel you wish to unclog (Fig 2). Do not be concerned if a small amount spills inside the print head carriage. Fig 1 Gently depress the plunger and force fluid through the head. You should see drops of ink, followed by a fine stream of clear fluid coming from the bottom of the print head (Fig 3).
31: Warranty Information What Is Covered: SignWarehouse warrants to the original purchaser that the product enclosed with this Limited Warranty statement and used in the country of purchase will conform to the manufacturer’s specifications and be free from defects in workmanship and materials for a period of one (1) year from the date of original purchase “as found on the installation report submitted to SignWarehouse”.
32: Support Resources 32.1 Lifetime Technical Support: Ph: 800-966-1783 SignWarehouse Technical Support is available to diagnose and resolve problems with the operation of hardware and software covered under the PSP support package outlined below. With the exception of initial hardware setup, covered Technical Support service does not include training, consultation, or problem resolution related to defective consumables, missing merchandise or order processing problems.