
Instruction Manual

page6/9/2022 8 www.ledalite.com
IS-TM11
6/9/2022 www.ledalite.com
!
ATTENTION: Install in accordance with local and national building and electric codes.
22b
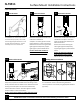
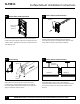
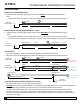
Fixture Lens Installation
Once lens is positioned inside housing,
starting on one end or joint, push
upwards gently and work outward to
complete the run.
Fully installed
24
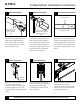
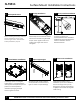
Corner Lens Installation
Installation Tip: For easier installation
of corner lenses, start at the corner and
work outward to complete the run.
Follow step 22.
Reinstall the surface corner plates with
the screws provided.
25
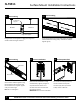
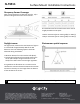
Corner Louver Installation
26
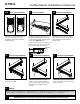
Corner Louver Installation
Install filler plate before installing
louvers. Tip: For easier installation,
start by squeezing filler plate in slightly
from both sides and guiding inside
housing.
27
Corner Louver Installation
Installation Tip: For easier installation,
start on one end of the louver pressing
gently on side tabs.
28
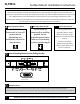
Finishing
• Ensure all fixtures are level and in line with each other. • Check that all joint or endcap screws are installed, and all
seams are tight. • Install LED Pan. • Power fixtures on and check all modules light up. • Install lenses.
Reinstall surface plates with the screws
provided and follow with louvers. Start
on one end of the louver pressing gently
on side tabs. IMPORTANT: For
asymmetric louver fixtures, orientate the
arrows on the louver pan to point at the
label on the outside of the housing.
23
Louver Installation
asymmetric
arrow
Surface Mount Installation Instructions