
Instruction Manual

page
IS-TM11
6/9/2022 7 www.ledalite.com
!
ATTENTION: Install in accordance with local and national building and electric codes.
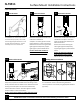
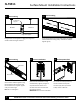
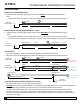
If a corner is required, it is
recommended the corner module be
installed first. Position of brackets are
critical for installation. Place as
dimensioned above.
19
Corner, Bracket Installation
20
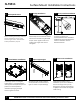
Closed Pattern Installation
If installing a square or rectangular
closed pattern, it is recommended to
install opposite U-shaped fixture/corner
patterns first and complete the
installation by bringing U-shaped
sections together as shown.
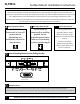
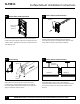
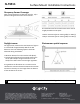
Slide endcap onto end of fixture module
and secure from below using two #8-32
X 5/16” screws. Tighten screws until
endcap seam is tight. Note: Do not
overtighten.
18
Endcap Installation
21
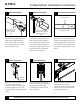
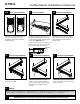
Replace Light Engine
Reinstall the lower led pans with the
screws provided. Ensure direction of
light is as shown on layout drawings.
Before installing the endcap, slide the
sensor towards the center of the
fixture to gain access. Proceed with
endcap installation, step 18.
17
Endcap with Sensor
22a
Fixture Lens Installation
Install lenses removed in step 1.
Installation Tip: For easier installation,
start at a housing end or a joint by
placing lens at an angle and squeezing
in slightly from the other side to guide
inside housing.
Partially installed
Surface Mount Installation Instructions