
Instruction Manual

page
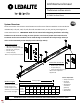
Surface Mount Installation Instructions
IS-TM11
6/9/2022 2 www.ledalite.com
!
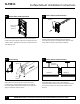
ATTENTION: Install in accordance with local and national building and electric codes.
Warning! Shock Hazard!
Fixture must be
connected to building
ground via the
provided ground wire
before re-connecting
to mains power supply.
Warning! Shock Hazard!
IMPORTANT:
Disconnect or turn off
power before
attempting any
installation, service or
maintenance.
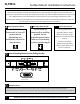
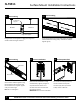
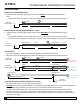
Joiner Mounting Dimensions for Ceiling Bracket
i
Note: A/C gripper adjustable
by 0.63” (16mm )
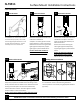
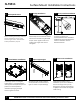
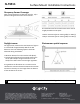
Arrange boxed fixtures on floor in specified mounting locations, based on supplied layout drawings. Remove fixtures from boxes.
Install all ceiling mounting components and vertical aircraft cables using separate installation instruction for Aircraft Cable Mounting (supplied).
Installation Notes
i
This equipment has been tested and found to comply with the limits for a Class A digital device, pursuant to part 15 of the FCC Rules.
These limits are designed to provide reasonable protection against harmful interreference when the equipment is
operated in a commercial environment. This equipment generates, uses, and can radiate radio frequency energy and, if
not installed and used in accordance with the instruction manual, may cause harmful interference to radio
communications. Operation of this equipment in a residential area is likely to cause harmful interference in which case
the user will be required to correct the interference at his own expense.
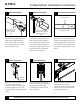
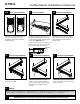
For D/I symmetric and
asymmetric fixtures, power
labels can be found on light
engine pans or under end louver
modules.
For Direct and Surface
symmetric and asymmetric
fixtures, power labels can be
found on upper pan.
!
Power Label Location