Automatic Washing Machine SIG100-97 Please check if the power receptacle is earthed reliably before usage to guarantee your safety. Please read this manual carefully before use. The manufacturer is not responsible for any risks occurred owing to disobey these stipulations. Please retain it attentively for future reference.
Contents Names of parts Safety precautions Installation and adjustment Preparation before washing Put in the laundries Usage of the detergent Usage of the operation buttons Close the top lid Finish washing After the washing Trouble shooting answer to question Packing list Specification 1 2 4 6 7 7 8 14 14 15 16 17 the back cover
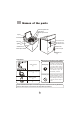
Names of the parts Softener injection inlet Door switch Bleach injection inlet Top lid Control panel Cold water inlet valve Inner tub Hot water inlet valve Agitator Water absorption cushion Cabinet Power line Control panel seat Drain hose joint Adjustable feet (4) Accessories Meaning and description of the symbols Warning sign Water inlet hose (2) Outer drain hose component (1) Contents marked with that symbol are related to the safety of the product and the personal safety of the users.
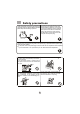
Safety precautions Please insert the power cord into special three The power cord plug should be convenient -phase receptacle.The earthing terminal of the to be pluged in or pluged out with hand receptacle must be earthed reliably.If possible ,while the washing machine runs normally. please adopt electric leakage protector. Be sure to pull the plug out and close the water tap when the machine is idle,when moving the machine,or when cleaning the machine.
Safety precautions Do not stretch hands into the working machine. It is dangerous even if the rotation is slow. Take special care of the children. Do not decompose, repair or alter the machine by yourself. Do not put any hot or heavy items (such as the kettle with hot water ) on the washing machine. Do not wash laundries with volatile materials (such as thinner, petrol etc.) l Petro Thinner The handicapped or children without care shall not use the machine.
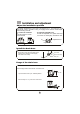
Installation and adjustment Adjust the installation position The largest allowed slope of the base of the machine is 2 . The slanting or rough ground will result in unstable running or stoppage of the machine. Please adjust it with following methods: Adjust the adjustable foot: Confirm it's horizontal: To twist the adjustable foot, please first lift up Hang the lead line to confirm the side of the foot slightly, and twist the foot. if it is horizontal. .
Install the water inlet hose 1. Respectively attach the water inlet hoses to the hot water faucet and the cold water faucet. Using pliers, tighten the coupling. ( As figure 1) NOTE: Do not over tighten. Damage to the valves can result. 2. Connect the hot and cold water inlet hoses to the hot and cold water faucet. Figure 1 3.
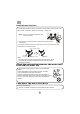
Preparation before washing Preparation before washing 1.Connect the water inlet hose. Open the water faucet. 2.Confirm that the washing machine is earthed reliably. Then insert the power plug into the receptacle. The earth terminal shall not link to gas pipeline and faucet water pipeline. 3.Put the drain hose up. 1.0m~1.5m Pay attention to followings before washing the laundries Confirm if there's special requirment for the laundries. Clear the pocket. Take out the coins , sand, hairpins etc.
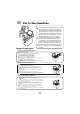
Put in the laundries The capacity of washing and spinning of the machine refer to the largest weight of the standard laundries under dry condition that can be washed or spined in one time. Laundries quantity in one washing cycle shall be lower than the rated capacity. The largest capacity of this machines is 8.5kg. The thickness, size, type of the cloth will influence the actual washing capacity.
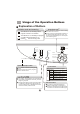
Usage of the Operation Buttons Explanation of Buttons Delay/Start button Indicator mode and meaning The indicator is off, indicating that the program or mode is not selected The indicator is on, indicating the program or mode selected and about to run Flashing Normal running mode Pushing the button to select the reserve washing time from 2 hour to 24 hour.
Start/Pause button Numeral tube s window After switch on the power, push it once to start the washing machine In operating, push the button to pause the operating. In pause, push the button to resume operating. To indicate remaining min. during program running. To indicate remaining reserved hr. during reservation period. To indicate fault symbols for abnormal conditions. Power On/Off button Push the button once to switch on the power. When the power is on, push the button once to cut off the power.
b Operating procedure Time Remaining Normal/Fast Power Time On Normal/Slow Louder Soak Delicate/Fast Delay Start Stain Wash Delicate/Slow Wash Rinse Heavy Normal Normal Speed Quick Wash 2ND Rinse Off Warm/Cold Cold/Cold Spin Light Wash/Spin Heavy Duty Load Size Whites Start Pause Cycle Signal Temp Delicate Casual Cycles Soil level On/Off Softer Hot/cold Process Wash/Rinse Hand Wash Power 1.
2. Press the button of cycles to select a suitable full-automatic program. Cycles After switching on, the Normal program will be the default. If other full-automatic program is desired, you can press the button of cycles to get the corresponding indicator on. Refer to button of cycles on page 8.
Note Spin shall begin after some time even there is no water in the tub Do not use soak process for woolen articles. Clothes prone to fade and other clothes shall be separately washed. 4. Press the button of Load Size to select a suitable water level. Load Size After switching on the power, the washing machine detects the load, and then automatically sets a water level. If other level is wanted, press the button Water level to select. Please refer to Button of 'Load Sizel' on page 8. Page 8 5.
Cycle Signal 8. Press the button of Cycle Signal , which will accordingly remind you of the cycle completion. After the power is switched on, the washing machine will automatically set at Softer . The user himself could also set three warning volumes Louder, Softer or Off for the completion of a cycle. Refer to Cycle Signal Page 9 on page 9 to select.
Close the top lid If you open the top lid, the machine will stop working except for water filling and draining water Finish Washing After Finishing wash alarm automatically The power will be switched off automatically after the finishing of the washing.
After washing After using, please clean the lint and foreign materials of the lint filter etc. in time. Otherwise it may influence your using the machine. Please first pull off the power plug from the receptacle before cleaning. Cleaning the lint filter The lint filter must be used during washing. It must be cleaned in time after each using 1.Take off the lint filter Pull up the lint filter on the agitator to remove. As shown in Figure 1. Lint filter Press Press 2.
Trouble shooting answer to question (If there's breakdown, please pull off the power plug before checking) The following phenomena are not breakdowns sometimes. Please confirm again before sending it to repair. If there are real breakdowns, please come to the special maintenance department or after-sale service department of our company. Do not repair it by yourself.
Packing list Name Quantity User's manual 1 Warranty Card 1 Drain hose 1 Drain hose hook 1 Water inlet hose 2 Drain hose clamp 1 Automatic washing machine 1 17
Specification Model Rated voltage SIG100-97 frequency Rated washing / spinning capacity 220-240V~ 50Hz 8.5kg (weight of standard dry cloth) Water level/Water quantity (about) 1/16L, 2/24L, 3/32L, 4/40L, 5/48L,6/56L, 7/60L, 8/72L, 9/80L, 10/90L Max water consumption About 180L(High water level; Normal program) Injection pressure 0.03MPa-1.