
Installation Sheet


2
INSTALLATION
3. Determine the location for your mounting bracket,
using the marked line for the top edge of the mirror
and the marked stud locations as guidelines. Use a
pencil to mark the location of the mounting holes.
Ensure that the bracket is perfectly level before
marking.
Tip: The mounting bracket does not have to be
perfectly centered. The mounting bracket is designed
to allow the mirror to shift slightly to the left or right as
needed after installation.
4. Drill pilot holes into the marked mounting bracket
location. Use the provided screws to secure the
mounting bracket to the wall.
Important: A perfectly flat wall is required for proper
hanging. If your wall is not flat, you may need to place
thin shims behind the bracket to accommodate. Use a
level or a straight edge on the face of the mounting
bracket to check for high/low points, until the bracket
is perfectly flat.
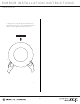
1. Center the mirror using a tape measure in the
desired location on your wall. Use a pencil to mark a
short line on the wall along the top of the mirror.
Tip: If necessary, have a second person help hold the
mirror while you mark the wall.
2.
Using a stud finder, locate and mark the position of
the wall studs to which you will fasten your mirror’s
mounting bracket.
Tip: If the studs do not line up to the mounting location
for your mirror, wood blocking can be installed between
the studs using standard 2 x 4’s. We recommend
consulting a professional if you are unfamiliar with this
type of installation.
MIRROR INSTALLATION INSTRUCTIONS
FRENCH CLEAT