
Installation Manual

ValveWatch II Hardware Installation and Setup Manual
Page 28 of 34
CRANE
Nuclear
8.5 Mounting the Strain Sensor
Within 15 minutes after the mounting location has been fully prepared, sensor installation can
proceed.
• The Epoxy comes in a two part packet for easy mixture. Remove the separating clip and mix
the epoxy achieving a paste of uniform color and consistency. There is a 90 minute pot life for
the epoxy.
• Apply an even layer of epoxy approximately 1/16in thick to the sensor mounting location on
the yoke.
• Remove the protective cap. Inspect for cleanliness and damage. Light cleaning of the
mounting surface area with one of the cleaning agents listed above is required if the Kapton
mounting surface is contaminated with dist or grease.
• Apply an even layer of epoxy approximately 1/16in thick to the bottom of the strain sensor
and body contact area. Cover the entire sensor face and metal lip to assure sensor bonding and
long term stability.
• Align the sensor to one of the four available mounting positions for the type strain to be
measured as shown on J-53115ExR.
• Firmly press the sensor into place on the yoke. Secure with the provided wire tie(s) wrapped
around the yoke and over the sensor. Tighten to apply a light pressure.
• Verify the sensor is mounted for the desired measurement for the valve type.
• Adjust the angle of the sensor slowly just to tweak in the accuracy of the measurement. The
more ideal the sensor is to the valve stem angle, the more accurate the readings from the
sensor will be.
• When the sensor is positioned correctly, tighten up the tie wrap securely. A wire tie
installation tool can be used for this operation to firmly compress the soft sensor mounting
surface.
• The sensor should again be checked to ensure it was not damaged during installation. Test for
electrical continuity with an ohmmeter by measuring 5000 ohms between the yellow and
green wire pair and 5000 ohms between the brown and white wire pair. All resistances should
read infinity between any insulated conductor and both the sensor metal housing or the cable
shield. The cable shield and sensor housing are not electrically connected and should also read
infinity.
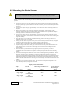
• Allow epoxy to cure before stroking valve. The cure time is temperature dependent. The
lower the temperature, the longer the cure time.
Epoxy Cure Time Chart
Temp. Pot Life Min Curing Time Before Use Curing Time For
Max Strength
25°C (77°F)
70 min. 24 hrs. 48 hrs.
65°C (150°F)
Not
recommended
2 hrs. 4 hrs.
80°C (176°F)
Not
recommended
1 hr 2 hrs
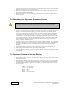
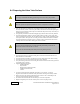
Caution:
It is strongly recommended that safety glasses and gloves be worn during this procedure.