
Installation Manual

ValveWatch II Hardware Installation and Setup Manual
Page 24 of 34
CRANE
Nuclear
The use of a second sensor in the upstream or downstream position will provide optimum leak
detection when the valve is in the open position.
• Review the orientation of the tap and verify that there are no obstacles preventing the sensor
from being installed into the location.
• Review the Unit Under Test and determine an appropriate sensor cable routing path to the
LDAU enclosure.
7.4 Mounting the Dynamic Pressure Sensor
• A ¼ in to ½ in NPT adapter and protective cover tube are provided to protect the sensors from
damage. This housing should be used in any location where there is a possibility that the
sensor may be damaged by inadvertent contact. To use this protective housing, thread the ½
in adapter into the desired location (pipe or valve body). Next, thread the pressure sensor
into the housing. Fit the protective tube over the sensor cable and then plug the sensor cable
into the sensor connector. Upon securing the cable to the sensor, install the protective tube
onto the adapter by sliding it over the sensor and thread it into the housing. The protective
tubing can then be treaded into place.
• The pressure sensors are manufactured with a ¼in NPT threaded connection. They should be
mounted on the ESD valve or pipe with block and bleed valves for isolation. (The block and
bleed valves will allow the sensors to be safely removed without affecting the platform
operation.)
• Apply thread sealant to the pressure sensor threads for preparation into the auxiliary tap.
• Screw the Dynamic Pressure sensor into the block valve housing.
• Using site specific procedures open the block valve and ensure there are no fluid leaks around
the installation.
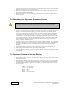
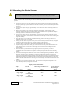
7.5 Dynamic Pressure Sensor Wiring
• The dynamic pressure sensor kit is provided with a cable for connecting the pressure sensor to
the LDAU enclosure.
• Route the sensor cable(s) in site approved cable tray or tubing to the LDAU enclosure. Route
the cable through an appropriate cable gland and secure. Connect the two sensor conductors
and cable shield conductor as required on J-51008ExS. Connect the cable connector into the
sensor connector.
Yellow - No connection
Green - No connection
Brown - SIG +
White - SIG –
Shield - Ground terminal
Caution:
It is strongly recommended that safety glasses and gloves be worn during this procedure.