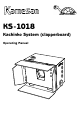
KS-1018 Kachinko System (clapperboard) Operating Manual
Kachinko System The Kamesan Kachinko System is a dual-unit system that solves the problem of video and audio synchronization in a number of different situations. The name comes from the Japanese term for “clapperboard”. For example, it is now common for the video portion ttof a broadcast to be sent via satellite, and the audio portion of the broadcast to be sent via landline.
Kachinko System The audio beep may be recorded using a microphone, or output at microphone or line level into a mixer. The beep may be manually triggered, or triggered automatically, with a visual countdown.
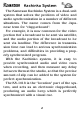
Kachinko System The KS -1018 uses four ‘AA’ batteries. The battery cover is located on the rear of the unit. Slide the catch away from the center in order to unlock the hinged door. Insert the batteries as marked on the inside of the battery compartment. The normal precautions apply when inserting or replacing batteries into the KS -1018: • Take care that the batteries are inserted correctly as shown in the battery compartment, with the polarity correct.
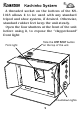
Kachinko System A threaded socket on the bottom of the KS 1018 allows it to be used with any standard tripod and shoe system, if desired. Otherwise, standard rubber feet keep the unit steady. Open the four shutters at the front of the unit before using it, to expose the “clapperboard” front light: Front light Note the ONE SHOT button on the top of the unit.
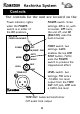
Kachinko System Controls The controls for the unit are located on the POWER switch: three settings: ON is on, with no buzzer, OFF turns the unit off, and ON (BUZZ ON) uses the built-in buzzer Power indicator; lights when the POWER switch is in either of the ON positions KS-1018 VIDEO KACHINKO ON POWER OFF ON (BUZZ ON) AUTO MODE MANU MIC LEVEL MODE switch: two settings: AUTO enables the top ONE SHOT button, MANU uses the POWER switch to produce the clapperboard effect LINE LEVEL switch: two settings:
Kachinko System right (as you look from the front): Operation Locate the unit where the front light is clearly visible by the camera. • Make any necessary connections from the TONE OUT to the camera, if you are not using the camera’s microphone. • If you are recording the signal with the camera microphone, set the POWER switch to ON (BUZZ), otherwise set it to ON. • Set the camera iris setting to manual.
count down and when they reach the end of the sequence, the front light lights, and the beep sounds. This sequence is repeated as long as the unit is on. Or, if you set the MODE switch to MANU (manual), the top ONE SHOT button can be used to light the front light and sound the beeper together. Read the KS -1017 manual for further details of how to measure the delay between the video and audio signals when they are received. Physical specifications Dimensions (w x h x d) Weight 125 x 90 x 60 (mm) 4.9 x 3.