
User Manual
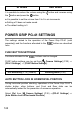


Table Of Contents
- PACKAGE CONTENTS / ACCESSORIES
- TABLE OF CONTENTS
- SAFETY PRECAUTIONS
- HANDLING PRECAUTIONS
- DESCRIPTION OF THE PARTS
- MONITOR DISPLAY DURING SHOOTING
- BASIC OPERATION AND QUICK REFERENCE
- PREPARATION
- BASIC OPERATION
- ADVANCED OPERATION
- SETTING THE WHITE BALANCE (WB)
- SETTING THE SENSITIVITY (ISO EQUIVALENCY)
- IMAGE FILE SETTING
- SELECTING THE METERING MODE
- AF/AEL BUTTON
- EXPOSURE COMPENSATION
- AUTO BRACKETING
- SFD MODE (SUPER FINE DETAIL)
- COLOR MODE
- CUSTOM BRACKETING
- TONE CONTROL
- COLOR SPACE
- AUTO ROTATE
- CUSTOM MODE
- USING THE EXTERNAL FLASH
- USING Eye-Fi CARD (Eye-Fi Connected)
- REVIEWING AND DELETING IMAGES
- OTHER REVIEWING FEATURES
- CHANGING OTHER SETTINGS
- CONNECTING TO A COMPUTER OR TV
- REFERENCE

150
USING A HOME POWER SUPPLY
(sold separately)
You can power the camera from a wall outlet using the provided AC
Adapter SAC-7 and DC Connector CN-31. When using your camera for an
extended period of time, reviewing the pictures or connecting the camera to
a computer, we recommend that you operate the camera from a household
power outlet.
1
Connect the AC cable to the AC adapter.
2
Open the Battery Cover, and open the DC
connector cover as shown in the
illustration.
Do not pull too hard on the DC connector
cover as it may come away from camera
body.
3
Insert the DC connector as shown in the
illustration until it is locks into place.