
User Manual

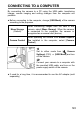


Table Of Contents
- PACKAGE CONTENTS / ACCESSORIES
- TABLE OF CONTENTS
- SAFETY PRECAUTIONS
- HANDLING PRECAUTIONS
- DESCRIPTION OF THE PARTS
- MONITOR DISPLAY DURING SHOOTING
- BASIC OPERATION AND QUICK REFERENCE
- PREPARATION
- BASIC OPERATION
- ADVANCED OPERATION
- SETTING THE WHITE BALANCE (WB)
- SETTING THE SENSITIVITY (ISO EQUIVALENCY)
- IMAGE FILE SETTING
- SELECTING THE METERING MODE
- AF/AEL BUTTON
- EXPOSURE COMPENSATION
- AUTO BRACKETING
- SFD MODE (SUPER FINE DETAIL)
- COLOR MODE
- CUSTOM BRACKETING
- TONE CONTROL
- COLOR SPACE
- AUTO ROTATE
- CUSTOM MODE
- USING THE EXTERNAL FLASH
- USING Eye-Fi CARD (Eye-Fi Connected)
- REVIEWING AND DELETING IMAGES
- OTHER REVIEWING FEATURES
- CHANGING OTHER SETTINGS
- CONNECTING TO A COMPUTER OR TV
- REFERENCE

147
CONNECTING TO A TV
By connecting the camera to the television with a commercially available
HDMI cable, the recorded images can be viewed on the television screen.
Moreover, shooting while viewing the images displayed on the television is
also possible.
Prepare the commercially-available HDMI cable with the HDMI terminal
(Type C) attached.
The images displayed on the television screen are the same as the
images displayed on the camera finder. The displayed icons are in
accordance with the mode set in [ Camera Settings]
( P. 30)
→
[View
Finder
Mode Settings].
1
Turn the power supplies of the camera and the television to OFF.
2
With the HDMI cable, connect the camera and the television. Then turn the
power supplies of the camera and the television to ON.
If used for a long time, it is recommended to use the AC adapter (sold
separately).
WARNING!!
When switching the input signal of the television, refer to the operation
manual of the television.
On some television screens, part of an image may not be able to be
seen.