
User Manual
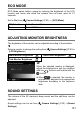

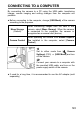


Table Of Contents
- PACKAGE CONTENTS / ACCESSORIES
- TABLE OF CONTENTS
- SAFETY PRECAUTIONS
- HANDLING PRECAUTIONS
- DESCRIPTION OF THE PARTS
- MONITOR DISPLAY DURING SHOOTING
- BASIC OPERATION AND QUICK REFERENCE
- PREPARATION
- BASIC OPERATION
- ADVANCED OPERATION
- SETTING THE WHITE BALANCE (WB)
- SETTING THE SENSITIVITY (ISO EQUIVALENCY)
- IMAGE FILE SETTING
- SELECTING THE METERING MODE
- AF/AEL BUTTON
- EXPOSURE COMPENSATION
- AUTO BRACKETING
- SFD MODE (SUPER FINE DETAIL)
- COLOR MODE
- CUSTOM BRACKETING
- TONE CONTROL
- COLOR SPACE
- AUTO ROTATE
- CUSTOM MODE
- USING THE EXTERNAL FLASH
- USING Eye-Fi CARD (Eye-Fi Connected)
- REVIEWING AND DELETING IMAGES
- OTHER REVIEWING FEATURES
- CHANGING OTHER SETTINGS
- CONNECTING TO A COMPUTER OR TV
- REFERENCE

145
CONNECTING TO A COMPUTER
By connecting the camera to a PC using the USB cable, transferring
images, remote imaging and setting changes from the computer are
possible.
Before connecting to the computer, change [USB Mode] of the camera
according to the purposes.
Mass Storage
(Default)
When transferring images from the card in the
camera, select [Mass Storage]
. When the camera
is connected to the computer, the camera is
recognized as a removal disc (device).
Camera Control
When operating the camera from SIGMA Capture
Pro installed in the computer, select [Camera
Control].
1
Set to either mode from [ Camera
Settings] ( P. 30) → [USB Mode] and turn
off the camera.
2
Connect your camera to a computer with
the provided USB cable, and turn on the
power supply switch of the camera.
If used for a long time, it is recommended to use the AC adapter (sold
separately).