
User Manual

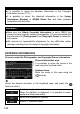


Table Of Contents
- PACKAGE CONTENTS / ACCESSORIES
- TABLE OF CONTENTS
- SAFETY PRECAUTIONS
- HANDLING PRECAUTIONS
- DESCRIPTION OF THE PARTS
- MONITOR DISPLAY DURING SHOOTING
- BASIC OPERATION AND QUICK REFERENCE
- PREPARATION
- BASIC OPERATION
- ADVANCED OPERATION
- SETTING THE WHITE BALANCE (WB)
- SETTING THE SENSITIVITY (ISO EQUIVALENCY)
- IMAGE FILE SETTING
- SELECTING THE METERING MODE
- AF/AEL BUTTON
- EXPOSURE COMPENSATION
- AUTO BRACKETING
- SFD MODE (SUPER FINE DETAIL)
- COLOR MODE
- CUSTOM BRACKETING
- TONE CONTROL
- COLOR SPACE
- AUTO ROTATE
- CUSTOM MODE
- USING THE EXTERNAL FLASH
- USING Eye-Fi CARD (Eye-Fi Connected)
- REVIEWING AND DELETING IMAGES
- OTHER REVIEWING FEATURES
- CHANGING OTHER SETTINGS
- CONNECTING TO A COMPUTER OR TV
- REFERENCE

139
LOCK SWITCH SETTING
It is possible to customize the contents to
be locked with the LOCK switch.
Select the setting from [ Camera Settings] ( P. 30) → [Operation in
LOCK Mode].
Camera Sleep
All operations are prohibited whilst the camera is
locked.
When the time set to Auto Power Off (P. 140)
elapses whilst the camera is locked, the camera
will not ‘wake up’ if only the lock switch is
moved
. In this case, release the lock and
half-press the shutter button.
Active
Whilst the camera is locked, only the shutter
button and the
monitor switching lever can be
operated. Other buttons and operation of the
Front and Rear dials is prohibited.
Active
(Default)
Whilst the camera is locked, only the shutter
button, Front and Rear dials, and the monitor
switching l
ever can be operated. Operation of
other buttons is prohibited.
+
Sub-Monitor
Active
Whilst the camera is locked, the buttons next to
the sub monitor ( , , , , and )
can be operated as well as the shutter button,
Front and Rear dials, and the monitor switching
lever. Operation of other buttons is prohibited.