
User Manual

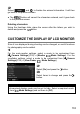

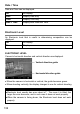


Table Of Contents
- PACKAGE CONTENTS / ACCESSORIES
- TABLE OF CONTENTS
- SAFETY PRECAUTIONS
- HANDLING PRECAUTIONS
- DESCRIPTION OF THE PARTS
- MONITOR DISPLAY DURING SHOOTING
- BASIC OPERATION AND QUICK REFERENCE
- PREPARATION
- BASIC OPERATION
- ADVANCED OPERATION
- SETTING THE WHITE BALANCE (WB)
- SETTING THE SENSITIVITY (ISO EQUIVALENCY)
- IMAGE FILE SETTING
- SELECTING THE METERING MODE
- AF/AEL BUTTON
- EXPOSURE COMPENSATION
- AUTO BRACKETING
- SFD MODE (SUPER FINE DETAIL)
- COLOR MODE
- CUSTOM BRACKETING
- TONE CONTROL
- COLOR SPACE
- AUTO ROTATE
- CUSTOM MODE
- USING THE EXTERNAL FLASH
- USING Eye-Fi CARD (Eye-Fi Connected)
- REVIEWING AND DELETING IMAGES
- OTHER REVIEWING FEATURES
- CHANGING OTHER SETTINGS
- CONNECTING TO A COMPUTER OR TV
- REFERENCE

133
2
Select and to finalize the entered information. It will then
go back to the previous screen.
The button will cancel the characters entered, and it goes back
to the previous screen.
Deleting characters
Using the front/rear dials, place the cursor after the letters you wish to
delete and press the button.
CUSTOMIZE THE DISPLAY OF LCD MONITOR
Size of icon displayed during shooting can be changed, or useful functions
for photography can be added.
1
For the main-monitor settings, select a mode to be customized from
[ Camera Settings]
( P. 30)
→
[Monitor
Mode Settings]. For the
viewfinder settings, select a mode to be customized from [ Camera
Settings]
( P. 30)
→
[View Finder
Mode Settings].
2
Select [On] and press the button.
3
Select items to change and press the
button.
TIP
Unrequired display mode can be set to hide. Select unrequired mode
from [
Mode Settings] and set them to [Off].