
User Manual

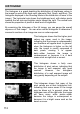


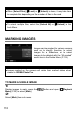


Table Of Contents
- PACKAGE CONTENTS / ACCESSORIES
- TABLE OF CONTENTS
- SAFETY PRECAUTIONS
- HANDLING PRECAUTIONS
- DESCRIPTION OF THE PARTS
- MONITOR DISPLAY DURING SHOOTING
- BASIC OPERATION AND QUICK REFERENCE
- PREPARATION
- BASIC OPERATION
- ADVANCED OPERATION
- SETTING THE WHITE BALANCE (WB)
- SETTING THE SENSITIVITY (ISO EQUIVALENCY)
- IMAGE FILE SETTING
- SELECTING THE METERING MODE
- AF/AEL BUTTON
- EXPOSURE COMPENSATION
- AUTO BRACKETING
- SFD MODE (SUPER FINE DETAIL)
- COLOR MODE
- CUSTOM BRACKETING
- TONE CONTROL
- COLOR SPACE
- AUTO ROTATE
- CUSTOM MODE
- USING THE EXTERNAL FLASH
- USING Eye-Fi CARD (Eye-Fi Connected)
- REVIEWING AND DELETING IMAGES
- OTHER REVIEWING FEATURES
- CHANGING OTHER SETTINGS
- CONNECTING TO A COMPUTER OR TV
- REFERENCE

120
4
Select [Yes] by using the buttons to and press the button to apply
the setting. If you want to cancel to apply the setting, please select [No] by
using the buttons to and press the button.
A flag icon will appear in all marked images.
WARNING !!
When [Select Files], [Mark All] or [Unmark All] is done, it may take
much time to finish them depending on the number of files in the card.
TIP
Select [Unmark All] from the Mark Menu to unmark all marked images
on the card.
ROTATING IMAGES
It is possible to rotate the displayed image.
TO ROTATE AN IMAGE
1
Display an image to rotate, press the button and open [
Playback Menu] (P.30) to select [Rotate].