
User Manual

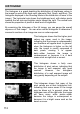


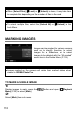


Table Of Contents
- PACKAGE CONTENTS / ACCESSORIES
- TABLE OF CONTENTS
- SAFETY PRECAUTIONS
- HANDLING PRECAUTIONS
- DESCRIPTION OF THE PARTS
- MONITOR DISPLAY DURING SHOOTING
- BASIC OPERATION AND QUICK REFERENCE
- PREPARATION
- BASIC OPERATION
- ADVANCED OPERATION
- SETTING THE WHITE BALANCE (WB)
- SETTING THE SENSITIVITY (ISO EQUIVALENCY)
- IMAGE FILE SETTING
- SELECTING THE METERING MODE
- AF/AEL BUTTON
- EXPOSURE COMPENSATION
- AUTO BRACKETING
- SFD MODE (SUPER FINE DETAIL)
- COLOR MODE
- CUSTOM BRACKETING
- TONE CONTROL
- COLOR SPACE
- AUTO ROTATE
- CUSTOM MODE
- USING THE EXTERNAL FLASH
- USING Eye-Fi CARD (Eye-Fi Connected)
- REVIEWING AND DELETING IMAGES
- OTHER REVIEWING FEATURES
- CHANGING OTHER SETTINGS
- CONNECTING TO A COMPUTER OR TV
- REFERENCE

119
3
Press the or button.
A flag icon will appear in the image
indicating that the image is marked.
TIP
If the image is already marked, the menu item changes to [Unmark].
To unmark a marked image, select the marked image and follow the
same steps as above.
The button can be used as a shortcut key for marking images. (See
P.123)
TO MARK MULTIPLE IMAGES
1
Press the button and open [ Playback Menu] (P. 30) to select
[Mark].
2
Select from the following options from the sub-menu.
Select Files
Select multiple files to mark. Use the buttons to
display the file to mark, and the buttons to display
icon. Repeat the process to select files to mark.
Mark All
Mark all images on the card.
3
A confirmation dialog will be displayed by pressing the or button.