
User Manual


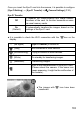


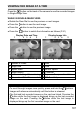


Table Of Contents
- PACKAGE CONTENTS / ACCESSORIES
- TABLE OF CONTENTS
- SAFETY PRECAUTIONS
- HANDLING PRECAUTIONS
- DESCRIPTION OF THE PARTS
- MONITOR DISPLAY DURING SHOOTING
- BASIC OPERATION AND QUICK REFERENCE
- PREPARATION
- BASIC OPERATION
- ADVANCED OPERATION
- SETTING THE WHITE BALANCE (WB)
- SETTING THE SENSITIVITY (ISO EQUIVALENCY)
- IMAGE FILE SETTING
- SELECTING THE METERING MODE
- AF/AEL BUTTON
- EXPOSURE COMPENSATION
- AUTO BRACKETING
- SFD MODE (SUPER FINE DETAIL)
- COLOR MODE
- CUSTOM BRACKETING
- TONE CONTROL
- COLOR SPACE
- AUTO ROTATE
- CUSTOM MODE
- USING THE EXTERNAL FLASH
- USING Eye-Fi CARD (Eye-Fi Connected)
- REVIEWING AND DELETING IMAGES
- OTHER REVIEWING FEATURES
- CHANGING OTHER SETTINGS
- CONNECTING TO A COMPUTER OR TV
- REFERENCE

108
MAGNIFYING IMAGES (ZOOMED-IN VIEW)
Reviewed images can be magnified, making it possible to check image
details and focusing.
While reviewing images, rotate the Front Dial to the
position.
The magnification ratio will be changed as follows.
Original
→
X1.25
→
X1.6
→
X2.0
→
X2.5
→
X3.15
→
X4.0
→
X5.0
→
X6.3
→
X8.0
→
X10.0
WHILE IN ZOOMED-IN VIEW:
Rotate the Front Dial to the position to increase magnification.
Rotate the Front Dial to the position to decrease magnification.
Press the buttons or the buttons to pan around the image.
Press the button to return to the original ratio.
Rotate the Rear Dial to see the previous or next images.
TIP
Images are magfinied based on the position of the focus point duing
shooting.