
User Manual


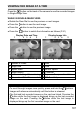


Table Of Contents
- PACKAGE CONTENTS / ACCESSORIES
- TABLE OF CONTENTS
- SAFETY PRECAUTIONS
- HANDLING PRECAUTIONS
- DESCRIPTION OF THE PARTS
- MONITOR DISPLAY DURING SHOOTING
- BASIC OPERATION AND QUICK REFERENCE
- PREPARATION
- BASIC OPERATION
- ADVANCED OPERATION
- SETTING THE WHITE BALANCE (WB)
- SETTING THE SENSITIVITY (ISO EQUIVALENCY)
- IMAGE FILE SETTING
- SELECTING THE METERING MODE
- AF/AEL BUTTON
- EXPOSURE COMPENSATION
- AUTO BRACKETING
- SFD MODE (SUPER FINE DETAIL)
- COLOR MODE
- CUSTOM BRACKETING
- TONE CONTROL
- COLOR SPACE
- AUTO ROTATE
- CUSTOM MODE
- USING THE EXTERNAL FLASH
- USING Eye-Fi CARD (Eye-Fi Connected)
- REVIEWING AND DELETING IMAGES
- OTHER REVIEWING FEATURES
- CHANGING OTHER SETTINGS
- CONNECTING TO A COMPUTER OR TV
- REFERENCE

107
VIEWING ONE IMAGE AT A TIME
Press the button on the back of the camera to see the recorded images
in Single-Image View.
WHILE IN SINGLE-IMAGE VIEW:
Rotate the Rear Dial to see the previous or next images.
Press the button to see the next image.
Press the button to see the previous image.
Press the button to switch the information as follows (P.41).
Display Date and Time
Display Image Info
1 2
3
4 5 1 2
3
4 5
6
7 8 6
9 10
11
12
1
Number of Pixels
7
Date
2
Image Size
8
Time
3
Aspect Ratio
9
Shutter Speed
4
Image Quality
10
F Number
5
Folder numbering
-
File numbering
11
Exposure Compensation Value
6
File number / Total files recorded
12
ISO Sensitivity
TIP
To scroll through images more quickly, press and hold the buttons.
Images will advance automatically until the button is released.
The first and last recorded images on the card are linked. Pressing the
button while the first image is displayed brings up the last recorded
image on the card. Pressing the button while the last image is
displayed brings up the first recorded image on the card.