
Programming Guide
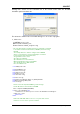
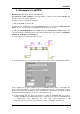
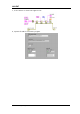

Table Of Contents
- 1. Programming Overview
- 2. SCPI Overview
- 3. System Commands
- 3.1 IEEE Common Commands
- 3.1.1 Identification Query (*IDN)
- 3.1.2 Reset (*RST)
- 3.1.3 Clear Status (*CLS)
- 3.1.4 Standard Event Status Enable (*ESE)
- 3.1.5 Standard Event Status Register Query (*ESR)
- 3.1.6 Operation Complete Query (*OPC)
- 3.1.7 Service Request Enable (*SRE)
- 3.1.8 Status Byte Query (*STB)
- 3.1.9 Wait-to-Continue (*WAI)
- 3.1.10 Self Test Query (*TST)
- 3.2 System Subsystem
- 3.2.1 System Time (:SYSTem:TIME)
- 3.2.2 System Date (:SYSTem:DATE)
- 3.2.3 IP Address (:SYSTem:COMMunicate:LAN:IPADdress)
- 3.2.4 Gateway (:SYSTem:COMMunicate:LAN:GATeway)
- 3.2.5 Subnet Mask (:SYSTem:COMMunicate:LAN:SMASk)
- 3.2.6 IP Config (:SYSTem:COMMunicate:LAN:TYPE)
- 3.2.7 Language (:SYSTem:LANGuage)
- 3.2.8 Power On Type (:SYSTem:PON:TYPE)
- 3.2.9 System Preset (:SYSTem:PRESet)
- 3.2.10 System Restart (:SYSTem:RESTart)
- 3.2.11 Preset Type (:SYSTem:PRESet:TYPE)
- 3.2.12 Factory ReSet (:SYSTem:FDEFault)
- 3.2.13 Enable Option (:SYSTem:LKEY)
- 3.2.14 Installed Options Query (:SYSTem:OPTions?)
- 3.2.15 Power Off (:SYSTem:POWer:OFF)
- 3.2.16 System Info (:SYSTem:CONFigure:SYSTem?)
- 3.3 Instrument Subsystem
- 3.4 Initiate Subsystem
- 3.5 Sense Subsystem
- 3.5.1 Frequency Subsection
- 3.5.1.1 Center Frequency ([:SENSe]:FREQuency:CENTer)
- 3.5.1.2 Start Frequency ([:SENSe]:FREQuency:STARt)
- 3.5.1.3 Stop Frequency ([:SENSe]:FREQuency:STOP)
- 3.5.1.4 Center Frequency Step ([:SENSe]:FREQuency:CENTer:STEP[:INCRement])
- 3.5.1.5 Center Frequency Step Mode ([:SENSe]:FREQuency:CENTer:STEP:AUTO)
- 3.5.1.6 Sets CF→Step ([:SENSe]:FREQuency:CENTer:SET:STEP)
- 3.5.1.7 Frequency Span ([:SENSe]:FREQuency:SPAN)
- 3.5.1.8 Full Span ([:SENSe]:FREQuency:SPAN:FULL)
- 3.5.1.9 Zero Span ([:SENSe]:FREQuency:SPAN:ZERO)
- 3.5.1.10 Last Span ([:SENSe]:FREQuency:SPAN:PREVious)
- 3.5.1.11 Zoom In ([:SENSe]:FREQuency:SPAN:HALF)
- 3.5.1.12 Zoom Out ([:SENSe]:FREQuency:SPAN:DOUBle)
- 3.5.2 Auto Tune Subsection
- 3.5.3 Amplitude Subsection
- 3.5.3.1 Reference Level (:DISPlay:WINDow:TRACe:Y[:SCALe]:RLEVel)
- 3.5.3.2 Input Attenuator ([:SENSe]:POWer[:RF]:ATTenuation)
- 3.5.3.3 Attenuator Auto Mode ([:SENSe]:POWer[:RF]:ATTenuation:AUTO)
- 3.5.3.4 Preamp on-off ([:SENSe]:POWer[:RF]:GAIN[:STATe])
- 3.5.3.5 Amplitude OffSets (:DISPlay:WINDow:TRACe:Y:SCALe:RLEVel:OFFSet )
- 3.5.3.6 Amplitude Units (:UNIT:POWer)
- 3.5.3.7 Scale Type (:DISPlay:WINDow:TRACe:Y[:SCALe]:SPACing)
- 3.5.3.8 Scale/Div (:DISPlay:WINDow:TRACe:Y[:SCALe]:PDIVision)
- 3.5.3.9 Correction Off ([:SENSe]:CORRection:OFF)
- 3.5.3.10 Correction Apply State ([:SENSe]:CORRection:CSET:ALL[:STATe])
- 3.5.3.11 Sets Correction X State Off ([:SENSe]:CORRection:CSET[1]|2|3|4:OFF)
- 3.5.3.12 Set Correction Data ([:SENSe]:CORRection:CSET[1]|2|3|4:DATA)
- 3.5.3.13 Input Impedance ([:SENSe]:CORRection:IMPedance[:INPut][:MAGNitude])
- 3.5.4 Bandwidth Subsection
- 3.5.4.1 Resolution Bandwidth ([:SENSe]:BWIDth[:RESolution])
- 3.5.4.2 Resolution Bandwidth Auto Mode ([:SENSe]:BWIDth[:RESolution]:AUTO)
- 3.5.4.3 Video Bandwidth ([:SENSe]:BWIDth:VIDeo)
- 3.5.4.4 Auto Video Bandwidth State ([:SENSe]:BWIDth:VIDeo:AUTO)
- 3.5.4.5 Video to Resolution Bandwidth Ratio ([:SENSe]:BWIDth:VIDeo:RATio)
- 3.5.4.6 Auto Video to Resolution Bandwidth Ratio State ([:SENSe]:BWIDth:VIDeo:RATio:CONfig?)
- 3.5.4.7 Filter Type ([:SENSe]:FILTer:TYPE)
- 3.5.5 Trace Subsection
- 3.5.6 Detector Subsection
- 3.5.7 Average Subsection
- 3.5.8 Sweep Subsection
- 3.5.9 Display Subsection
- 3.5.1 Frequency Subsection
- 3.6 Calculate Subsystem
- 3.6.1 Marker Subsection
- 3.6.1.1 Marker On/Off (:CALCulate:MARKer[1]|2|3|4|5|6|7|8:STATe)
- 3.6.1.2 Marker All Off (:CALCulate:MARKer:AOFF)
- 3.6.1.3 Marker Mode (:CALCulate:MARKer[1]|2|3|4|5|6|7|8:MODE)
- 3.6.1.4 Marker to Trace (:CALCulate:MARKer[1]|2|3|4|5|6|7|8:TRACe)
- 3.6.1.5 Marker Relative To (:CALCulate:MARKer[1]|2|3|4|5|6|7|8:RELative:TO)
- 3.6.1.6 Marker X Value (:CALCulate:MARKer[1]|2|3|4|5|6|7|8:X)
- 3.6.1.7 Query Marker Y Value (:CALCulate:MARKer[1]|2|3|4|5|6|7|8:Y?)
- 3.6.1.8 Marker Table (:CALCulate:MARKer:TABLe)
- 3.6.1.9 Marker to Start Frequency (:CALCulate:MARKer[1]|2|3|4|5|6|7|8[:SET]:START)
- 3.6.1.10 Marker to Stop Frequency (:CALCulate:MARKer[1]|2|3|4|5|6|7|8[:SET]:STOP)
- 3.6.1.11 Marker to Center Frequency (:CALCulate:MARKer[1]|2|3|4|5|6|7|8[:SET]:CENTer)
- 3.6.1.12 Marker to Center Frequency Step (:CALCulate:MARKer[1]|2|3|4|5|6|7|8[:SET]:STEP)
- 3.6.1.13 Marker to Reference Level (:CALCulate:MARKer[1]|2|3|4|5|6|7|8[:SET]:RLEVel)
- 3.6.1.14 Marker Delta to Span (:CALCulate:MARKer[1]|2|3|4|5|6|7|8:DELTa[:SET]:SPAN)
- 3.6.1.15 Marker Delta to Center Frequency (:CALCulate:MARKer[1]|2|3|4|5|6|7|8:DELTa[:SET]:CENTer)
- 3.6.1.16 Peak Search Type (:CALCulate:MARKer:PEAK:SEARch:MODE)
- 3.6.1.17 Peak Threshold (:CALCulate:MARKer:PEAK:THReshold)
- 3.6.1.18 Peak Excursion (:CALCulate:MARKer:PEAK:EXCursion)
- 3.6.1.19 Peak Table (:CALCulate:MARKer:PEAK:TABLe)
- 3.6.1.20 Continuous Peaking Marker (:CALCulate:MARKer[1]|2|3|4|5|6|7|8:CPEak[:STATe])
- 3.6.1.21 Peak Search (:CALCulate:MARKer[1]|2|3|4|5|6|7|8:MAXimum)
- 3.6.1.22 Next Peak Search (:CALCulate:MARKer[1]|2|3|4|5|6|7|8:MAXimum:NEXT)
- 3.6.1.23 Marker Peak Left Search (:CALCulate:MARKer[1]|2|3|4|5|6|7|8:MAXimum:LEFT)
- 3.6.1.24 Marker Peak Right Search (:CALCulate:MARKer[1]|2|3|4|5|6|7|8:MAXimum:RIGHt)
- 3.6.1.25 Peak to Peak Search (:CALCulate:MARKer[1]|2|3|4|5|6|7|8:PTPeak)
- 3.6.1.26 Marker Function (:CALCulate:MARKer[1]|2|3|4|5|6|7|8:FUNCtion)
- 3.6.1.27 Frequency Counter (:CALCulate:MARKer:FCOunt[:STATe])
- 3.6.1.28 Query Frequency Counter (:CALCulate:MARKer:FCOunt:X?)
- 3.6.1.29 N dB Bandwidth Result (:CALCulate:MARKer:BANDwidth:RESult?)
- 3.6.1.30 N dB Bandwidth Reference Value (:CALCulate:MARKer[1]|2|3|4|5|6|7|8:BANDwidth:NDB?)
- 3.6.1.31 Marker X-Axis Read Out (:CALCulate:MARKer[1]|2|3|4|5|6|7|8:X:READout)
- 3.6.2 Limit Subsection
- 3.6.2.1 Limit Test Start (:CALCulate:LLINe:TEST:STARt)
- 3.6.2.2 Limit Test Stop (:CALCulate:LLINe:TEST:STOP)
- 3.6.2.3 Gets Limit Test State (:CALCulate:LLINe:TEST:STATe?)
- 3.6.2.4 Limit Line State (:CALCulate:LLINe[1]|2:STATe)
- 3.6.2.5 Limit Type (:CALCulate:LLINe[1]|2:TYPE)
- 3.6.2.6 Limit Mode (:CALCulate:LLINe[1]|2:MODE)
- 3.6.2.7 Limit Line Y-axis Value (:CALCulate:LLINe[1]|2:Y)
- 3.6.2.8 Define Limit Points Data (:CALCulate:LLINe[1]|2:DATA)
- 3.6.2.9 Add Limit Point Data (:CALCulate:LLINe[1]|2:DATA)
- 3.6.2.10 Delete Assigned Limit Point (:CALCulate:LLINe[1]|2:DELete)
- 3.6.2.11 Delete All Limit Points (:CALCulate:LLINe:ALL:DELete)
- 3.6.2.12 Limit X-axis Unit (:CALCulate:LLINe:CONTrol:DOMain)
- 3.6.2.13 Limit Beep State (:CALCulate:LLINe:CONTrol:BEEP)
- 3.6.2.14 Query Limits Result (:CALCulate:LLINe:FAIL?)
- 3.6.2.15 Limit Fail to Stop (:CALCulate:LLINe:FAIL:STOP)
- 3.6.1 Marker Subsection
- 3.7 Measurement Subsystem
- 3.7.1 ACPR Subsection
- 3.7.1.1 Main Channel ([:SENSe]:ACPRatio:BWIDth:INTegration)
- 3.7.1.2 Adjacent Channel Bandwidth ([:SENSe]:ACPRatio:OFFSet:BWIDth[:INTegration])
- 3.7.1.3 Channel Space ([:SENSe]:ACPRatio:OFFSet[:FREQuency])
- 3.7.1.4 Query Main Channel Power (:MEASure:ACPRatio:MAIN?)
- 3.7.1.5 Query Lower Adjacent Channel Power (:MEASure:ACPRatio:LOWer:POWer?)
- 3.7.1.6 Query Lower Adjacent Channel Power Ratio (:MEASure:ACPRatio:LOWer?)
- 3.7.1.7 Query Upper Adjacent Channel Power (:MEASure:ACPRatio:UPPer:POWer?)
- 3.7.1.8 Query Upper Adjacent Channel Power Ratio (:MEASure:ACPRatio:UPPer?)
- 3.7.2 CHP Subsection
- 3.7.2.1 Integration BW ([:SENSe]:CHPower:BWIDth:INTegration)
- 3.7.2.2 Channel Span ([:SENSe]:CHPower:FREQuency:SPAN:POWer)
- 3.7.2.3 Query Channel Power and Power Spectral Density (:MEASure:CHPower?)
- 3.7.2.4 Query Channel Power (:MEASure:CHPower:CHPower?)
- 3.7.2.5 Query Power Spectral Density (:MEASure:CHPower:DENSity?)
- 3.7.3 OBW Subsection
- 3.7.3.1 Select the Method of OBW ([:SENSe]:OBWidth:METHod)
- 3.7.3.2 Set Percentage(%) Method of OBW ([:SENSe]:OBWidth:PERCent)
- 3.7.3.3 Set dBc Method of OBW ([:SENSe]:OBWidth:XDB)
- 3.7.3.4 Query OBW and Centroid (:MEASure:OBWidth?)
- 3.7.3.5 Query OBW (:MEASure:OBWidth:OBWidth?)
- 3.7.3.6 Query OBW Centroid (:MEASure:OBWidth:CENTroid?)
- 3.7.3.7 Query Transmit Frequency Error (:MEASure:OBWidth:OBWidth:FERRor?)
- 3.7.4 SubsectionT-power(T-Power)
- 3.7.5 Spectrum Monitor(SPECtrogram)
- 3.7.6 Third-order Intercept Point(TOI)
- 3.7.1 ACPR Subsection
- 3.8 Trigger Subsystem
- 3.9 TG Subsystem
- 3.9.1 TG On-off (:OUTPut[:STATe])
- 3.9.2 TG Level (:SOURce:POWer[:LEVel][:IMMediate][:AMPLitude])
- 3.9.3 TG Level OffSets (:SOURce:CORRection:OFFSet )
- 3.9.4 TG Normalize on-off (:CALCulate:NTData[:STATe])
- 3.9.5 TG Normalize Reference Level (:DISPlay:WINDow:TRACe:Y[:SCALe]:NRLevel)
- 3.9.6 TG Normalize Reference Position (:DISPlay:WINDow:TRACe:Y[:SCALe]:NRPosition)
- 3.9.7 TG Normalize Reference Trace on-off (:DISPlay:WINDow:NTTRace[:STATe])
- 3.10 Demod Subsystem
- 3.11 Memory Subsystem
- 3.1 IEEE Common Commands
- 4. Programming Examples

SIGLENT
SVA1000X Programming Guide 77
4.1.4 Example of LabVIEW
Environment: Win7 32bit system, LabVIEW 2011
The functions of this example: use the NI-VISA, to control the device with USBTMC and
TCP/IP access to do a write and read.
Follow the steps to complete the example:
1、 Open LabVIEW, create a VI file.
2、 Add controls. Right-click in the Front Panel interface, select and add VISA resource
name, error in, error out and some indicators from the Controls column.
3、 Open the Block Diagram interface. Right-click on the VISA resource name and you can
select and add the following functions from VISA Palette from the pop-up menu: VISA Write,
VISA Read, VISA Open and VISA Close.
4、 Connect them as shown in the figure below
5、 Select the device resource from the VISA Resource Name list box and run the program.
In this example, the VI opens a VISA session to a USBTMC device, writes a command to the
device, and reads back the response. In this example, the specific command being sent is
the device ID query. Check with your device manufacturer for the device command set. After
all communication is complete, the VI closes the VISA session.
6、 Communicating with the device via TCP/IP is similar to USBTMC. But you need to
change VISA Write and VISA Read Function to Synchronous I/O. The LabVIEW default
is asynchronous I/O. Right-click the node and select Synchronous I/O
Mod>>Synchronous from the shortcut menu to write or read data synchronously.