
SIGRC19EPARFB-Manual

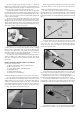
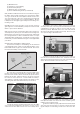

The wings are designed as a 2-piece system, with separate right
and left wing panels joined by an aluminum tube wing joiner and
a hardwood locating pin at the rear. Due to the high strength of
the wing joiner tube, the wing panels do not need to be perma-
nently glued together. Gluing them permanently together is op-
tional - your call. The obvious benefit to leaving the wing panels
separate is the fact that they can be easily transported or stored.
To help protect your wings during the following steps we recom-
mend that you cover your work surface with a soft cloth or piece
of soft cell foam.
INSTALLING THE AILERON SERVOS
For the following steps you will need:
(1) Right Wing Panel
(1) Left Wing Panel
(1) Aluminum Tube Wing Joiner
(2) Servos with Mounting Screws (not furnished)
(2) Servo Extension Chords (not furnished)
(1) Servo Y- Harness (not furnished)
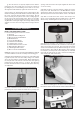
❑ 1) Mount the aileron servos in the bottom of each wing panel.
a) The servo bays are precut for you but you’ll want to double
check the covering around the cutout to make sure it is sealed
down tight.
b) Install the rubber grommets and brass eyelets (supplied
with your radio system) into each aileron servo.
c) Install the control arms on the two aileron servos. The
arms should be at 90 degrees to the servo when the aileron con-
trol stick on the transmitter is in neutral and the transmitter trims
are in neutral as well.
d) Before installing the aileron servos in the wing panels you
must attach a servo extension chord to each of the aileron servo
wires. Plug the servo plug into the extension chord and tape the
plugs together for added security.
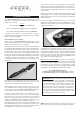
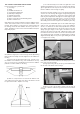
e) A string is provided in the wing panel for pulling the aileron
servo chord through the wing. Each end of the string is taped on
the outside of the wing panel. Carefully untape the string at the
servo opening and tie the end of the string securely to the end of
the servo wire, as shown.
f) Untape the string at the root end of the wing panel and
begin carefully pulling the string and the aileron chord through the
wing You will occasionally feel like the wire has become stuck in-
side the wing. This is simply the plug on the end of the servo wire
hitting the side of one of the holes in the wing ribs. Gently work
the string back and forth from both ends until the plug slips
through the hole. Sometimes the servo plug comes through all
the ribs the first time without getting hung up, and other times it
seem like it gets hung up on every rib. Be patient and don’t try to
force it.
g) Repeat this step to pass the other aileron servo wire
through the other wing panel.
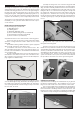
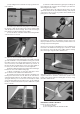
h) Fit the servo into the servo mount in the wing panel, (note
that the servo is positioned so that the servo arm is at the forward
end toward the wing leading edge). Take up any slack in the servo
chord as you insert the servo in the mount. Use a pin vise and a
small drill bit to drill small pilot holes in the servo mount for the
servo mounting screws. Use the screws supplied with your radio
system to mount the servo in place on the servo mount. Repeat
this procedure to mount the servo in the opposite wing panel.
HINGING THE AILERONS
❑ 2) Note that the CA Hinges are installed, but not yet glued, in
the ailerons and wing panels. The installation process for the
hinges is the same for all of the control surfaces on this model.
a) If you removed the ailerons and hinges from the wing pan-
els when you tightened the covering material, reinstall them now.
First insert the three CA Hinges into the slots in the aileron. Put
two pins in the center of each hinge, up against the leading edge
of the aileron, to keep the hinges centered during the next step.
5
WING ASSEMBLY