
SIGRC19EPARFB-Manual


Your KADET SENIORITA ARF is covered with Oracover®, a pre-
mium quality covering made in Germany, and sold in the U.S. by
Hanger-9 as Ultracote
®
.
Colors
Oracover® #10 White (Ultracote® #HANU870)
and
Oracover® #29 Transparent Red (Ultracote® #HANU950)
or
Oracover® #59 Transparent Blue (Ultracote® #HANU954)
If sometime in the future you need replacement covering or
matching paint for repairs, they are available from your local hobby
dealer or online from Hanger-9.
How To Tighten Loose Covering
After you open your KADET SENIORITA and take all the covered
parts out of their plastic bags the covering may begin to wrinkle.
This is not unusual and is no cause for alarm.
Your airplane was built and covered in a part of the world which
has relatively high humidity and therefore, the wood was likely car-
rying a fair amount of moisture. When exposed to drier air, the
wood typically loses this moisture, dimensionally "shrinking" in the
process. In turn, this may cause some wrinkles. However, wrin-
kles are easy to remove by just using a hobby type heat iron. Cau-
tion: Trying to remove the wrinkles by hastily going over them with
a heat gun can lead to more problems. You should take your time
to carefully go over the entire model with a covering iron, as we
will describe.
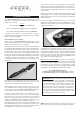
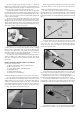
We suggest using a model airplane covering iron for this process.
Cover the iron's shoe with a thin cotton cloth, such as an old t-
shirt, to prevent scratching the covering as you work.
After covering your iron, the next step is to set the iron to the cor-
rect temperature. This is critical for achieving a good result! The
iron should be set to about 220
O
F - 250
O
F (104
O
C - 121
O
C) as
measured on the bottom of the iron using a thermometer.
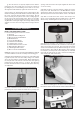
If you do not have a thermometer, you can find the correct tem-
perature by trial and error. Set your iron to a medium setting.
Glide the iron over some of the covering that is over over solid
wood, such as the sheeted wing center section. Observe the cov-
ering to see if any bubbles appear. If bubbles appear, the covering
is getting too hot! Turn down the temperature of the iron.
If no bubbles appear, turn up the heat slightly and repeat the test.
Keep adjusting until you “zero in” on the correct temperature. Find
the temperature that will get the covering to stick down without
forming bubbles or causing the seams to pull away.
Once your iron is set to the correct temperature, go over the entire
framework of the airplane, making sure that the covering is se-
curely bonded to the structure everywhere the covering comes in
contact with the wood underneath. This takes some time, but is
worth the effort.
After you have all the covering secured onto the solid areas, turn
the temperature of the iron up to approximatelly 300
O
F - 320
O
F
(149
O
C - 160
O
C). This is the correct temperature for shrinking the
covering material.
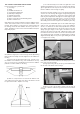
Use the iron to tighten up any wrinkles in the “open” areas of the
model (no wood underneath the covering). Glide the iron over the
wrinkle for a few seconds, then remove. Repeat until the covering
is tight with no wrinkles.
If wrinkles keep coming back on the tail surfaces, you may need
to “ventilate” the areas between the ribs. Otherwise the air that is
sealed in those relatively small areas will expand when the heat
is applied and actually cause the covering to stretch instead of
shrink. Use a pin to poke a tiny hole in the covering between each
rib, on the bottom of the part. That will let the expanding air es-
cape and the covering to shrink properly.
Caution When Using Heat Guns:
You can also use a hobby-type
heat gun to shrink the covering, but you must be careful around
seams or color joints. Getting too much heat on the seams may
cause them to "creep" or come loose. You must also be careful
when using a heat gun when working around the windshield and
side windows - heat will distort the clear plastic material.
Recommended Temperatures:
To adhere the covering - 220
O
F - 250
O
F (104
O
C - 121
O
C)
To shrink the covering - 300
O
F - 320
O
F (149
O
C - 160
O
C)
NOTE: In this manual, any references to right or left, refer to your
right or left as if you were seated in the cockpit of the airplane.
4
COVERING MATERIAL
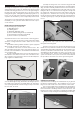
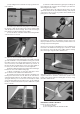
MODELER’S TIP: One of the most common problems as-
sociated with shrinking any covering film is controlling the
heat around the seams. Heat applied too close or directly
onto seams re-heats the covering adhesive and the seams
will often "crawl". This is easy to control. Just tear a few
paper towels into strips and soak them in cool tap water.
Lay the wet strips over the covering and use a heat gun or
iron as you normally would. The wet strips keep the seam
cool while the covering immediately next to it shrinks. This
tip workS great with any iron-on covering.