
SIGRC19EPARFB-Manual

❑ 33) COOLING IS IMPORTANT!
With a fully cowled motor, it is very important to make sure your
power system is getting proper cooling. Air flowing into the front
of the cowling must have a place to exit the cowl. In fact it’s best
to have more air exit area than inlet area to create a positive air
flow through the cowling - an actual suction effect - drawing the
heated air out of the cowling so that more cool air can come in.
This positive air flow keeps your motor running cool.
The KADET SENIORITA cowling has openings in the front, on
each side of the prop opening, to let air in. It also has a generous
sized opening at the bottom rear edge of the cowling to let the air
exit. Cooling air can also exit the fuselage through the open tail
end of the airplane. In many cases these openings should provide
adequate cooling for the KADET SENIORITA.
However if test flights indicate that your motor, ESC or battery
need more cooling, you can make an additional air exit hole by
removing the covering material over the oval shaped hole that is
already cut in the bottom rear of the fuselage.
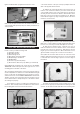
❑ 34) Mount a suitable propeller (not furnished) on your motor.
Be sure to balance the propeller before installation.
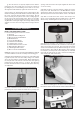
A plastic Spinner is included with this kit. Assembly of the spinner
is simple, with two screws to attach the front cone to the spinner
backplate. The hole in the spinner backplate will most likely need
to be reamed or drilled out to fit over the prop shaft of your motor.
Also check to make sure that the prop openings in spinner cone
are large enough that the spinner cone does not come into con-
tact with the prop blades.
Some of you may decide to leave the plastic spinner off to allow
more cooling air to enter the cowling around the prop shaft. If so,
be sure to use an “acorn” style prop nut for safety.
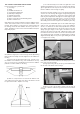
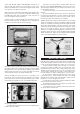
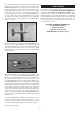
❑ 35) From the kit contents, locate the bag containing the molded
clear plastic side windows. The clear windows are molded to fit
into the fuselage window frames from the inside. Note that each
window has a flange all the way around the outside perimeter to
provide a easy gluing surface. You may need to trim the flanges
a little closer than the factory did, in order to fit them in place. A
sharp scissors or snips works best for trimming the windows.
Glue the windows in place with 5-minute epoxy or RC-56 type
glue. Do not use thin CA glue because it can cloud the plastic.
Apply a thin bead of glue around the edge of the window and
press the window in place from the inside of the fuselage. Don’t
use too much glue or it may ooze out onto the outside surface of
the window. Use a few small pieces of low tack tape to hold the
window in place until the glue dries.
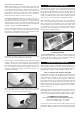
CONGRATULATIONS!
Your KADET SENIORITA is completely assembled. However, it
is NOT ready for flight! There are a few very critical pre-flight tasks
we must perform before flying. These are extremely important
and should be approached with patience and care.
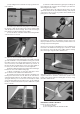
This may be the single most important step in preparing your air-
plane for flight. All airplanes, model or full-size, must be accu-
rately balanced in order to fly successfully. An airplane that is not
properly balanced will be unstable and will most likely crash.
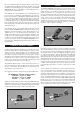
NOT ALL KADETS WILL BALANCE THE SAME
It is impossible to produce a model airplane kit that will automat-
ically have the correct balance point. Not everyone uses the same
motor or radio gear - and all those items can vary in weight! Even
propellers of the same size can vary as much as a 3/4 oz. be-
tween different brands. That’s why every model must be balanced
before flying. Don’t feel that whatever the balance point your
model came out at is “good enough”. Check carefully and make
whatever adjustments are required. Trying to fly an out of balance
model is dangerous!
Preliminary: All the parts and components that will be in the air-
plane in flight must be installed in their correct positions. This in-
cludes all the radio gear, the propeller, battery pack, etc. Every
piece of essential equipment must be installed, ready for flight.
RECOMMENDED BALANCE RANGE
3-1/2” to 3-7/8” Behind The Leading Edge Of The Wing
(3-1/2” = 28% of MAC; 3-7/8” = 31% of MAC)
Anywhere within this range is acceptable.
Using a ruler, measure back from the leading edge of the wing
and mark the balance range on the bottom of the wing, next to
the fuselage. Make the same marks on both sides of the fuselage.
13
INSTALL SIDE WINDOWS
BALANCE YOUR AIRPLANE